Honda CR-V: Front Bumper
Front Bumper Removal/Installation
NOTE:
- Have an assistant help you when removing and installing the front bumper.
- Take care not to scratch the front bumper and body.
- Put on gloves to protect your hands.
1. Remove the front bulkhead cover.
2. Remove the bolts (A) and clips (B, C) securing the front bumper (D).
NOTE: To remove the clips, pry the inner clip up at the edge near the line (E) on its head.
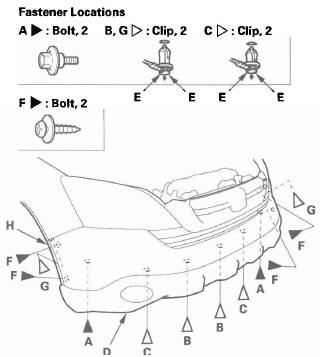
3. Remove the screws (F) and clips (G) securing the front bumper side trim (H).
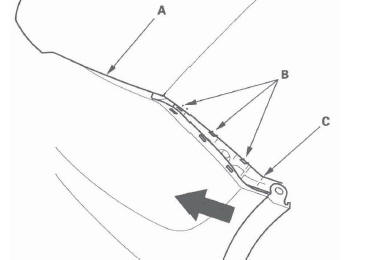
4. Pull on the front bumper (A) at the wheel arch areas to release it from the hooks (B) on the side spacer (C).
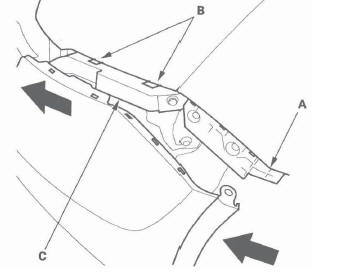
5. With the help of an assistant, while pulling the wheel arch portion away from the side spacer (A), pull the front bumper to release the bumper from the hooks (B) on the center upper beam (C).
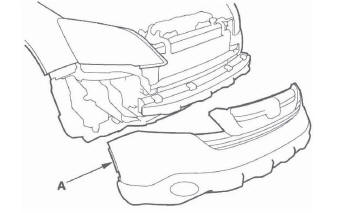
6. Remove the front bumper (A).
7. Remove the front bumper absorber (A) from the front bumper beam (B).
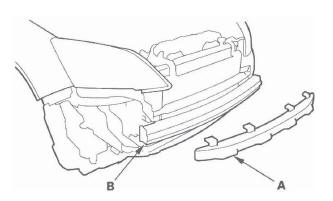
8. Install the bumper in the reverse order of removal, and note these items:
- Make sure the front bumper engages the hooks (of both corner upper beams and side spacers) on each side securely.
- Check if the clips are damaged or stress-whitened, and if necessary, replace them with new ones.
- Push the clips and hooks into place securely.
Front Bumper Disassembly/Reassembly
NOTE: Take care not to scratch the front bumper faces.
1. Remove the front bumper.
2. Remove the clips, then separate the upper front bumper face (A) from the lower front bumper face (B).
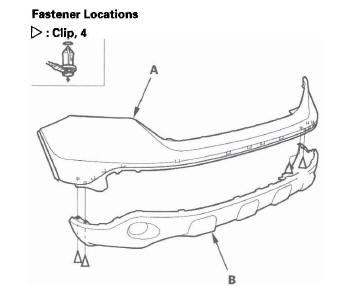
3. Reassemble the bumper faces in the reverse order of disassembly.
READ NEXT:
 Rear Bumper
Rear Bumper Removal/Installation
NOTE:
Have an assistant help you when removing and
installing the rear bumper.
Take care not to scratch the rear bumper and body.
Put on gloves to protect your ha
Hood
Hood Adjustment
1. Remove these items:
Front bulkhead cover
Front fender trim
Cowl cover
2. Slightly loosen each bolt (A).
3. Adjust the hood alignment in this sequence:
Adjust the hood right
Tailgate
Tailgate Adjustment
NOTE:
Have an assistant help you when adjusting the
tailgate.
Take care not to scratch the tailgate, body, and other
related parts.
Put on gloves to protect your hands.
1. R
SEE MORE:
ATF Cooler
ATF Cooler Cleaning
Special Tools Required
ATF cooler cleaner GHTTTCF6H
Magnetic nonbypass spin-on filter GTHGNBP2
These special tools are available through the Honda
Tool and Equipment Program 1-888-424-6857.
Before installing an overhauled or remanufactured
automatic transmission, you must
Using the Cruise Control
1. Push the CRUISE button on the
steering wheel. The CRUISE
MAIN indicator on the instrument
panel comes on.
The cruise control systemcan be
left on, even when it is not in use.
2. Accelerate to the desired cruising
speed above 25 mph (40 km/h).
3. Press and release the SET/
DECEL b
