Honda CR-V: Rear Differential Fluid Inspection and Replacement
1. With the vehicle on level ground, inspect the differential fluid with the ignition switch turned to LOCK (0).
2. Use solvent and a brush to wash off any oil and dirt from the differential fluid inspection oil filler plug.
3. Remove the oil filler plug (A) and the sealing washer (B), then check the condition of the fluid, and make sure the fluid is at the proper level (C).
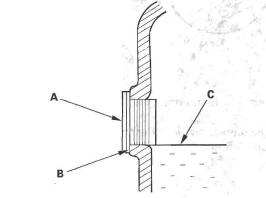
4. The fluid level must be up to the fill hole. If it is below the hole, add the differential fluid until it runs out, then reinstall the oil filler plug with a new sealing washer.
5. If the fluid is dirty, remove the drain plug (A) and the sealing washer (B) then drain the fluid.
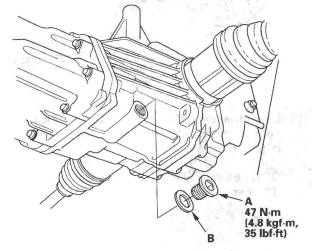
6. Clean the drain plug, then reinstall it with a new sealing washer, and refill the differential with the differential fluid to the proper level.
NOTE: If you disassemble the differential, check the fluid level again after the 4WD system check is finished. Add fluid if necessary.
Fluid Capacity
1.2 L (1.3 US qt) at fluid change
1.4 L (1.5 US qt) at overhaul
Recommended fluid:
Honda Dual Pump Fluid (P/N 08200-9002)
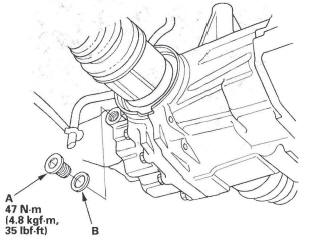
7. Reinstall the oil filler plug (A) with a new sealing washer (B).
Differential Removal
1. Raise the vehicle, and make sure it is securely supported.
2. Drain the differential fluid.
3. Mark the propeller shaft (A) and the companion flange of the rear differential assembly (B) so they can be reinstalled in their original positions (C).
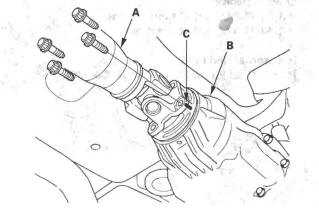
4. Remove the propeller shaft from the rear differential assembly.
5. Remove the breather tube (A) from the clip (B).
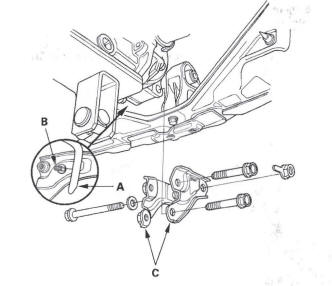
6. Place a transmission jack under the rear differential assembly, then remove the right and left rear differential mount bracket (C).
7. Remove the breather tubes (A) from the clip (B).
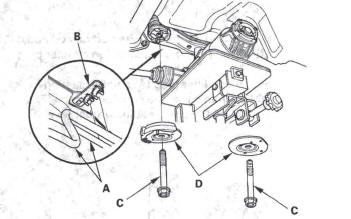
8. Remove the mounting bolts (C) and the plates (D).
9. Disconnect the breather tube (A) from the breather tube fitting.
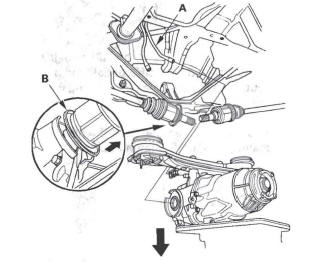
10. Lower the rear differential assembly while pulling both driveshaft inboard joints out of the rear differential assembly.
NOTE: Be careful not to damage the driveshaft ring (B) when prying out the driveshaft inboard joints.
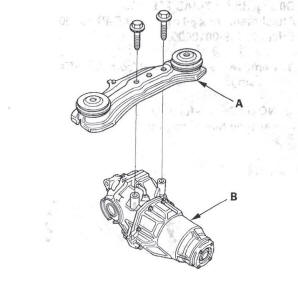
11. Remove the rear differential mount assembly (A) from the rear differential assembly (B).
Differential Housing Assembly Removal and Installation
1. Remove the six mounting bolts in a crisscross pattern in several steps, then remove the differential housing assembly (A) and the oil seals (B).
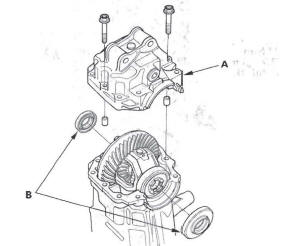
2. Remove the dirt and oil from the sealing surfaces.
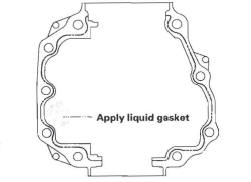
Apply liquid gasket (P/N 08718-0001) to the sealing surface. Make sure you seal the entire circumference of the bolt holes to prevent oil leakage.
NOTE:
- You must assemble the housings within 5 minutes after applying the liquid gasket. If not, the sealing surface must be cleaned, and the liquid gasket reapplied.
- Allow it to cure at least 30 minutes after assembly before filling the differential with fluid.
3. Install the differential housing assembly (A), then torque the six mounting bolts (B) in a crisscross pattern in several steps.
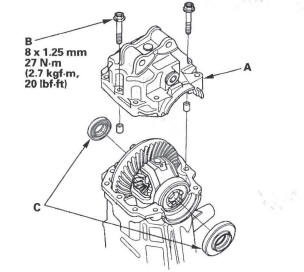
4. Install the oil seals (C).
Oil Seal Replacement
Special Tools Required
- Attachment, 52 x 55 mm 07NAD-P200100
- Oil seal driver 07JAD-PL90100
- Attachment, 78 x 80 mm 07NAD-PX40100
- Driver 07749-0010000
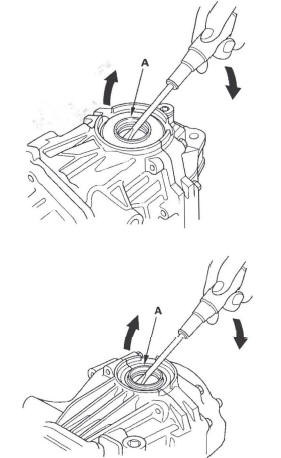
1. Remove the oil seals (A) from the differential housing.
NOTE: Be careful not to damage the differential carrier while prying out the seals.
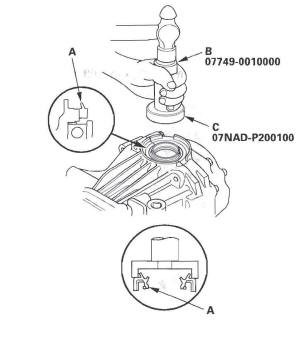
2. Install the right side oil seal (A) squarely using the driver (B) and attachment (C). Installation depth of the oil seal is 9 mm (0.35 in.) below the machined edge of the differential carrier assembly. Be careful not to damage the lip of the oil seals.

3. Install the left side oil seal (A) squarely and flush with the machined edge of the differential carrier assembly using the driver (B) and attachment (C).
Be careful not to damage the lip of the oil seal.
4. Remove the companion flange (see step 2).
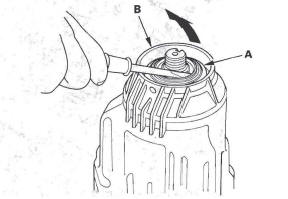
5. Remove the oil seal (A) from the torque control differential case (B).
NOTE: Be careful not to damage the shaft or case while prying out the seal.
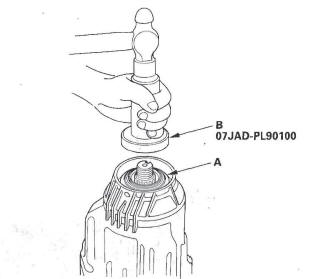
6. Install the oil seal (A) squarely using the oil seal driver (B). Be careful not to damage the lip of the oil seal.
7. Install the companion flange (see step 10).
READ NEXT:
 Differential Disassembly
Special Tools Required
Holder handle 07JAB-001020A
Companion flange holder 07RAB-TB4010B
1. Remove the drain plug (A) and the oil filler plug (B)
with sealing washers (C).
2. Raise the locknut ta
Differential Reassembly
Exploded View
Special Tools Required
Holder handle 07JAB-001020A
Companion flange holder 07RAB-TB4010B
1. Apply differential fluid to the rubber pinion of the
ATF strainer (A), then install the A
Differential Mount Replacement
Exploded View
Differential Installation
1. Install rear differential mount assembly A to the
rear differential assembly (B).
2. Jack up the rear differential.
3. Install the new set rings (A) onto t
SEE MORE:
DTC 11-1x/4x ("x" can be 0 thru 9 or A thru F) :
Open or Increased Resistance in Driver's
Airbag First/Second Inflator
DTC 11-1x ("x" can be 0 thru 9 or A thru F):
Open or Increased Resistance in Driver's
Airbag First Inflator
DTC 11-4x ("x" can be 0 thru 9 or A thru F):
Open or Increased Resistance in Driver's
Airbag Second Inflator
Special Tools Required
SRS inflator simulator 07SAZ-TB4011A
SRS simulator lead J
Oil Check
Wait a few minutes after turning the
engine off before you check the oil.
1. Remove the dipstick (orange
handle).
2. Wipe off the dipstick with a clean
cloth or paper towel.
3. Insert the dipstick all the way back
into its hole.
4. Remove the dipstick again, and
check the level. It
