Honda CR-V: Passenger's Tray Removal/Installation
Special Tools Required
KTC trim tool set SOJATP2014 *
* Available through the American Honda Tool and Equipment Program; call 888-424-6857
SRS components are located in this area. Review the SRS component locations and the precautions and procedures before doing repairs or service.
NOTE:
- Use the appropriate tool from the KTC trim tool set to avoid damage when prying components.
- Take care not to scratch the dashboard and related parts.
1. Remove the passenger's vent panel.
2. Open the lid.
3. Detach the hook of the glove box damper and release the glove box stop on each side from the dashboard by pushing them inside (see step 1).
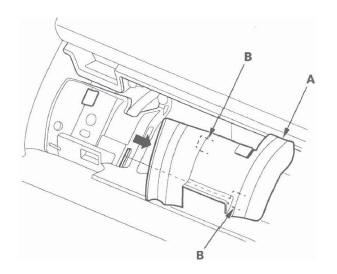
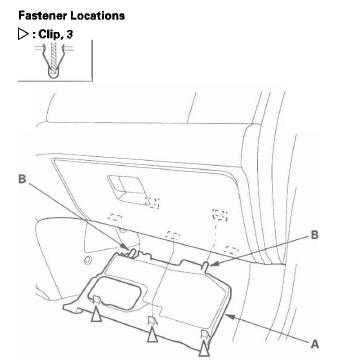
4. Lift up the mat. Pull out the side edge of the side lid (A) by hand to release the hooks (B), then remove the side lid.
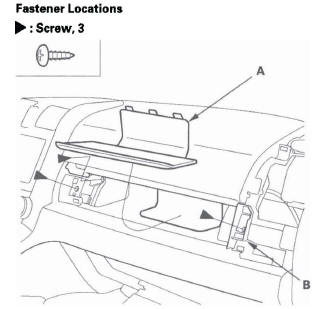
5. Remove the access panel (A), then remove the screws from the tray (B).
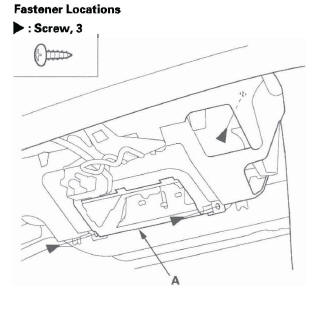
6. Remove the screws from the access panel opening (A).
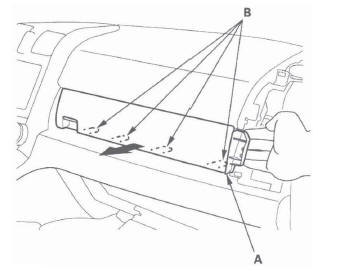
7. Pull out the right portion of the tray (A) to release the hooks (B).
8. Slide the tray (A) toward the right, then pull out the right end of the tray and remove it from the dashboard.
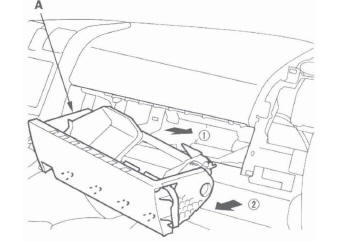
9. Install the tray in the reverse order of removal.
Passenger's Vent Panel Removal/Installation
Special Tools Required
KTC trim tool set SOJATP2014 *
* Available through the American Honda Tool and Equipment Program; call 888-424-6857
NOTE:
- Put on gloves to protect your hands.
- Use the appropriate tool from the KTC trim tool set to avoid damage when prying components.
- Take care not to scratch the dashboard and related parts.
1. Open the passenger's tray lid.
2. Remove the passenger's vent panel (A).
- From the tray lid opening, pull the left side edge of the panel out by hand.
- Pry the front bottom of the panel slightly you to detach the lower clips.
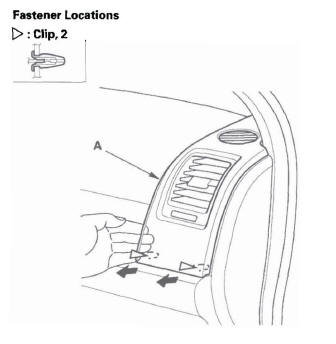
3. Pull the lower portion of the passenger's vent panel (A) partially out by hand. Detach the upper clips by pulling the middle and upper portions of the panel toward you.
4. If necessary, remove the screws, then remove the passenger's vent (A) from the passenger's vent panel (B).

5. Install the panel in the reverse order of removal, and note these items:
- Check if the clips are damaged or stress-whitened, and if necessary, replace them with new ones.
- Push the clips into place securely.
Passenger's Dashboard Undercover Removal/Installation
NOTE: Take care not to scratch the dashboard and related parts.
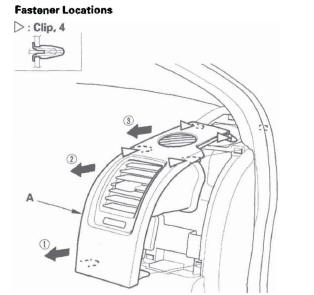
1. Remove the passenger's dashboard undercover (A).
- Gently pull down the front edge to detach the clips.
- Pull the cover away to release the pins (B) of the cover.
2. Install the cover in the reverse order of removal, and push the clips into place securely.
READ NEXT:
 Glove Box Removal/Installation
NOTE: Take care not to scratch the dashboard and
related parts.
1. Open the glove box (A), and detach the hook (B) of
the glove box damper. While holding the glove box,
release the glove box stop (C)
Column Cover Removal/Installation
SRS components are located in this area. Review the
SRS component locations and the
precautions and procedures before
doing repairs or service.
NOTE: Take care not to scratch the dashboard and
relate
Seats
Component Location Index
REAR SEAT
Removal/Installation
Armrest Removal/Installation
Armrest Cover Replacement
Right Rear Seat Cover Replacement
Left Rear Seat Cover Replacement
Right S
SEE MORE:
Airbag System Components
Airbag System Components
Your airbag system includes:
Two SRS (supplemental restraint
system) front airbags. The driver’s
airbag is stored in the center of
the steering wheel; the front
passenger’s airbag is stored in the
dashboard. Both are marked ‘‘SRS AIRBAG’’
Two
Knuckle/Hub Bearing Unit Replacement
Exploded View
Hub Bearing Unit Replacement
1. Raise the rear of the vehicle, and support it with safety stands in the
proper locations.
2. Remove the wheel nuts (A) and the rear wheel.
3. Remove the brake hose bracket mounting bolt (A)
from the knuckle.
4. Remove the brake caliper bracket mount
