Honda CR-V: Column Cover Removal/Installation
SRS components are located in this area. Review the SRS component locations and the precautions and procedures before doing repairs or service.
NOTE: Take care not to scratch the dashboard and related parts.
1. Release the tilt/telescopic lock lever, tilt the steering wheel to fully down, and pull it fully out.
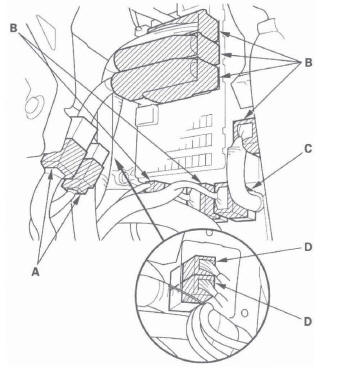
2. Insert a suitable sized screwdriver or equivalent tool (A) along the guide rib (B) into the lever hole in the lower column cover (C).
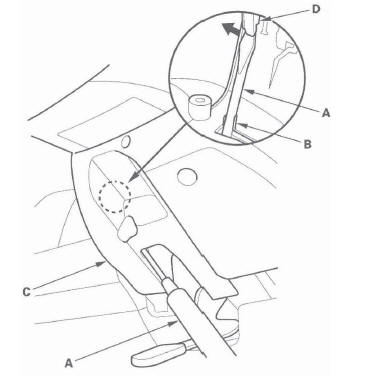
3. Release the hook (D) located on the left side of the upper column cover. The right side hook on the upper column cover can't be released from the inside.
4. Turn the steering wheel to left. Release the pawl (A) of the upper column cover (B) while pushing the lower column cover from the front side. Carefully release the hooks, noting the hooks (C) may break if upper column cover is pulled up too hard.
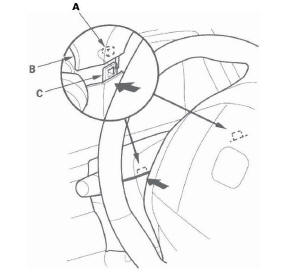
5. Turn the steering wheel to right. Release the pawl on the upper column cover the same as the step 4.
6. Separate the upper column cover (A) from the lower column cover (B) by pulling up it lightly.
Release the pins (C) of the cover to remove it.
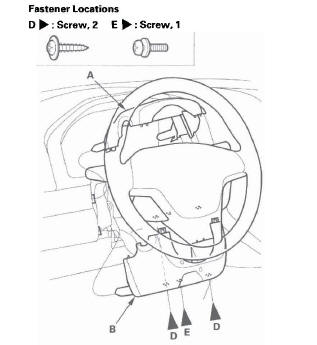
7. Remove the screws (D, E), then remove the column lower cover.
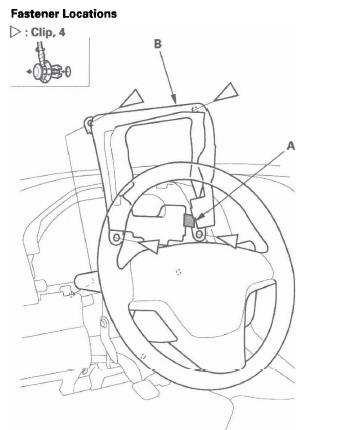
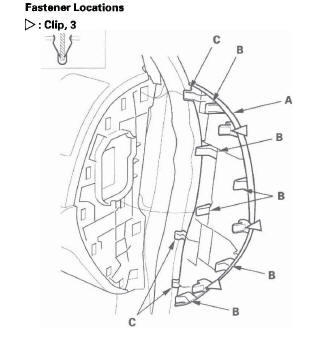
8. If necessary, remove these items, then remove the clips and release the Velclo fastener (A), then pull out the column cover seal (B) from dashboard.
- Instrument upper visor
- Dashboard driver's lower cover
9. Install the cover in the reverse order of removal, and note these items:
- Check if the clips are damaged or stress-whitened, and if necessary, replace them with new ones.
- Push the clips into place securely.
Dashboard/Steering Hanger Beam Removal/Installation
Special Tools Required
KTC trim tool set SOJATP2014 *
* Available through the American Honda Tool and Equipment Program; call 888-424-6857
SRS components are located in this area. Review the SRS component locations and the precautions and procedures before doing repairs or service.
NOTE:
- Have an assistant help you when removing and installing the dashboard.
- Put on gloves to protect your hands.
- Use the appropriate tool from the KTC trim tool set to avoid damage when prying components.
- Take care not to scratch the dashboard and related parts.
1. Make sure you have the anti-theft codes for the audio and the navigation system (if equipped), then write down the XM audio presets (if equipped).
2. Disconnect the negative cable from the battery, and wait at least 3 minutes before beginning work.
3. Remove these items:
- Front seats, both sides
- Center console
- Driver's dashboard undercover
- Passenger's dashboard undercover
- Steering column
- Glove box
- A-pillar trim, both sides
- Kick panel, both sides
- Front console cover, both sides
- Dashboard center lower cover
- Shift lever
Driver's side
4. From under dash, disconnect the left side wire harness connectors (A), engine compartment wire harness connectors (B), interior wire harness connector (C), and driver's door wire harness connectors (D).
Center
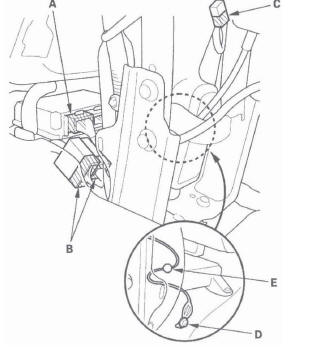
5. Remove the rear heater joint (A).
6. From under dash, disconnect SRS control unit connector (A), floor harness connectors (B), and A/C subharness connector (C). Using a T30 TORX bit, remove the ground bolt (D), and release the wire harness clips (E).
Passenger's side
7. From under the dash, disconnect the radio tuner connectors (A), antenna connector (B), and right side wire harness connectors (C).
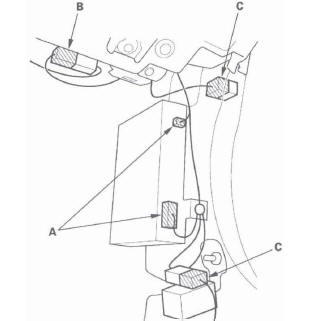
8. Remove the bolts, and remove the center bracket (A) from the dashboard center frame (B).
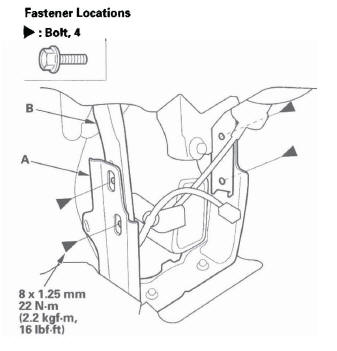
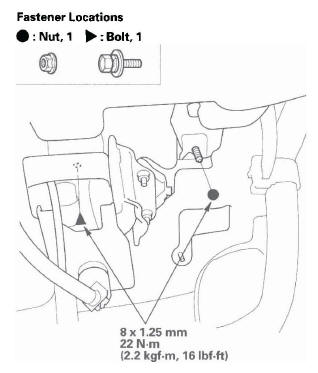
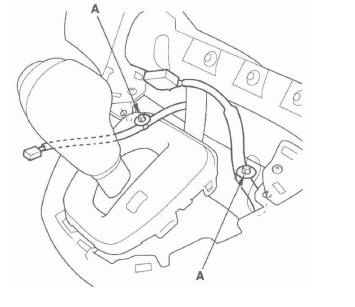
9. From the driver's side: Remove the bolt from brake pedal bracket, and remove the nut from the body.
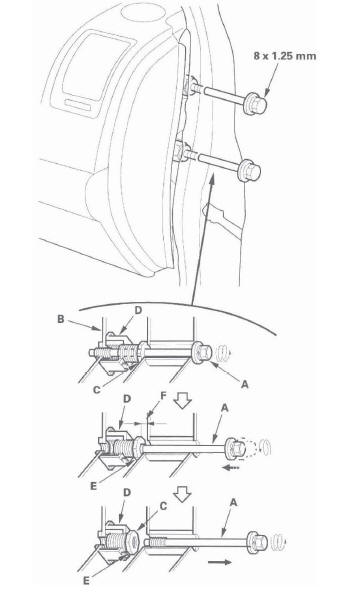
10. Remove the special bolts (A) from outside the passenger's door.
- Loosen the special bolt until its threads have come off the side bracket (B) of the steering hanger beam. The bolt will be screwed into the inside threads of the collar bolt (C) by loosening the bolt. Because of the thread locks on the thread of the bolt, the bolt and collar bolt will be fixed.
- Loosen the bolt again to screw the collar bolt in to the fixed space adjuster (D) until it is stopped by the stopper (E). This will provide a gap (F) between the collar bolt and body.
- Remove the bolt.
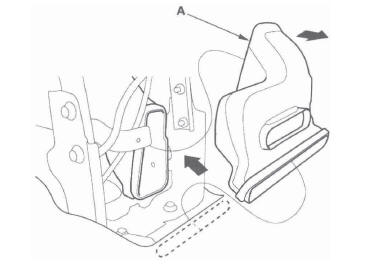
11. If necessary, remove the dashboard side cover (A).
- Using a KTC trim tool, pry up on the front edge of the dashboard side cover to release the clips and hooks (B).
- Pull out the cover to release the hooks (C), then remove the cover. Repeat on the other side of the dashboard.
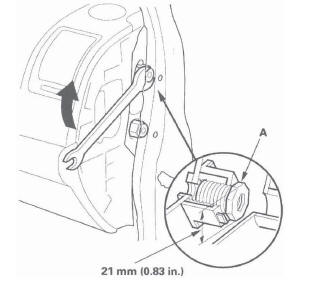
12. If the adjusting nuts (A) are not screwed fully into the sleeve when removing the special bolts, screw externally threaded nuts into the sleeve with a 21 mm open-end wrench. In this case, the special bolt should be replaced with a new one because its thread locks were worn out.
13. Remove the bolts (A, B) from outside the driver's door.
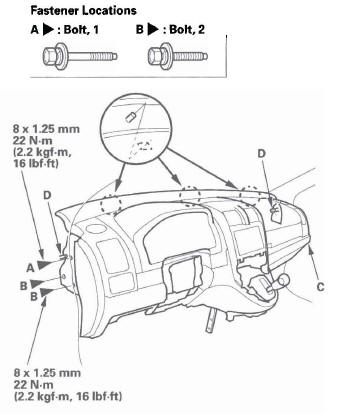
14. Lift up on the dashboard (C) to release it from the guide pins (D).
15. Have an assistant hold the dashboard away from the body, open the driver's door fully. Carefully remove the dashboard through the driver's door opening. Take care not to scratch the body with the collar bolt.
NOTE:
- Do not rest the dashboard on its lower center console opening, or it may be damaged. Lay it on its front or back.
- Push the forward bolt on the passenger's side into the body to prevent the bolt and/or the passenger's door from getting damaged.
16. Install the dashboard in the reverse order of removal, and note these items:
- Before tightening the bolts, make sure the wire harnesses are not pinched.
- Make sure the connectors are plugged in properly, and the antenna lead and each cable are connected properly.
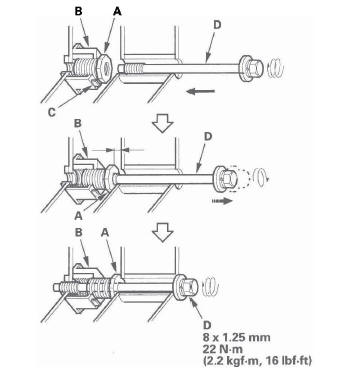
- Before reinstalling the dashboard, be sure the collar bolt (A) on passenger's side can be screwed/unscrewed lightly by hand, and then screw all of them into the fixed space adjuster (B) until they contact the stoppers (C) by hand. Do not tighten them fully with any tools.
- Before reinstalling the dashboard, try to screw the special bolt (D) into the loosened collar bolt. If the collar bolt is not unscrewed by screwing the special bolt, replace this special bolt with a new one.
- After setting the dashboard on the body, reinstall
all of the mounting bolts to the dashboard,
tighten the driver's side bracket to the specified
torque, then torque the special bolt (A) on the
passenger's side.
First screw the special bolt into the collar bolt nut (B), they will be fixed because of the thread lock on the bolt. Go on tightening the bolt with the collar bolt, they are loosened from the fixed space adjuster (C) until the coolar bolt contacts the inside face of the body. Then tighten the bolts again to the specified torque.
- Apply medium strength type liquid thread lock to the bolts securing the center bracket and the dashboard before reinstallation.
- Reconnect the negative cable to the battery.
- Enter the anti-theft code for the audio and the navigation system (if equipped), then enter the XM audio presets (if equipped).
- Set the clock (without navigation system).
- Check for any DTCs that may have been set during repairs, and clear them.
Special bolt tightening on passenger's side
Dashboard Replacement
Special Tools Required
KTC trim tool set SOJATP2014 *
* Available through the American Honda Tool and Equipment Program; call 888-424-6857
NOTE:
- Have an assistant help you when removing and installing the dashboard.
- Put on gloves to protect your hands.
- Use the appropriate tool from the KTC trim tool set to avoid damage when prying components.
- Take care not to scratch the dashboard and related parts.
1. Remove these items:
- Center upper dashboard panel
- Driver's vent panel
- Dashboard center vent
- Passenger's vent panel
- Passenger's airbag
- Glove box
- Instrument panel
- Gauge control module
- Navigation unit, with navigation system
- Audio unit, without navigation system
Driver's side
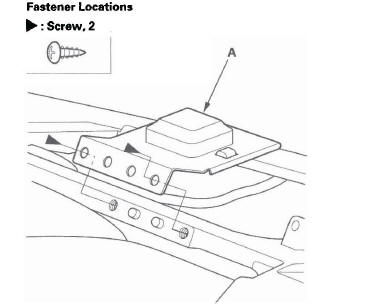
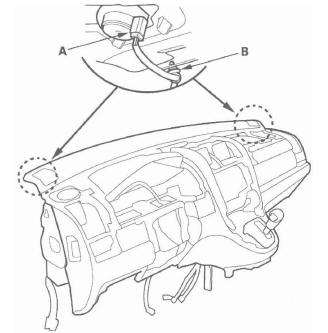
2. Remove the screws, then remove the GPS antenna (A), then pull the antenna out through the hole in the dashboard.
Center
3. Detach the wire harness clips (A) from the shift lever panel opening.
4. From the back of the dashboard, disconnect the tweeter connectors (A), then detach the wire harness clips (B).
Passenger's side
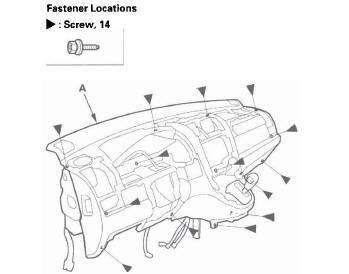
5. Carefully pry the glove box light (A) from the inside of the dashboard, and detach the wire harness clips (B).

6. From the back of the dashboard, remove the screws, and center joint duct (A).
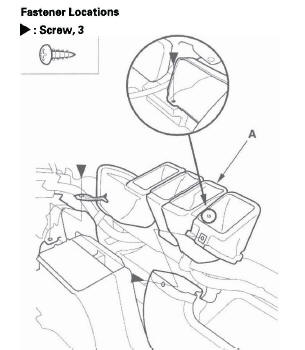
7. From the front of the dashboard (A), remove the screws.
8. Assemble the dashboard and steering hanger beam in the reverse order of removal, and note these items:
NOTE:
- Make sure the dashboard wire harness is not pinched.
- Make sure the connectors are plugged in properly.
READ NEXT:
 Seats
Seats
Component Location Index
REAR SEAT
Removal/Installation
Armrest Removal/Installation
Armrest Cover Replacement
Right Rear Seat Cover Replacement
Left Rear Seat Cover Replacement
Right S
Front Seat
Front Seat Active Head Restraint Inspection
NOTE: If the vehicle has been in a collision, always
inspect the active head restraints, even if they appear
reusable, by doing the following procedure.
Res
Rear Seat
Rear Seat Armrest Removal/Installation
NOTE: Take care not to tear the seams or damage the
seat covers.
1. Remove the E-ring (A) from the right side portion
on the armrest pivot.
2. Slide the armres
SEE MORE:
Playing an Optional Audio Unit
Your vehicle has the auxiliary input
jack on the front panel, on the center
table, or in the console compartment,
depending on models. The system
will accept auxiliary input from
standard audio accessories.
When a compatible audio unit is
connected to the jack, press the AUX
butto
DTC 33-9x ("x" can be 0 thru 9 or A thru F):
Short to Ground in Left Side Curtain Airbag
Inflator
Special Tools Required
SRS inflator simulator 07SAZ-TB4011A
SRS simulator lead L 070AZ-SNAA300
NOTE: Before doing this troubleshooting procedure,
review SRS Precautions and Procedures.
1. Erase the DTC memory.
2. Turn the ignition switch ON (II), and check that the
SRS indicator comes on for a
