Honda CR-V: Front Seat
Front Seat Active Head Restraint Inspection
NOTE: If the vehicle has been in a collision, always inspect the active head restraints, even if they appear reusable, by doing the following procedure.
Resetting Head Restraint Position
1. Push the head restraint (A) forward fully from the locked position to return the inside inertia lock (B).
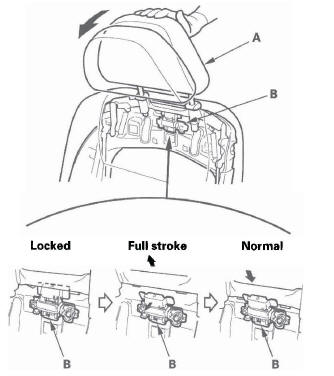
2. Slowly raise the head restraint into the normal position.
Inspection
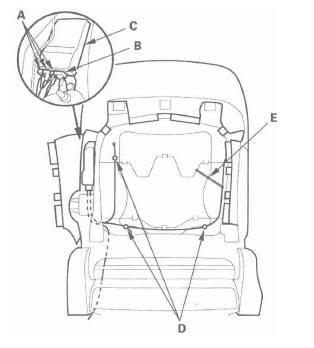
3. Fold the seat-back forward, then recline the seatback to the first lock position, and adjust the head restraint to the head restraint position.
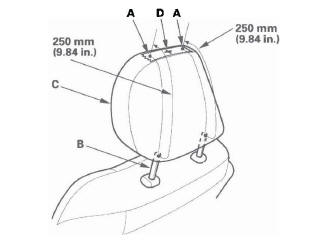
4. Apply masking tape on the top of the head restraint.
5. Make marks (A) on both sides at 250 mm (9.84 in.) upward from the posts of the head restraint frame (B) along the back of the head restraint (C) surface.
Make a center of these points as a datum point (D).
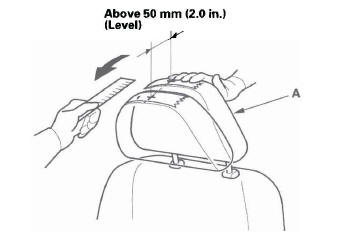
6. Push the head restraint (A) forward, and check: With a ruler, measure the level amount of the head restraint movement. The head restraint should move more than 50 mm (2.0 in.) without resistance.
If it is less than 50 mm (2.0 in.), or the head restraint doesn't move smoothly, replace the seat-back frame assembly:
- Passenger's seat
- Driver's seat
Front Seat Removal/Installation
Special Tools Required
KTC trim tool set SOJATP2014 *
* Available through the American Honda Tool and Equipment Program; call 888-424-6857
SRS components are located in this area. Review the SRS component locations and the precautions and procedures before doing repairs or service.
NOTE:
- Put on gloves to protect your hands.
- When prying with a flat-tip screwdriver, wrap it with protective tape to prevent damage.
- Take care not to scratch the body or tear the seat covers.
- Use the appropriate tool from the KTC trim tool set to avoid damage when prying components.
1. Make sure you have the anti-theft code for the audio and the navigation system (if equipped), then write down the XM audio presets (if equipped).
2. Disconnect the negative cable from the battery, and wait at least 3 minutes before beginning work.
3. Passenger's seat: Remove the front seat under tray (for some models).
4. Tilt the steering wheel all the way up, and telescope it all the way in.
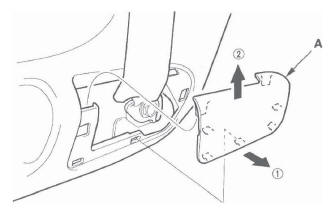
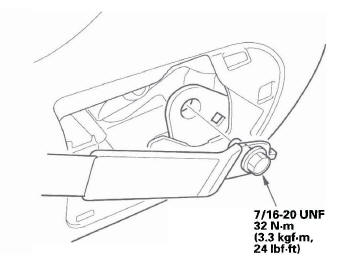
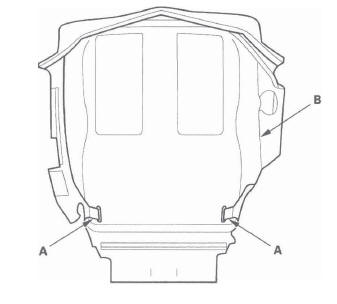
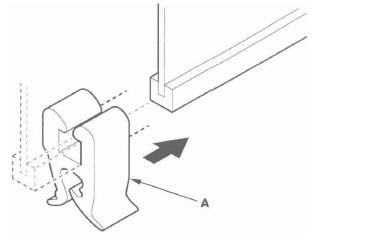
5. Slide the front seat forward fully, carefully pry up on the bottom edge of the anchor cover (A) to release the hooks, and remove the cover.
6. Remove the lower anchor bolt (A).
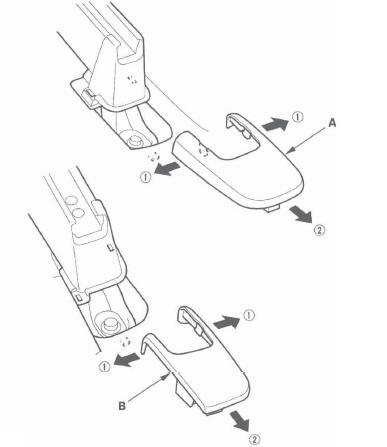
7. Remove the rear inner seat track end covers (A) and rear outer seat track end covers (B) from the rear of both seat tracks.
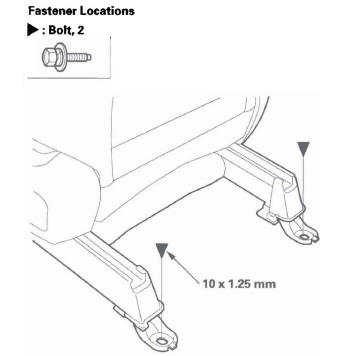
8. Remove the bolts.
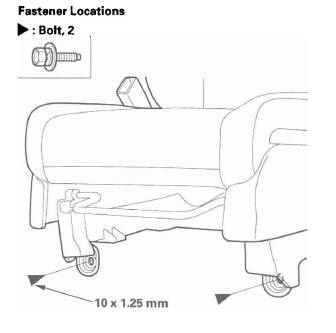
9. Slide the front seat rearward fully, and remove the bolts.
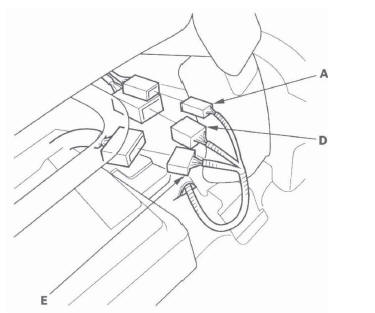
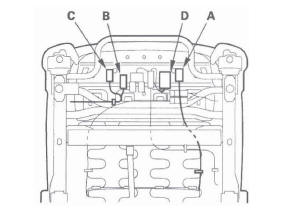
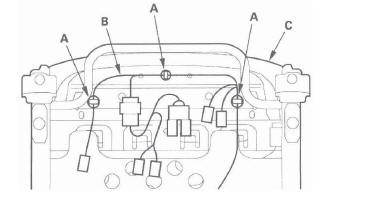
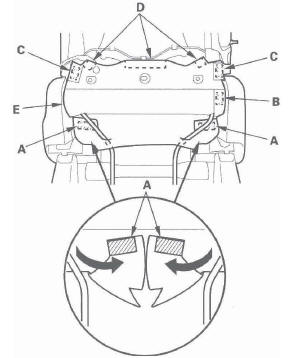
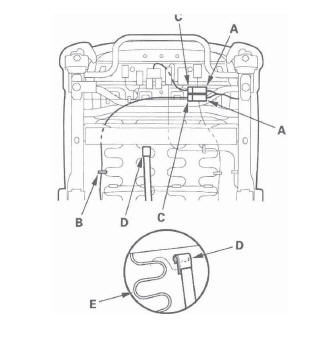
10. Lift up the front seat, then detach the harness clips, and disconnect the side airbag connector (A), seat belt switch connector (B), seat belt buckle tensioner connector (C), and seat subharness connector (D) on the driver's seat.
On passenger's seat, disconnect the woofer connector (E) (for some models).
Passenger's seat
Driver's seat
11. With the help of an assistant, carefully remove the front seat through the front door opening.
12. Install the seat in the reverse order of removal, and note these items:
- Apply medium strength type liquid thread lock to the seat mounting bolts before reinstallation.
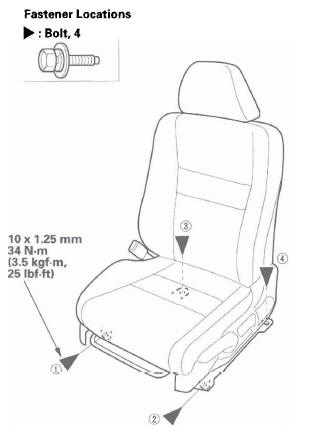
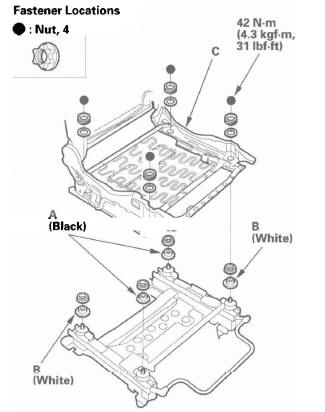
- Tighten the seat mounting bolts to the specified torque in the sequence shown. Slide the seat all the way back and tighten 1 and 2, then slide it forward and tighten 3 and 4. The driver's seat is shown the passenger's seat is similar.
- Tighten the bolts by hand first, then tighten them to specification with a torque wrench.
- Make sure each connector is plugged in properly.
- Reconnect the negative cable to the battery.
- Before installing the anchor bolts, make sure there are no twists or kinks in the seat belt.
- Enter the anti-theft code for the audio and the navigation system (if equipped), then enter the XM audio presets (if equipped).
- Set the clock (without navigation system).
- Check for any DTCs that may have been set during repairs, and clear them.
Front Seat Center Table Replacement
Special Tools Required
KTC trim tool set SOJATP2014 *
* Available through the American Honda Tool and Equipment Program; call 888-424-6857
NOTE:
- Put on gloves to protect your hands.
- When prying with a flat-tip screwdriver, wrap it with protective tape to prevent damage.
- Take care not to scratch the body or tear the seat covers.
- Use the appropriate tool from the KTC trim tool set to avoid damage when prying components.
1. Set up the table.
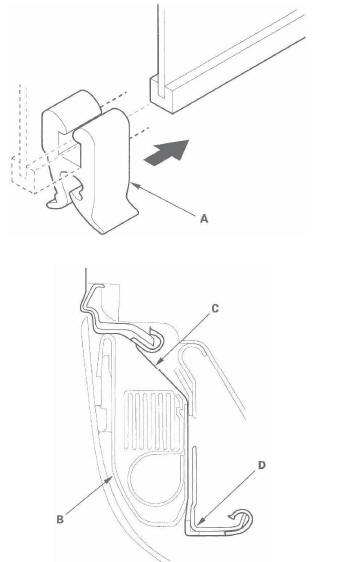
2. Remove the clip and pull the outer cover (A) back to detach the hook (B), then remove it.
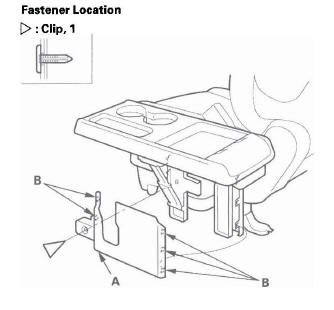
3. For some models: Disconnect the center table cord connector (A), and release the harness clip (B) from the passenger's seat. Remove the nuts, then remove the center table (C).

4. Install the table in the reverse order of removal, and note these items:
- Check if the clip is damaged or stress-whitened, and if necessary, replace it with a new one.
- Push the clip and hooks into place securely.
- Make sure the center table cord connector is plugged in properly, if equipped.
Front Seat Armrest Replacement
Special Tools Required
KTC trim tool set SOJATP2014 *
* Available through the American Honda Tool and Equipment Program; call 888-424-6857
NOTE:
- Take care not to scratch the body or tear the seat covers.
- Use the appropriate tool from the KTC trim tool set to avoid damage when prying components.
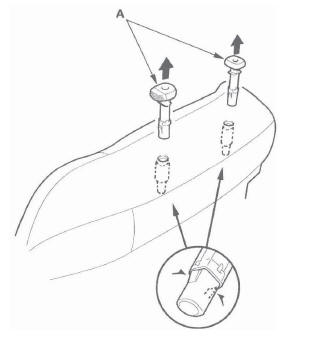
1. Using a trim tool, remove the cap (A).
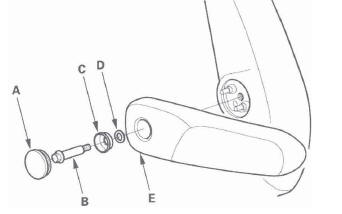
2. Remove the center pin (B), bushing (C), and washer (D), then remove the armrest (E).
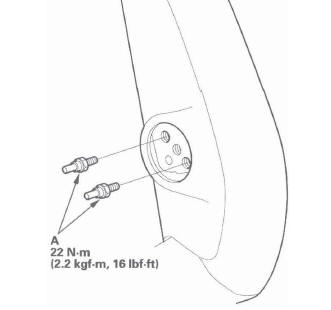
3. If necessary, remove the pins (A) from the seatback.
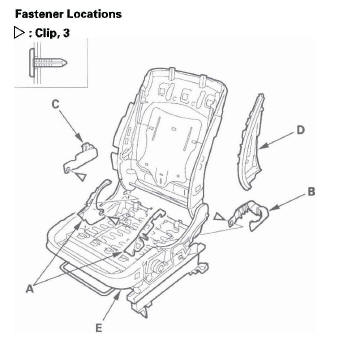
Front Seat Frame Replacement
Passenger's Seat
Calibrate the ODS unit after any of the these actions:
- Front passenger's seat replacement (including any seat components)
- Replacement of the seat weight sensors
- After a vehicle collision
NOTE:
- Put on gloves to protect your hands.
- Apply oil to the pivot portions of the slide locks.
- Apply multipurpose grease to the sliding portions of the seat tracks.
- If the side airbag has deployed, replace the seat frame and related parts with new ones.
1. Remove the front seat.
2. Remove these items:
- Front seat-back cover/pad
- Front seat cushion cover/pad
- ODS unit
3. Gently pull out the outer riser cover (A) and inner riser cover (B) by releasing the clips
4. Remove the clips, then remove the recline inner covers (A) from the seat frame (B), and remove the module holder (C).
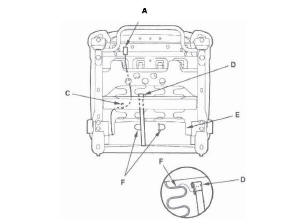
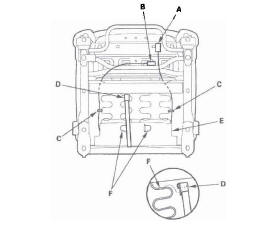
5. Detach the harness clips (A), and remove the seat subharness (B) from the seat cushion frame (C).
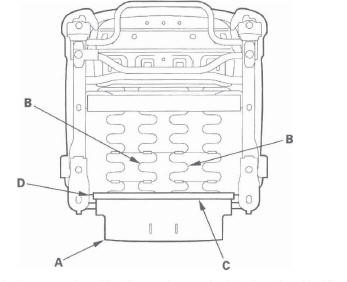
6. Remove the bolts, and release the seat cushion springs (A) from the hooks (B), then remove the seat cushion frame (C),
7. Remove the seat weight sensor.
8. If necessary, remove the bushings (A, B) from the seat cushion frame (C).
9. If necessary, remove the member cover (A) from the front cushion rear member (B).
10. Install the new seat frame in the reverse order of removal, and note these items:
- Make sure the ODS unit connector is plugged in properly.
- Check if the clips are damaged or stress-whitened, and if necessary, replace them with new ones.
- Push the clips into place securely.
Driver's Seat
Calibrate the ODS unit after any of the these actions:
- Front driver's seat replacement (including any seat components)
- After a vehicle collision
NOTE:
- Put on gloves to protect your hands.
- Apply oil to the pivot portions of the slide locks.
- Apply multipurpose grease to the sliding portions of the seat tracks.
- If the side airbag has deployed, replace the seat frame and related parts with new ones.
1. Remove the front seat.
2. Remove these items:
- Front seat-back cover/pad
- Front seat cushion cover/pad
- Seat position sensor
3. Remove the clips, then remove the recline inner covers (A), outer upper rail cover (B), inner upper rail cover (C), and the module holder (D) from the seat frame (E).
4. Install the new seat frame in the reverse order of removal, and note these items:
- Make sure the ODS unit connector is plugged in properly.
- Check if the clips are damaged or stress-whitened, and if necessary, replace them with new ones.
- Push the clips into place securely.
Front Seat-back Cover/Pad Replacement
SRS components are located in this area. Review the SRS component locations and the precautions and procedures before doing repairs or service.
- Check the operation of the driver's seat position
sensor after any of these actions:
- Driver's seat position sensor replacement
- Cover plate (front side of driver's seat slide rail) replacement
- Calibrate the ODS unit after any of the these actions:
- Front passenger's seat replacement (including any seat components)
- Replacement of the seat weight sensors
- After a vehicle collision
NOTE:
- Take care not to tear the seams or damage the seat covers.
- On the passenger's seat, do not touch the ODS
sensor in the seat-back pad, and keep it away from oil.
Oil can corrode the sensor causing it to fail.
- Put on gloves to protect your hands.
1. Remove the front seat.
2. Passenger's seat: Remove the front seat under tray.
3. Remove the armrest.
4. Remove the head restraint.
5. From under the seat cushion, detach the side airbag connector clip (A) and seat heater connector clip (driver's seat) (B), then remove the wire harness ties (C).
Passenger's seat
Driver's seat
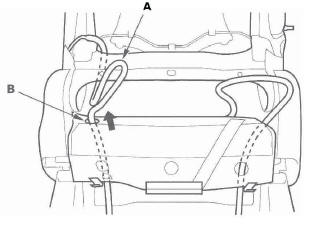
6. Release the hook (D) and the slit in the seat cushion cover (E) from the seat cushion frame spring (F), then pull the cover back.
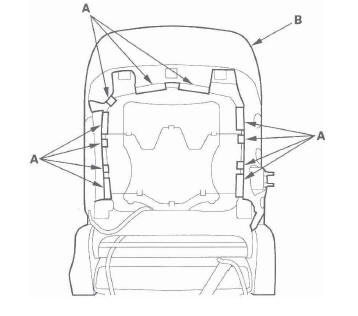
7. Using the appropriate trim tool, pry out the clips (A) to release the lower portion of the back cover.
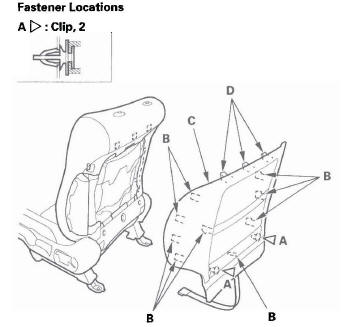
8. Detach the clips and hooks (B) by pulling the bottom of the back cover (C) back, then gently pull down the cover to release the hooks (D) from the seat frame, and remove the panel.
9. Release the Velcro fasteners (A, B, C), and release the hooks (D), then pull the seat-back cover (E) back.
10. Pull the side airbag harness (A) out through the harness hole (B) in the seat-back cover and seat frame. Driver's seat is shown; passenger's seat is similar.
11. Remove the side airbag.
12. Release the hook strips (A), then loosen the seatback cover (B). Driver's seat is shown; passenger's seat is similar.
13. Turn over the reinforcing cloth (A), then release the hooks (B) from the module holder (C).
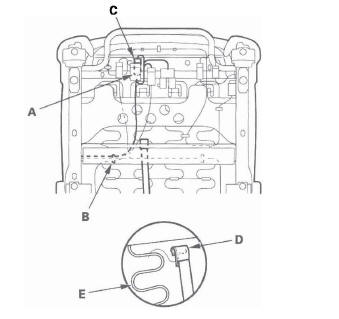
14. Passenger's seat: Disconnect the ODS sensor connectors (A) and ODS subharness connector (B) from the ODS unit (C), and pull them in through the hole in the seat frame. Detach the harness clips (D), and remove the wire tie (E).
15. Pinch the tabs on the ends of the head restraint guides (A), and remove them from the seat-back.
16. Remove the seat-back cover/pad (A) from the seat (B).
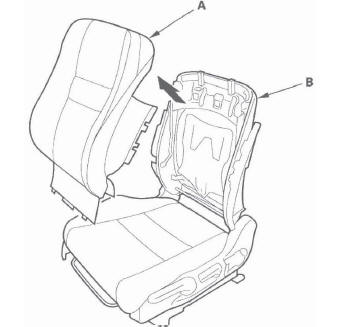
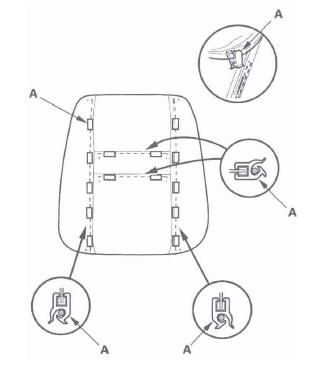
17. Pull back the edge of the seat-back cover all the way around, and release the clips (A), then remove the seat-back cover.
18. Install the cover in the reverse order of removal, and note these items:
- Reinitialize the ODS unit.
- To prevent wrinkles when installing a seat-back cover, make sure the material is stretched evenly over the pad before securing the clips, hooks, and hook strips.
- Replace any clips (A) you removed with new ones.
- Before installing the side airbag (B), make sure the reinforcing cloth (C) is fixed on the seat-back frame (D) securely.
- Make sure the side airbag harness and ODS subharness (passenger's seat) are routed properly.
Front Seat Under Tray Replacement
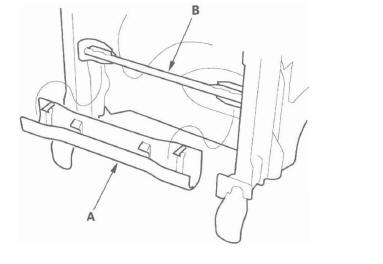
1. Open the under tray (A).
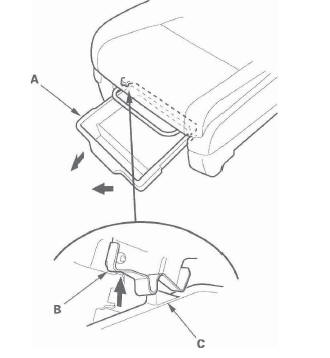
2. While pushing up on one of springs (B) on both guide rails, pull the under tray out until the stop (C) passes under the spring to remove one side of the tray from the guide rail.
3. Tilt the removed side of the under tray down, then pull another side of it off the guide rail.
4. Install the under tray by pushing it on to both guide rails until the springs snap into places.
Front Seat Recline Cover Removal/Installation
Special Tools Required
KTC trim tool set SOJATP2014 *
* Available through the American Honda Tool and Equipment Program; call 888-424-6857
SRS components are located in this area. Review the SRS component locations and the precautions and procedures before doing repairs or service.
NOTE:
- Use the appropriate tool from the KTC trim tool set to avoid damage when prying components.
- Take care not to tear the seams of damage the seat covers.
- Put on gloves to protect your hands.
1. Remove the front seat.
2. Passenger's seat: Remove these items:
- Woofer (for some models)
- Front seat belt buckle
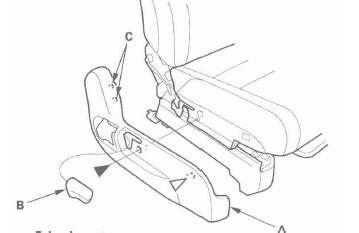
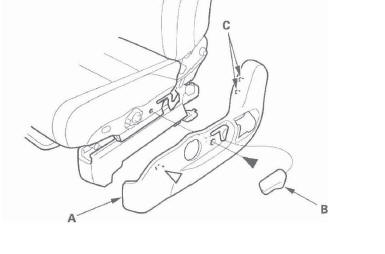
3. Pull back the cap (A) to release the hooks (B), and remove the screws, then remove the height adjuster handle (C).
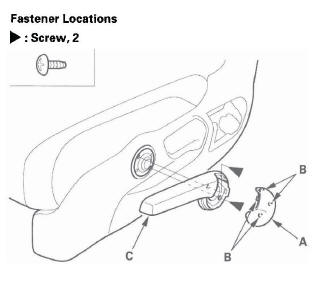
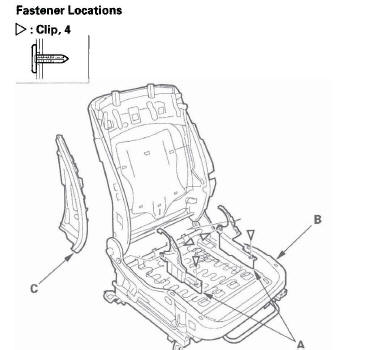
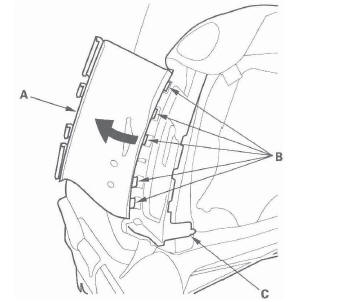
4. Remove the recline outer cover (A).
- Remove the recline knob (B), and remove the screw.
- Fold back the seat to fully.
- Detach the clip by pulling the outer cover back by hand.
- Using a trim tool, and release the hooks (C) along the upper edge of the outer cover.
- Gently pull out the outer cover, and remove it to the back.
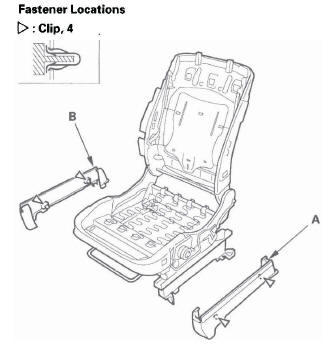
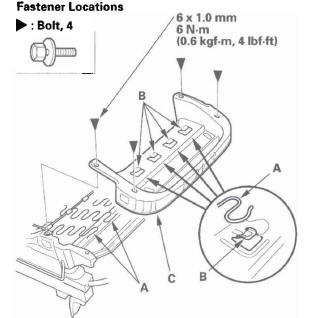
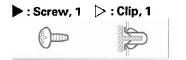
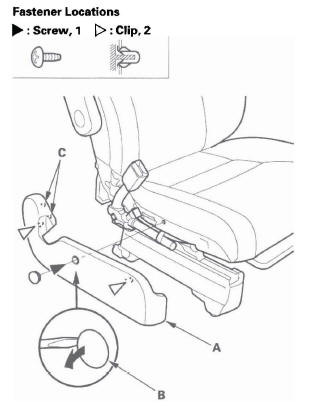
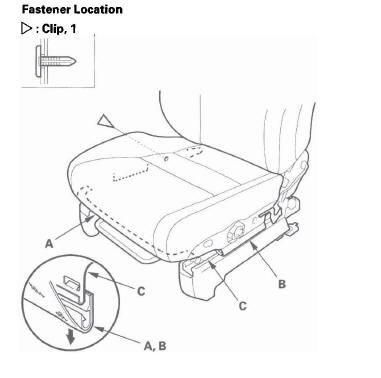
Fastener Locations
Passenger's seat
Driver's seat
5. Remove the recline inner cover (A).
- Carefully pry up the cap (B), and remove the screw.
- Fold back the seat to fully.
- Detach the clips by pulling the inner cover back by hand.
- Using a trim tool, release the hooks (C) along the upper edge of the inner cover.
- Gently pull out the inner cover, and remove it to the back.
6. Install the recline covers in the reverse order of removal.
Front Seat Cushion Cover/Pad Replacement
Special Tools Required
KTC trim tool set SOJATP2014 *
* Available through the American Honda Tool and Equipment Program; call 888-424-6857
SRS components are located in this area. Review the SRS component locations and the precautions and procedures before doing repairs or service.
- Check the operation of the driver's seat position
sensor after any of these actions:
- Driver's seat position sensor replacement
- Cover plate (front side of driver's seat slide rail) replacement
- Calibrate the ODS unit after any of the these actions:
- Front passenger's seat replacement (including any seat components)
- Replacement of the seat weight sensors
- After a vehicle collision
NOTE:
- Use the appropriate tool from the KTC trim tool set to avoid damage when prying components.
- Take care not to tear the seams of damage the seat covers.
- Put on gloves to protect your hands.
1. Remove the front seat.
2. Passenger's seat: Remove these items:
- Front seat under tray (for some models)
- Woofer (for some models)
- Center table (for some models)
- Front seat recline cover, both side
- Front seat belt buckle
3. Detach the seat subharness clip (A), and remove the wire tie (B), then disconnect seat heater connector (C) on the front seat. Release the hook (D) from the seat cushion frame springs (E), then turn over the seat-back cover.
Passenger's seat
Driver's seat
4. Release the seat cushion cover (A) from the seat cushion frame springs (B), then release the hook strips (C) from the seat frame (D).
5. Remove the clip, then release the hook strips (A, B) from the seat frame (C).
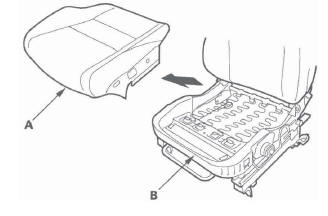
6. Remove the seat cushion/pad (A) from the seat frame (B).
7. Release the hooks (A) from under the seat cushion (B).
8. Pull back the edge of the seat cushion cover all the way around, and release the clips (A), then remove the seat cushion cover.

9. Install the cover in the reverse order of removal, and note these items:
- To prevent wrinkles when installing a seat-back cover, make sure the material is stretched evenly over the pad before securing the clips, hooks, and hook strips.
- Replace any clips (A) you removed with new ones.
READ NEXT:
 Rear Seat
Rear Seat Armrest Removal/Installation
NOTE: Take care not to tear the seams or damage the
seat covers.
1. Remove the E-ring (A) from the right side portion
on the armrest pivot.
2. Slide the armres
Front Bumper
Front Bumper Removal/Installation
NOTE:
Have an assistant help you when removing and
installing the front bumper.
Take care not to scratch the front bumper and body.
Put on gloves to protect your
SEE MORE:
Operating the XM Radio
To listen to XM radio, turn the
ignition switch to the ACCESSORY
(I) or the ON (II) position. Push the
button to turn on the audio
system, and press the ‘‘XM’’ button.
Adjust the volume by turning the
VOL/SELECT knob. The last
channel you listened to will show in
the display.
Keys and Locks
The master key fits all the locks on
your vehicle. The valet key works
only in the ignition and the driver’s
door lock. You can keep the glove
box locked when you leave your
vehicle and the valet key at a parking
facility.
You should have received a key
number tag with your keys
