Honda CR-V: Fuel Pressure Relieving
Before disconnecting fuel lines or hoses, relieve pressure from the system by disabling the fuel pump and then disconnecting the fuel tube/quick connect fitting in the engine compartment.
With the HDS
1. Make sure you have the anti-theft code for the audio system.
2. Remove the fuel fill cap, to relieve the pressure in the fuel tank.
3. Turn the ignition switch ON (II).
4. From the INSPECTION MENU of the HDS, select Fuel Pump OFF, then start the engine, and let it idle until it stalls.
NOTE:
- Do not allow the engine to idle above 1,000 rpm or the PCM will continue to operate the fuel pump.
- A DTC or a Temporary DTC may be set during this procedure. Check for DTCs, and clear them as needed.
5. Turn the ignition switch OFF.
6. Disconnect the negative cable from the battery.
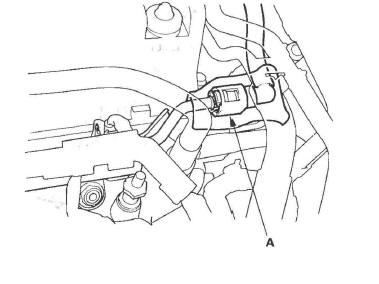
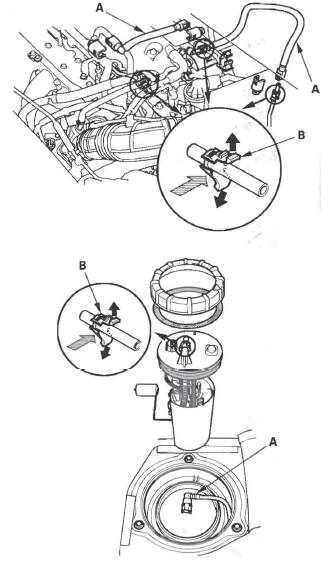
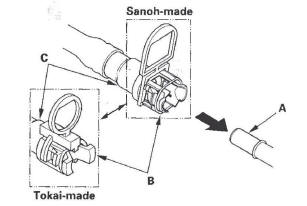
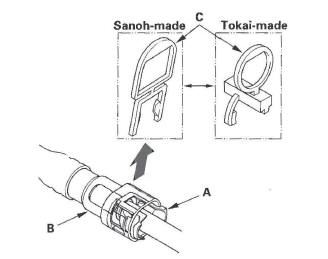
7. Remove the quick-connect fitting cover (A).
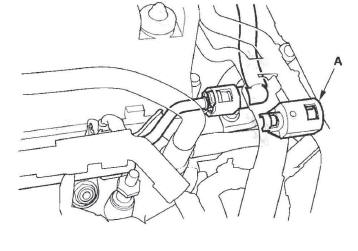
8. Check the fuel quick-connect fitting for dirt, and clean it if needed.
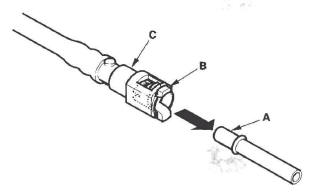
9. Place a rag or shop towel over the quick-connect fitting (A).
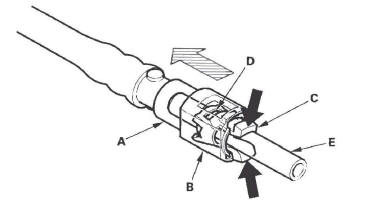
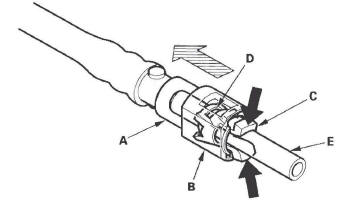
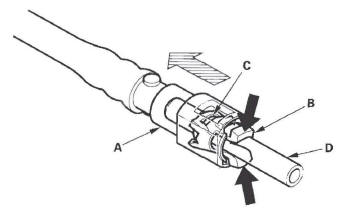
10. Disconnect the quick-connect fitting (A): Hold the connector (B) with one hand, and squeeze the retainer tabs (C) with the other hand to release them from the locking tabs (D). Pull the connector off.
NOTE:
- Be careful not to damage the line (E) or other parts.
- Do not use tools.
- If the connector does not move, keep the retainer tabs pressed down, and alternately pull and push the connector until it comes off easily.
- Do not remove the retainer from the line; once removed, the retainer must be replaced with a new one.
11. After disconnecting the quick-connect fitting, check it for dirt or damage (see step 4).
12. Reconnect the negative cable to the battery, then do this:
- Enter the anti-theft code for the audio system.
- Set the clock.
Without the HDS
1. Make sure you have the anti-theft code for the audio system.
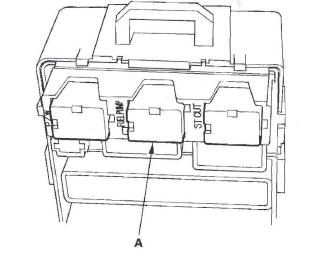
2. Remove the under-dash fuse/relay box, then remove PGM-FI main relay 2 (FUEL PUMP) (A) from the under-dash fuse/relay box.
3. Reinstall the under-dash fuse/relay box.
4. Start the engine, and let it idle until it stalls.
NOTE: If any DTCs are stored, clear and ignore them.
5. Turn the ignition switch OFF.
6. Remove the fuel fill cap.
7. Disconnect the negative cable from the battery.
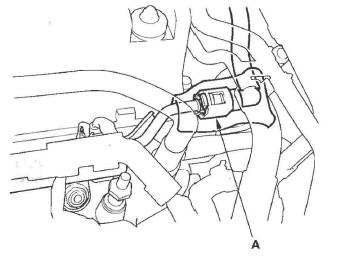
8. Remove the quick-connect fitting cover (A).

9. Check the fuel quick-connect fitting for dirt, and clean it if needed.
10. Place a rag or shop towel over the quick-connect fitting (A).
11. Disconnect the quick-connect fitting (A): Hold the connector (B) with one hand, and squeeze the retainer tabs (C) with the other hand to release them from the locking tabs (D). Pull the connector off.
NOTE:
- Be careful not to damage the line (E) or other parts.
- Do not use tools.
- If the connector does not move, keep the retainer tabs pressed down, and alternately pull and push the connector until it comes off easily.
- Do not remove the retainer from the line; once removed, the retainer must be replaced with a new one.
12. After disconnecting the quick-connect fitting, check it for dirt or damage (see step 4 ).
13. Reconnect the negative cable to the battery, then do this:
- Enter the anti-theft code for the audio system.
- Set the clock.
Fuel Pressure Test
Special Tools Required
- Fuel pressure gauge 07406-004000B
- Fuel pressure gauge attachment set 07 AAJ-S6MA 150
1. Relieve the fuel pressure.
2. Disconnect the quick-connect fitting. Attach the fuel pressure gauge set and the fuel pressure gauge.
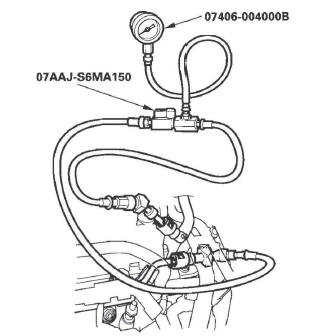
3. Start the engine, and let it idle.
- If the engine starts, go to step 5.
- If the engine does not start, go to step 4.
4. Check to see if the fuel pump is running: Listen to the fuel filler port with the fuel fill cap removed.
The fuel pump should run for 2 seconds when the ignition switch is first turned on.
- If the pump runs, go to step 5.
- If the pump does not run, do the fuel pump circuit troubleshooting.
5. Read the fuel pressure gauge. The pressure should be 320-370 kPa (3.3-3.8 kgf/cm2, 47-54 psi).
- If the pressure is OK, the test is complete.
- If the pressure is out of specification, replace the fuel pressure regulator and the fuel filter, then recheck the fuel pressure.
Fuel Tank Draining
1. Remove the fuel tank unit.
2. Using a hand pump, a hose, and a container suitable for fuel, draw the fuel from the fuel tank.
3. Reinstall the fuel tank unit.
Fuel Line Inspection
Check the fuel system lines and hoses for damage, leaks, and deterioration. Replace any damaged parts.
Check all clamps, and retighten if necessary.

Fuel Line/Quick-Connect Fitting Precautions
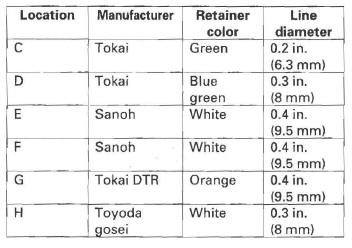
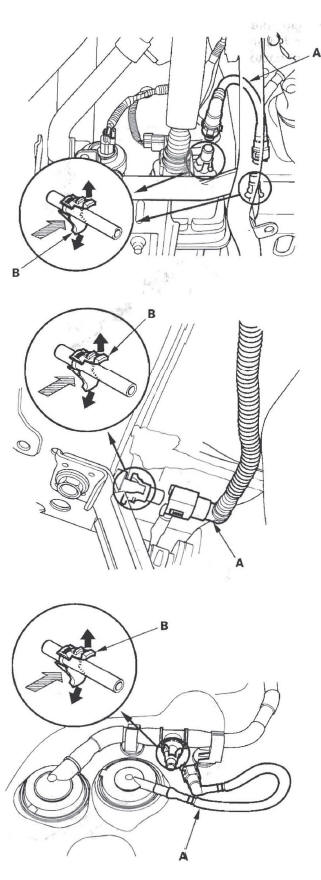
The fuel line/quick-connect fittings (C), (D), (E), (F), (G), and (H) connect the fuel rail (I) to fuel feed hose A, fuel feed hose A to fuel feed hose B, fuel feed hose B to the fuel line (J), the fuel line (K) to the fuel tank unit (L), the fuel vapor line (M) to the EVAP canister (N), the fuel tank vapor control valve hose (O) to the fuel tank vapor/ liquid separator valve hose (P), and the fuel tank vapor recirculation tube (Q) to the joint (R). When removing or installing the fuel feed hose, the fuel tank unit, or the fuel tank, it is necessary to disconnect or connect the quick-connect fittings.
Pay attention to the following:
- The fuel feed hoses, fuel line, and quick-connect fittings are not heat-resistant; be careful not to damage them during welding or other heat-generating procedures.
- The fuel feed hoses, fuel line, and quick-connect fittings are not acid-proof; do not touch them with a shop towel that was used for wiping battery electrolyte. Replace them if they come in contact with electrolyte or something similar.
- When connecting or disconnecting the fuel feed hoses, fuel line, and quick-connect fittings, be careful not to bend or twist them excessively. Replace them if they are damaged.

A disconnected quick-connect fitting can be reconnected, but the retainer on the mating line cannot be reused once it has been removed from the line.
Replace the retainer when:
- replacing the fuel rail.
- replacing the fuel line.
- replacing the fuel pump.
- replacing the fuel filter.
- replacing the fuel gauge sending unit.
- replacing the EVAP purge line.
- replacing the EVAP canister.
- replacing the fuel tank.
- it has been removed from the line.
- it is damaged.
Fuel Line/Quick-Connect Fitting Removal
NOTE: Before you work on the fuel lines and fittings, read the "Fuel Line/Quick-Connect Fitting Precautions".
1. Relieve the fuel pressure.
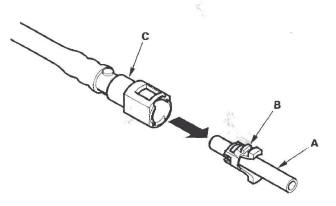
2. Check the fuel quick-connect fittings (A) for dirt, and clean them if needed.

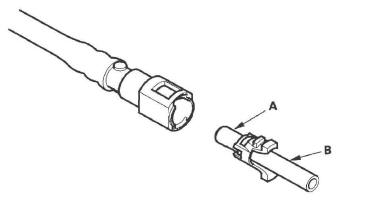
3. Place a rag or shop towel over the quick-connect fitting. Hold the connector (A) with one hand, and squeeze the retainer tabs (B) with the other hand to release them from the locking tabs (C). Pull the connector off.
NOTE:
- Be careful not to damage the line (D) or other parts. Do not use tools.
- If the connector does not move, keep the retainer tabs pressed down, and alternately pull and push the connector until it comes off easily.
- Do not remove the retainer from the line; once removed, the retainer must be replaced with a new one.
4. Check the contact area (A) of the line (B) for dirt or damage.
- If dirty, clean the connector, and dry it with the compressed air.
- If it is rusty or damaged, replace the fuel filter, or fuel feed line.
5. To prevent damage and keep foreign matter out, cover the disconnected connector and line ends with plastic bags (A).
NOTE: The retainer cannot be reused once it has been removed from the line.
Replace the retainer when:
- replacing the fuel rail.
- replacing the fuel feed line.
- replacing the fuel pump.
- replacing the fuel filter.
- replacing the fuel gauge sending unit.
- replacing the EVAP purge pipe.
- replacing the EVAP canister.
- replacing the fuel tank.
- it has been removed from the line.
- it is damaged.
Fuel Line/Quick-Connect Fitting Installation
NOTE: Before you work on the fuel lines and fittings, read the "Fuel Line/Quick-Connect Fitting Precautions".
1. Check the contact area (A) of the line (B) for dirt or damage, and clean it if needed.
2. Insert a new retainer (A) into the connector (B) if the retainer is damaged, or after:
- replacing the fuel rail.
- replacing the fuel feed line.
- replacing the fuel pump.
- replacing the fuel filter.
- replacing the fuel gauge sending unit.
- replacing the EVAP purge pipe.
- replacing the EVAP canister.
- replacing the fuel tank.
- removing the retainer from the line.
- Use the same manufacturer retainer and the same size retainer when the replacing the retainer.
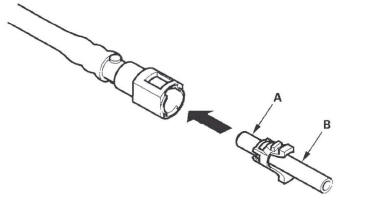
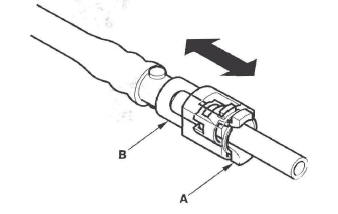
3. Before connecting a new fuel tube/quick-connect fitting assembly (A), remove the old retainer (B) from the mating line.
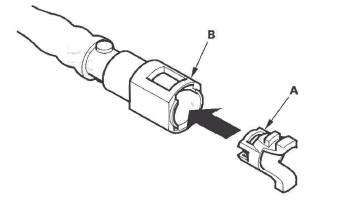
4. Align the quick-connect fittings with the line (A), and align the retainer locking tabs (B) with the connector grooves (C). Then press the quick-connect fittings onto the line until both retainer tabs lock with a clicking sound.
NOTE: If it is hard to connect, put a small amount of new engine oil on the line end.
Connection with new retainer
Connection to new fuel line
Reconnection to existing retainer
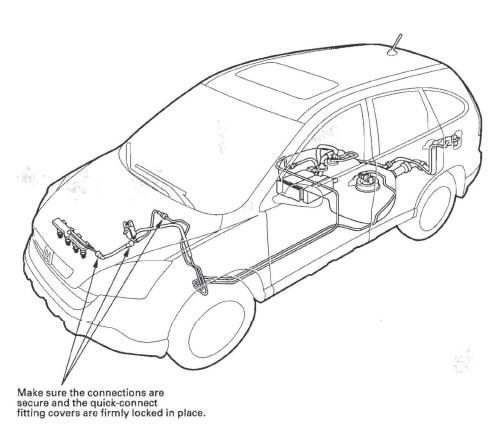
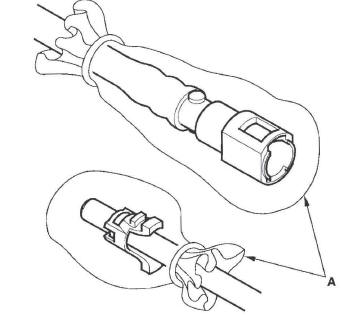
5. When you are reconnecting the connector with the old retainer, make sure the connection is secure and the tabs (A) are firmly locked into place; check visually and also by pulling the connector (B).
When you are replacing the fuel line with a new one, make sure you remove the ring pull (C) upwards after you confirm the connection is secure.
NOTE: Before you remove the ring pull, make sure the fuel line connection is secure. If the connection is not secure, the ring pull could break when you try to remove it.
Reconnection to existing retainer
Connection to new fuel line
6. Reconnect the negative cable to the battery, and turn the ignition switch ON (II) (but do not operate the starter motor). The fuel pump will run for about 2 seconds, and fuel pressure will rise. Repeat two or three times, and check that there is no leakage in the fuel supply system.
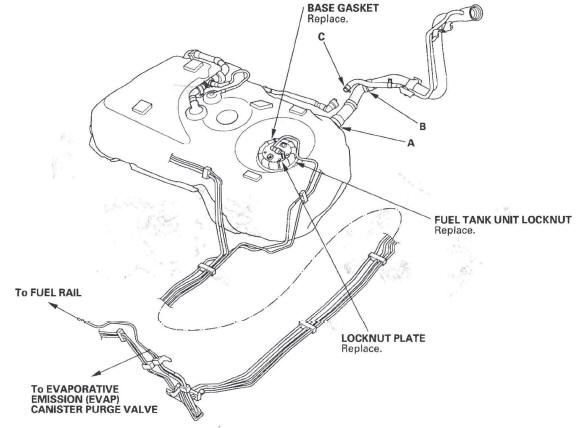
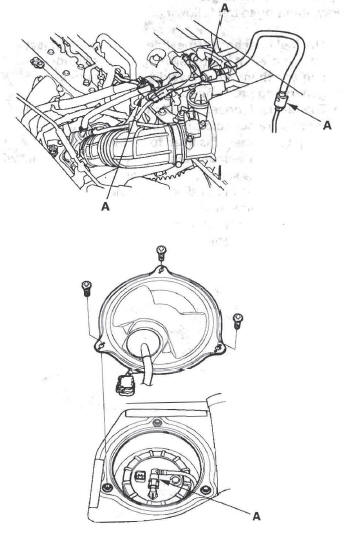
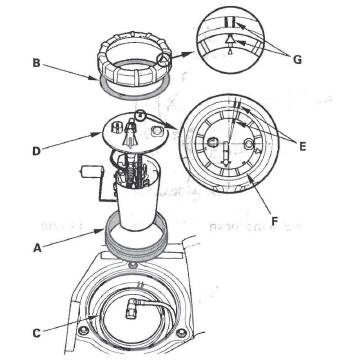
Fuel Tank Unit Removal/Installation
Special Tools Required
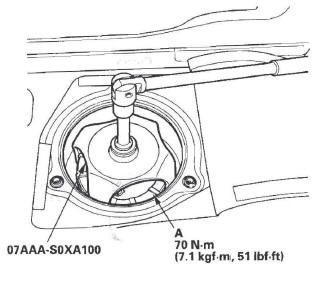
Fuel sender wrench 07 AAA-SOXA 100
Removal
1. Relieve the fuel pressure.
2. Remove the fuel fill cap.
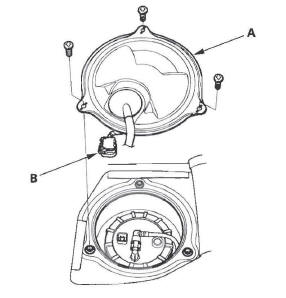
3. Fold the left side rear seat forward, and pull back the carpet to expose the access panel.
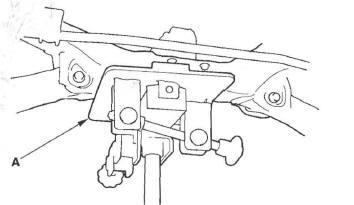
4. Remove the access panel (A) from the floor.
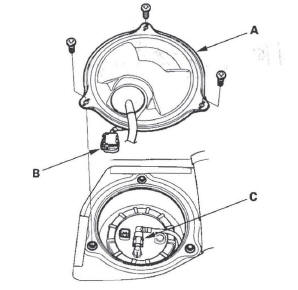
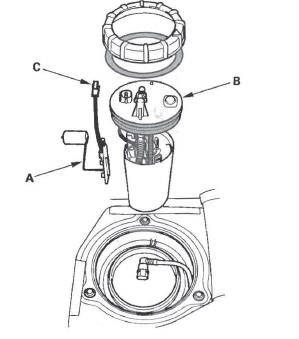
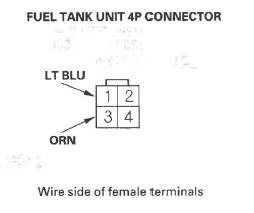
5. Disconnect the fuel tank unit 4P connector (B).
6. Disconnect the quick-connect fitting (C) from the fuel tank unit.
7. Using the special tool, loosen the locknut (A).
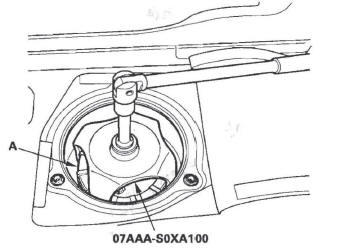
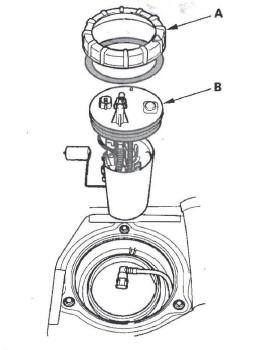
8. Remove the locknut (A) and the fuel tank unit (B).
Installation
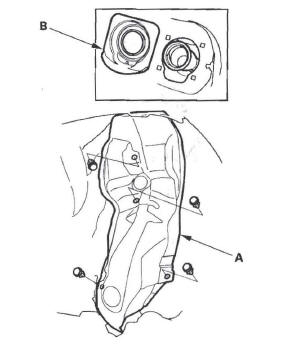
1. Install a new base gasket (A) and the locknut plate (B) to the fuel tank (C).
2. Insert the fuel tank unit (D) into the fuel tank. Be careful not to bend the fuel gauge sending unit.
3. Align the marks (E) on the fuel tank and the fuel tank unit, then tighten a new locknut (F) by hand.
NOTE:
- Before tightening, align the marks (G) on the fuel tank and the locknut.
- After tightening, make sure the marks are still aligned. Check circumference of the base gasket visually or by hand and be sure that the gasket is not pinched.
- Do not coat the base gasket and the locknut plate with engine oil.
4. Using the tool, tighten the fuel tank unit locknut (A).
NOTE: After installation, check the base gasket visually or by hand to be sure the gasket is not pinched.
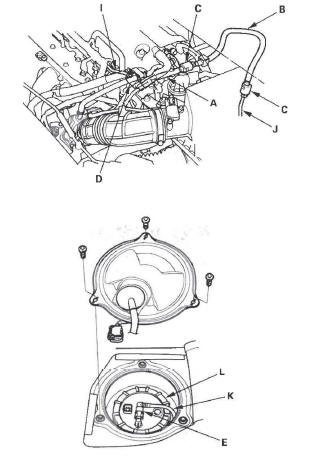
Fuel Pressure Regulator Replacement
1. Remove the fuel tank unit.
2. Remove the reservoir (A).
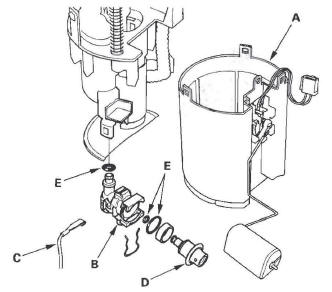
3. Remove the bracket (B).
4. Remove the ground (C).
5. Remove the fuel pressure regulator (D).
6. Install the parts in the reverse order of removal with new O-rings (E) and a new bracket. When installing the fuel tank unit, align the marks on the unit and the fuel tank.
NOTE: Coat the O-rings with clean engine oil; do not use any other oils or fluids.
Do not pinch the O-rings during installation.
Fuel Filter Replacement
The fuel filter should be replaced whenever the fuel pressure drops below the specified value, after making sure that the fuel pump and the fuel pressure regulator are OK.
1. Remove the fuel tank unit.
2. Remove the fuel filter set (A).
3. Check these items before installing the fuel tank unit:
- When connecting the wire harness, make sure the connection is secure and the connectors (B) are firmly locked into place.
- When installing the fuel gauge sending unit (C), make sure the connection is secure and the connector is firmly locked into place. Be careful not to bend or twist it excessively.
4. Install the parts in the reverse order of removal with new O-rings (D). When installing the fuel tank unit, align the marks on the unit and the fuel tank.
NOTE: Coat the O-rings with clean engine oil.
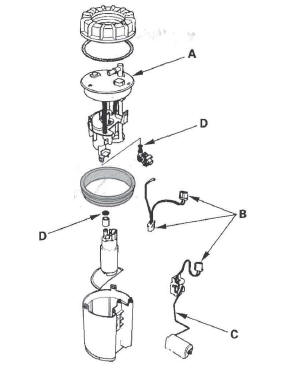
Fuel Pump/Fuel Gauge Sending Unit Replacement
1. Remove the fuel tank unit.
2. Remove the fuel level sensor (fuel sending unit) (A) from the fuel tank unit (B).
3. Check these items before installing the fuel tank unit:
- When connecting the wire harness, make sure the connection is secure and the connector (C) are firmly locked into place.
- When installing the fuel gauge sending unit, make sure the connection is secure and the connector is firmly locked into place. Be careful not to bend or twist it excessively.
4. Install the parts in the reverse order of removal.
When installing the fuel tank unit, align the marks on the unit and the fuel tank.
Fuel Tank Replacement
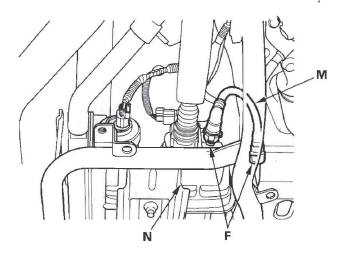
1. Drain the fuel tank, then disconnect the fuel tank unit 4P connector (A) and the quick-connect fittings (B).

2. Lift the vehicle, and support it with jackstands.
3. Remove the EVAP canister.
4. Remove the cover (C) and the fuel tank guard (D).
5. 4WD model: Remove the propeller shaft.
6. Remove the exhaust pipe.
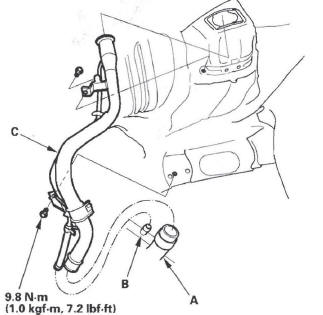
7. Disconnect the hoses (E). Slide back the clamps, then twist the hoses as you pull to avoid damaging them.
8. Place a jack or other support under the tank (F).
9. Remove the strap bolts and the straps (G).
10. Remove the fuel tank.
11. Install the parts in the reverse order of removal.
Fuel Fill Pipe Removal/Installation
1. Relieve the fuel pressure.
2. Drain the fuel tank.
3. Remove the fuel fill cap.
4. Remove the fuel fill pipe cover (A) and the fuel fill cap adapter (B).
5. Remove the rear wheel and wheel sensors.
6. Support the rear differential (4WD model), and the rear axle beam with a transmission jack.
7. Remove the flange bolts from the bottom of the rear damper/springs.
8. Remove the rear differential (4WD model) and the rear suspension subframe mounting bolts.
9. Lower the transmission jack (A) and the rear differential or axle beam.
NOTE: Be careful not to damage the connecting parts.
10. Disconnect the fuel fill tube (A) and the fuel vapor hose (B).
11. Remove the fuel fill pipe (C).
12. Install the parts in the reverse order of removal.
Fuel Gauge Sending Unit Test
NOTE: For the fuel gauge system circuit diagram, refer to the Gauges Circuit Diagram.
1. Check the No. 10 METER (7.5 A) fuse in the under-dash fuse/relay box before testing.
2. Check for body electrical system DTCs.
- If no problem is found, go to step 3.
- If DTC B1175 or B1176 is indicated, go to the indicated DTC's troubleshooting.
3. Turn the ignition switch OFF.
4. Fold the left side rear seat forward, and pull back the carpet to expose the access panel.
5. Remove the access panel (A) from the floor.
6. Disconnect the fuel tank unit 4P connector (B).
7. Measure voltage between fuel tank unit 4P connector terminals No. 1 and No.3 with the ignition switch ON (II). There should be battery voltage.
- If the voltage is OK, go to step 8.
- If the voltage is not as specified, check for:
- a short in the LT BLU w ire to ground.
- an open in the LT BLU or ORN wire.
8. Turn the ignition switch OFF.
9. Remove the fuel tank unit from the fuel tank.
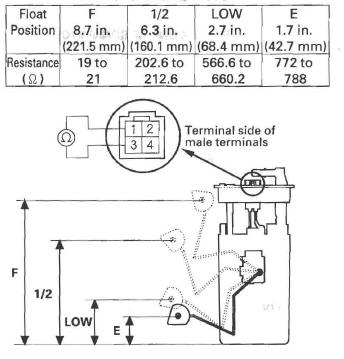
10. Measure resistance between fuel tank unit 4P connector terminals No.1 and No.3 with the float at E (EMPTY), LOW (LOW FUEL INDICATOR), 1/2 (HALF FULL), and F (FULL) positions.
If you do not get the following readings, replace the fuel gauge sending unit.
11. Reconnect the fuel tank unit 4P connector.
12. Remove the No. 23 BACK UP (10 A) fuse from the under-hood fuse/relay box for at least 10 seconds, then reinstall it.
13. Turn the ignition switch ON (II).
14. Check that the pointer of the fuel gauge indicates "F" with the float at F.
- If the pointer of the fuel gauge does not indicate "F", replace the gauge assembly.
- If the gauge is OK, the test is complete.
NOTE:
- The pointer of the fuel gauge returns to the bottom of the gauge dial when the ignition switch is OFF, regardless of the fuel level.
- Remove the No. 23 BACK UP (10 A) fuse from the under-hood fuse/relay box for at least 10 seconds after completing troubleshooting, otherwise it may take up to 20 minutes for the fuel gauge to indicate the correct fuel level.
Low Fuel Indicator Test
1. Do the gauge self-diagnostic test.
- If the low fuel indicator flashes, go to step 2.
- If the low fuel indicator does not flash, replace the gauge control module.
2. Check for body electrical system DTCs.
- If any DTCs are indicated, do the indicated DTC's troubleshooting.
- If no DTCs are indicated, go to step 3.
3. Do the fuel gauge sending unit test.
READ NEXT:
 Intake Air System
Component Location Index
AIR CLEANER
RESONATOR
THROTTLE BODY
INTAKE AIR BYPASS CONTROL
THERMAL VALVE
Throttle Body Test
Carbon Accumulation Check
NOTE: If the malfunction in
Catalytic Converter System
Component Location Index
CATALYTIC CONVERTER
Removal/Installation
POWERTRAIN CONTROL MODULE (PCM)
General Troubleshooting information
Replacement
DTC Troubleshooting
EGR System
Component Location Index
EXHAUST GAS RECIRCULATION (EGR) VALVE
POWERTRAIN CONTROL MODULE (PCM)
EXHAUST GAS RECIRCULATION (EGR) PLATE
DTC Troubleshooting
DTC P0401: EGR Insufficient Flow
NOT
SEE MORE:
Accessory Power Sockets
Your vehicle has two or three
accessory power sockets depending
on the model.
To use an accessory power socket,
the ignition switch must be in the
ACCESSORY (I) or ON (II) position.
Each socket is intended to supply
power for 12 volt DC accessories
that are rated 120 watts or l
Ignition System
Component Location Index
SPARK PLUG
Inspection
IGNITION COIL
Ignition Timing Inspection
Removal/Installation
Circuit Diagram
Ignition Timing Inspection
1. Connect the Honda Diagnostic System (HDS) to the
data link connector (DLC).
2. Turn the ignition switch
