Honda CR-V: EGR System
Component Location Index
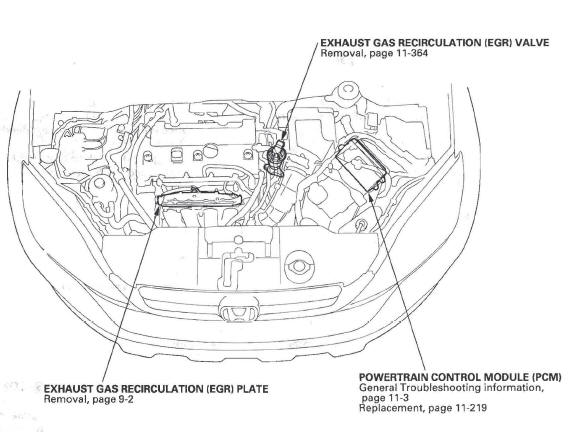
- EXHAUST GAS RECIRCULATION (EGR) VALVE
- POWERTRAIN CONTROL MODULE (PCM)
- EXHAUST GAS RECIRCULATION (EGR) PLATE
DTC Troubleshooting
DTC P0401: EGR Insufficient Flow
NOTE: Before you troubleshoot, record all freeze data and any on-board snapshot, and review the general troubleshooting information.
1. Turn the ignition switch ON (II).
2. Clear the DTC with the HDS.
3. Start the engine. Hold the engine speed at 3,000 rpm without load (in Park or neutral) until the radiator fan comes on, then let it idle.
4. Do the EGR TEST in the INSPECTION MENU with the HDS.
Is the result OK? YES-Go to step 5.
NO-Go to step 7.
5. Test-drive under these conditions:
- Engine coolant temperature (ECT SENSOR 1) above 158 ºF (70 ºC)
- Transmission in D position
- Drive the vehicle at a steady speed between 55- 75 mph (88-120 km/h)
- During the drive, decelerate (with the throttle fully closed) for 5 seconds
6. Monitor the OBD STATUS for DTC P0401 in the DTCs MENU with the HDS: Does the screen indicate FAILED? YES-Remove the EGR plate, and clean the intake manifold EGR port and the passage inside the EGR valve with throttle plate and induction cleaner, then go to step 9.
NO-If the screen indicates PASSED, intermittent failure, the system is OK at this time. Check for poor connections or loose terminals at the EGR valve and the PCM. If the screen indicates EXECUTING, keep driving until a result comes on. If the screen indicates OUT OF CONDITION, go to step 5 and recheck.
7. Turn the ignition switch OFF.
8. Replace the EGR valve.
9. Turn the ignition switch ON (II).
10. Reset the PCM with the HDS.
11. Do the PCM idle learn procedure.
12. Test-drive under these conditions:
- Engine coolant temperature (ECT SENSOR 1) above 158 ºF (70 ºC)
- Transmission in 0 position
- Drive the vehicle at a steady speed between 55- 75 mph (88-120 km/h)
- During the drive, decelerate (with the throttle fully closed) for 5 seconds
13. Check for Temporary DTCs or DTCs with the HDS.
Is DTC P0401 indicated? YES-Check for poor connections or loose terminals at the EGR valve and the PCM. If the connector and terminal fits are OK, go to step 15.
NO-Go to step 14.
14. Monitor the OBD STATUS for DTC P0401 in the DTCs MENU with the HDS.
Does the screen indicate PASSED? YES-Troubleshooting is complete. If any other Temporary DTCs or DTCs were indicated in step 13, go to the indicated DTC's troubleshooting.
NO-If the screen indicates FAILED, check for poor connections or loose terminals at the EGR valve and the PCM, then go to step 1. If the screen indicates EXECUTING, keep driving until a result comes on. If the screen indicates OUT OF CONDITION, go to step 12.
15. Update the PCM if it does not have the latest software, or substitute a known-good PCM.
16. Test-drive under these conditions:
- Engine coolant temperature (ECT SENSOR 1) above 158 ºF (70 ºC)
- Transmission in D position
- Drive the vehicle at a steady speed between 55- 75 mph (88-120 km/h)
- During the drive, decelerate (with the throttle fully closed) for 5 seconds
17. Check for Temporary DTCs or DTCs with the HDS.
Is DTC P0401 indicated? YES-Check for poor connections or loose terminals at the EGR valve and the PCM. If the PCM was updated, substitute a known-good PCM, then go to step 16. If the PCM was substituted, go to step 1.
NO-Go to step 18.
18. Monitor the OBD STATUS for DTC P0401 in the DTCs MENU with the HDS.
Does the screen indicate PASSED? YES-If the PCM was updated, troubleshooting is complete. If the PCM was substituted, replace the original PCM. If any other Temporary DTCs or DTCs were indicated in step 17, go to the indicated DTC's troubleshooting.
NO-If the screen indicates FAILED, check for poor connections or loose terminals at the EGR valve and the PCM. If the PCM was updated, substitute a known-good PCM, then go to step 16. If the PCM was substituted, go to step 1. If the screen indicates EXECUTING, keep driving until a result comes on. If the screen indicates OUT OF CONDITION, go to step 16.
DTC P0404: EGR Control Circuit Range/Performance Problem
NOTE: Before you troubleshoot, record all freeze data and any on-board snapshot, and review the general troubleshooting information.
1. Turn the ignition switch ON (II).
2. Clear the DTC with the HDS.
3. Start the engine. Hold the engine speed at 3,000 rpm without load (in Park or neutral) until the radiator fan comes on, then let it idle.
4. Do the EGR TEST in the INSPECTION MENU with the HDS.
Is the result OK? YES-Intermittent failure, the system is OK at this time. Clean any carbon build-up on the EGR valve with throttle plate and induction cleaner..
NO-Go to step 5.
5. Turn the ignition switch OFF.
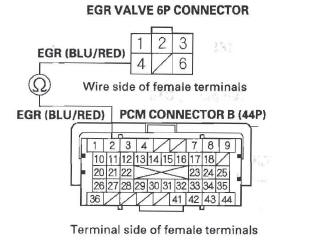
6. Disconnect the EGR valve 6P connector.
7. At the EGR valve side, measure resistance between EGR valve 6P connector terminals No.1 and No.2.
Is there 100 k Ω or more? YES-Go to step 25.
NO-Go to step 8.
8. Measure resistance between EGR valve 6P connector terminals No.1 and No.3.
Is there 100 k Ω or more? YES-Go to step 25.
NO-Go to step 9.
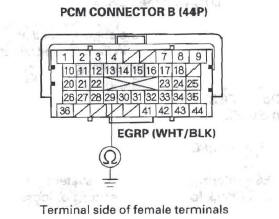
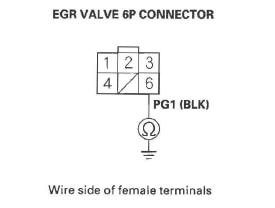
9. Check for continuity between EGR valve 6P connector terminal No. 6 and body ground.
Is there continuity? YES-Go to step 10.
NO-Repair open in the wire between the EGR valve and G101, then go to step 26.
10. Jump the SCS line with the HDS.
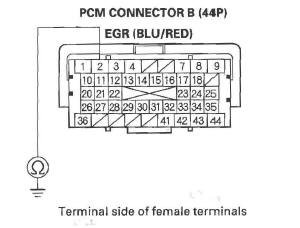
11. Disconnect PCM connector B (44P).
12. Check for continuity between PCM connector terminal B2 and body ground.
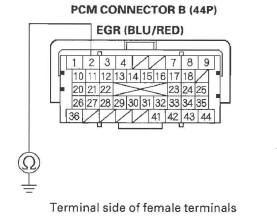
Is there continuity? YES-Repair short in the wire between the PCM (B2) and the EGR valve, then go to step 26.
NO-Go to step 13.
13. Check for continuity between PCM connector terminal B2 and EGR valve 6P connector terminal NO. 4.
Is there continuity? YES-Go to step 14.
NO-Repair open in the wire between the PCM (B2) and the EGR valve, then go to step 26.
14. Remove the EGR valve.
15. Remove the EGR plate, and clean the intake manifold EGR port and the passage inside the EGR valve with throttle plate and induction cleaner.
16. Install the EGR valve.
17. Reconnect the EGR valve 6P connector.
18. Reconnect PCM connector B (44P).
19. Turn the ignition switch ON (II).
20. Reset the PCM with the HDS.
21. Do the PCM idle learn procedure.
22. Start the engine. Hold the engine speed at 3,000 rpm without load (in Park or neutral) until the radiator fan comes on, then let it idle.
23. Do the EGR TEST in the INSPECTION MENU with the HDS.
Is the result OK? YES-Go to step 32.
NO-Go to step 24.
24. Turn the ignition switch OFF.
25. Replace the EGR valve.
26. Reconnect all connectors.
27. Turn the ignition switch ON (II).
28. Reset the PCM with the HDS.
29. Do the PCM idle learn procedure.
30. Start the engine. Hold the engine speed at 3,000 rpm without load (in Park or neutral) until the radiator fan comes on, then let it idle.
31. Do the EGR TEST in the INSPECTION MENU with the HDS.
32. Check for Temporary DTCs or DTCs with the HDS.
Is DTC P0404 indicated? YES-Check for poor connections or loose terminals at the EGR valve and the PCM. If the connector and terminal fits are OK, go to step 34.
NO-Go to step 33.
33. Monitor the OBD STATUS for DTC P0404 in the DTCs MENU with the HDS.
Does the screen indicate PASSED? YES-Troubleshooting is complete. If any other Temporary DTCs or DTCs were indicated in step 32, go to the indicated DTC's troubleshooting.
NO-If the screen indicates FAILED, check for poor connections or loose terminals at the EGR valve and the PCM, then go to step 1. If the screen indicates EXECUTING, keep testing until a result comes on. If the screen indicates OUT OF CONDITION, go to step 30.
34. Update the PCM if it does not have the latest software, or substitute a known-good PCM.
35. Do the EGR TEST in the INSPECTION MENU with the HDS.
36. Check for Temporary DTCs or DTCs with the HDS.
Is DTC P0404 indicated? YES-Check for poor connections or loose terminals at the EGR valve and the PCM. If the PCM was updated, substitute a known-good PCM, then go to step 35. If the PCM was substituted, go to step 1.
NO-Go to step 37.
37. Monitor the OBD STATUS for DTC P0404 in the DTCs MENU with the HDS.
Does the screen indicate PASSED? YES-If the PCM was updated, troubleshooting is complete. If the PCM was substituted, replace the original PCM. If any other Temporary DTCs or DTCs were indicated in step 36, go to the indicated DTC's troubleshooting.
NO-If the screen indicates FAILED, check for poor connections or loose terminals at the EGR valve and the PCM. lf the PCM was updated, substitute a known-good PCM, then go to step 35. If the PCM was substituted, go to step 1. If the screen indicates EXECUTING, keep testing until a result comes on. If the screen indicates OUT OF CONDITION, go to step 35.
DTC P0406: EGR Valve Position Sensor Circuit High Voltage
NOTE: Before you troubleshoot, record all freeze data and any on-board snapshot, and review the general troubleshooting information.
1. Turn the ignition switch ON (II).
2. Check the EGR VLS in the DATA LIST with the HDS.
Is 4.88 V or more indicated? YES-Go to step 3.
NO-Intermittent failure, the system is OK at this time. Check for poor connections or loose terminals at the EGR valve and the PCM.
3. Turn the ignition switch OFF.
4. Disconnect the EGR valve 6P connector.
5. Turn the ignition switch ON (II).
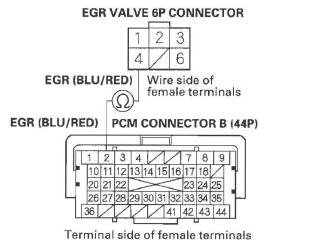
6. Measure voltage between EGR valve 6P connector terminals No. 2 and No. 3.
Is there about 5 V? YES-Go to step 11.
NO-Go to step 7.
7. Turn the ignition switch OFF.
8. Jump the SCS line with the HDS.
9. Disconnect PCM connector B (44P).
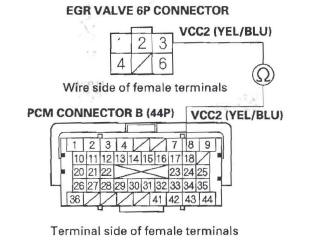
10. Check for continuity between PCM connector terminal B33 and EGR valve 6P connector terminal No.2.
Is there continuity? YES-Go to step 18.
NO-Repair open in the wire between the EGR valve and the PCM (B33), then go to step 13.
11. Turn the ignition switch OFF.
12. Replace the EGR valve.
13. Reconnect all connectors.
14. Turn the ignition switch ON (II).
15. Reset the PCM with the HDS.
16. Do the PCM idle learn procedure.
17. Check for Temporary DTCs or DTCs with the HDS.
Is DTC P0406 indicated? YES-Check for poor connections or loose terminals at the EGR valve and the PCM, then go to step 1.
NO-Troubleshooting is complete. If any other Temporary DTCs or DTCs are indicated, go to the indicated DTC's troubleshooting.
18. Reconnect all connectors.
19. Update the PCM if it does not have the latest software, or substitute a known-good PCM.
20. Check for Temporary DTCs or DTCs with the HDS.
Is DTC P0406 indicated? YES-Check for poor connections or loose terminals at the EGR valve and the PCM. If the PCM was updated, substitute a known-good PCM , then recheck. If the PCM was substituted, go to step 1.
NO-If the PCM was updated, troubleshooting is complete. If the PCM was substituted, replace the original PCM. If any other Temporary DTCs or DTCs are indicated, go to the indicated DTC's troubleshooting.
DTC P2413: EGR System Malfunction
NOTE: Before you troubleshoot, record all freeze data and any on-board snapshot, and review the general troubleshooting information.
1. Turn the ignition switch ON (II).
2. Clear the DTC with, the HDS.
3. Start the engine. Hold the engine speed at 3,000 rpm without load (in Park or neutral) until the radiator fan comes on, then let it idle.
4. Do the EGR TEST in the INSPECTION MENU with the HDS.
Is the result OK? YES-Intermittent failure, the system is OK at this time. Check for poor connections or loose terminals at the EGR valve and the PCM.
NO-Go to step 5.
5. Turn the ignition switch OFF.
6. Turn the ignition switch ON (II).
7. Check the EGR VLS in the DATA LIST with the HDS.
Is about a v indicated? YES-Go to step 8.
NO-Go to step 21.
8. Turn the ignition switch OFF.
9. Disconnect the EGR valve 6P connector.
10. Turn the ignition switch ON (II).
11. Measure voltage between EGR valve 6P connector terminal No.3 and body ground.
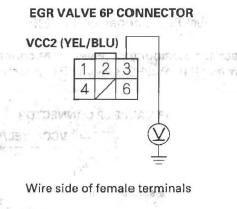
Is there about 5 V? YES-Go to step 16.
NO-Go to step 12.
12. Turn the. ignition switch OFF.
13. Jump the SCS line with the HDS.
14. Disconnect PCM connector B (44P).
15. Check for continuity between PCM connector terminal B18 and EGR valve 6P connector terminal No.3.
Is there continuity? YES-Go to step 52.
NO-Repair open in the wire between the EGR valve and the PCM (B18), then go to step 44.
16. Turn the ignition switch OFF.
17. Jump the SCS line with the HDS.
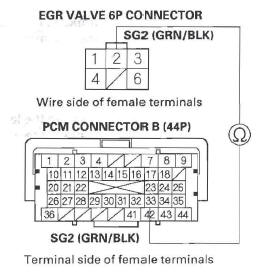
18. Disconnect PCM connector B (44P).
19. Check for continuity between PCM connector terminal B29 and body ground.
Is there continuity? YES-Repair short in the wire between the PCM (B29) and the EGR valve, then go to step 44.
NO-Go to step 20.
20. Check for continuity between PCM connector terminal B29 and EGR valve 6P connector terminal No.1.

Is there continuity? YES-Go to step 21.
NO-Repair open in the wire between the PCM (B29) and the EGR valve, then go to step 44.
21. Turn the ignition switch OFF.
22. If not already done, disconnect the EGR valve 6P connector.
23. At the EGR valve side, measure resistance between EGR valve 6P connector terminals No.1 and No.2.
Is there 100 kΩ or more? YES-Go to step 43.
NO-Go to step 24.
24. At the EGR valve side, measure resistance between EGR valve 6P connector terminals No.1 and No.3.

Is there 100 k Ω or more? YES-Go to step 43.
NO-Go to step 25.
25. If not already done, jump the SCS line with the HDS.
26. If not already done, disconnect PCM connector B (44P).
27. Check for continuity between PCM connector terminal B2 and body ground.
Is there continuity? YES-Repair short in the wire between the PCM (B2) and the EGR valve, then go to step 44.
NO-Go to step 28.
28. Check for continuity between PCM connector terminal B2 and EGR valve 6P connector terminal No.4.
Is there continuity? YES-Go to step 29.
NO-Repair open in the wire between the PCM (B2) and the EGR valve, then go to step 44.
29. Check for continuity between EGR valve 6P connector terminal No.6 and body ground.
Is there continuity? YES-Go to step 30.
NO-Repair open in the wire between the EGR valve and G101, then go to step 44.
30. Reconnect PCM connector B (44P).
31. At the EGR valve side, connect the battery positive terminal to EGR valve 6P connector terminal No.4 with a jumper wire.
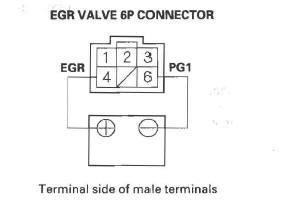
32. Start the engine, and let it idle. Then connect the battery negative terminal to EGR valve 6P connector terminal No.6 with a jumper wire.
Does the engine stall or run roughly? YES-Go to step 51.
NO-Go to step 33.
33. Turn the ignition switch OFF.
34. Remove the EGR valve.
35. Clean the intake manifold EGR port with throttle plate and induction cleaner. Also, clean the passage inside the EGR valve with throttle plate and induction cleaner.
36. Install the EGR valve.
37. Reconnect all connectors.
38. Turn the ignition switch ON (II).
39. Reset the PCM with the HDS.
40. Do the PCM idle learn procedure.
41. Do the EGR TEST in the INSPECTION MENU with the HDS; Is the result OK? YES-Go to step 49.
NO-Go to step 42.
42. Turn the ignition switch OFF.
43. Replace the EGR valve.
44. Reconnect all connectors.
45. Turn the ignition switch ON (II).
46. Reset the PCM with the HDS.
47. Do the PCM idle learn procedure.
48. Do the EGR TEST in the INSPECTION MENU with the HDS.
49. Check for Temporary DTCs or DTCs with the HDS.
Is DTC P2413 indicated? YES-Check for poor connections or loose terminals at the EGR valve and the PCM, then go to step 1.
NO-Go to step 50.
50. Monitor the OBD STATUS for DTC P2413 in the DTCs MENU with the HDS.
Does the screen indicate PASSED? YES-Troubleshooting is complete. If any other Temporary DTCs or DTCs were indicated in step 49, go to the indicated DTC's troubleshooting.
NO-If the screen indicates FAILED, check for poor connections or loose terminals at the EGR valve and the PCM, then go to step 1. If the screen indicates EXECUTING, keep testing until a result comes on. If the screen indicates OUT OF CONDITION, go to step 48.
51. Turn the ignition switch OFF.
52. Reconnect all connectors.
53. Update the PCM if it does not have the latest software, or substitute a known-good PCM.
54. Do the EGR TEST in the INSPECTION MENU with the HDS.
55. Check for Temporary DTCs or DTCs with the HDS.
Is DTC P2413 indicated? YES-Check for poor connections or loose terminals at the EGR valve and the PCM. If the PCM was updated, substitute a known-good PCM, then go to step 54. If the PCM was substituted, go to step 1.
NO-Go to step 56.
56. Monitor the OBD STATUS for DTC P2413 in the DTCs MENU with the HDS.
Does the screen indicate PASSED? YES-If the PCM was updated, troubleshooting is complete. If the PCM was substituted, replace the original PCM. If any other Temporary DTCs or DTCs were indicated in step 55, go to the indicated DTC's troubleshooting.
NO-If the screen indicates FAILED, check for poor connections or loose terminals at the EGR valve and the PCM. If the PCM was updated, substitute a known-good PCM, then go to step 54. If the PCM was substituted, go to step 1. If the screen indicates EXECUTING, keep testing until a result comes on. If the screen indicates OUT OF CONDITION, go to step 54 and recheck.
EGR Valve Replacement
1. Remove the air cleaner.
2. Relieve the fuel pressure.
3. Remove the fuel line (A). Disconnect the hose (B).
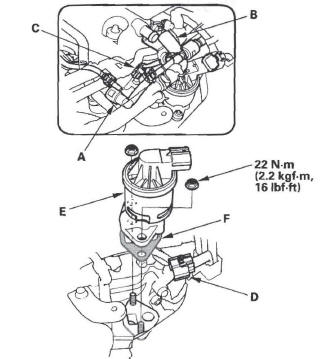
4. Disconnect the CMP sensor A connector (C).
5. Remove the EGR valve 6P connector (D).
6. Remove the EGR valve (E).
7. Install the parts in the reverse order of removal with a new gasket (F).
READ NEXT:
 PCV System
Component Location Index
PCV VALVE
PCV Valve Inspection
1. Check the PCV valve (A), hoses (B), and
connections for leaks or restrictions.
2. At idle, make sure there is a clicking sound from t
EVAP System
Component Location Index
EVAPORATIVE EMISSION (EVAP)
CANISTER PURGE VALVE
Replacement
POWERTRAIN CONTROL MODULE (PCM)
General Troubleshooting Information
Replacement
SEE MORE:
Power Windows
Turn the ignition switch to the ON
(II) position to raise or lower any
window. To open the window, push
the switch down and hold it. Release
the switch when you want to stop the
window. To close the window, pull
back on the switch and hold it.
The windows will operate for up to
10
Fuel Fill Door
Fuel Fill Door Adjustment
1. Remove the nut (A), then remove the open spring
(B).
2. Slightly loosen the hinge mounting bolts (A).
3. Adjust the fuel fill door (B) in or out until it's flush
with the body, and up or down as necessary to
equalize the gaps.
4. Tighten the hinge mounting bolts.
5. C
