Honda CR-V: DTC P1658: ETCS Control Relay ON Malfunction
NOTE: Before you troubleshoot. record all freeze data and any on-board snapshot, and review the general troubleshooting information.
1. Turn the ignition switch ON (II).
2. Do the ETCS TEST in the INSPECTION MENU with the HDS.
Is the RELAY circuit OK? YES-Intermittent failure, the system is OK at this time. Check for poor connections or loose terminals at the ETCS control relay and the PCM.
NO-Go to step 3.
3. Turn the ignition switch OFF.
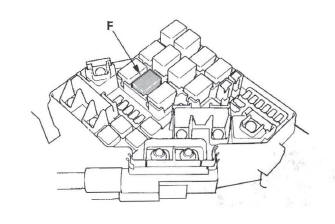
4. Remove the ETCS control relay (F) from the under-hood fuse/relay box.
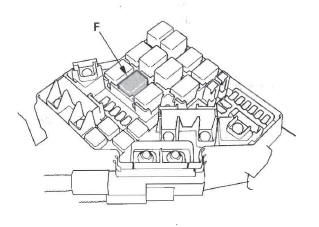
5. Test the ETCS control relay.
Is the ETGS control relay OK? YES-Go to step 6.
NO-Replace the ETCS control relay, then go to step 13.
6. Jump the SCS line with the HDS.
7. Disconnect PCM connector A (44P).
8. Check for continuity between PCM connector terminal A20 and body ground.
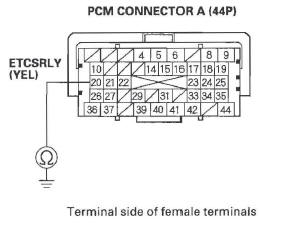
Is there continuity? YES-Repair short in the wire between the PCM (A20) and the ETCS control relay, then go to step 13.
NO-Go to step 9.
9. Disconnect PCM connector C (44P).
10. Turn the ignition switch ON (II).
11. Measure voltage between PCM connector terminal C1 and body ground.
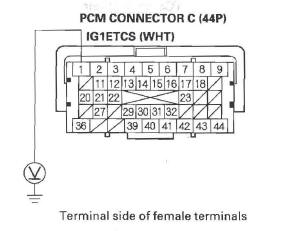
Is there battery voltage? YES-Repair short to power in the wire between the PCM (C1) and the ETCS control relay, then go to step 12.
NO-Go to step 18.
12. Turn the ignition switch OFF.
13. Reconnect all connectors.
14. Turn the ignition switch ON (II).
15. Reset the PCM with the HDS.
16. Do the PCM idle learn procedure.
17. Check for Temporary DTCs or DTCs with the HDS.
Is DTC P1658 indicated? YES-Check for poor connections or loose terminals at the ETCS control relay and the PCM, then go to step 1.
NO-Troubleshooting is complete. If any other Temporary DTCs or DTCs are indicated, go to the indicated DTC's troubleshooting.
18. Reconnect all connectors.
19. Update the PCM if it does not have the latest software, or substitute a known-good PCM.
20. Check for Temporary DTCs or DTCs with the HDS.
Is DTC P1658 indicated? YES-Check for poor connections or loose terminals at the ETCS control relay and the PCM. If the PCM was updated, substitute a known-good PCM, then recheck. If the PCM was substituted, go to step 1.
NO-If the PCM was updated, troubleshooting is complete. If the PCM was substituted, replace the original PCM. If any other Temporary DTCs or DTCs are indicated, go to the indicated DTC's troubleshooting.
DTC P1659: ETCS Control Relay OFF Malfunction
NOTE: Before you troubleshoot, record all freeze data and any on-board snapshot, and review the general troubleshooting information.
1. Turn the ignition switch ON (II).
2. Clear the DTC with the HDS.
3. Check for Temporary DTCs or DTCs with the HDS.
Is DTC P1659 indicated? YES-Go to step 4.
NO-Intermittent failure, the system is OK at this time. Check for poor connections or loose terminals at the ETCS contro.1 relay and the PCM.
4. Turn the ignition switch OFF.
5. Check the No. 21 DBW (THROTTLE ACTUATOR CONTROL) (15 A) fuse in the under-hood fuse/relay box.
Is the fuse OK? YES-Go to step 6.
NO-Go to step 17.
6. Remove the ETCS control relay (F) from the under-hood fuse/relay box.
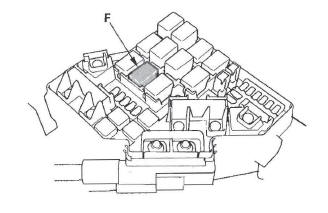
7. Test the ETCS control relay.
Is the ETCS control relay OK? YES-Go to step 8.
NO-Replace the ETCS control relay, then go to step 23.
8. Turn the ignition switch ON (II).
9. Measure voltage between ETCS control relay 4P connector terminal No.1 and body ground.
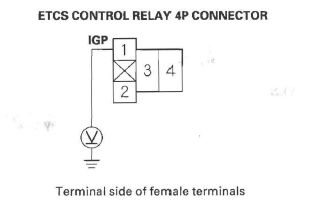
Is there battery voltage? YES-Go to step 10.
NO-Replace the under-hood fuse/relay box, then go to step 22.
10. Measure voltage between ETCS control relay 4P connector terminal No.4 and body ground.
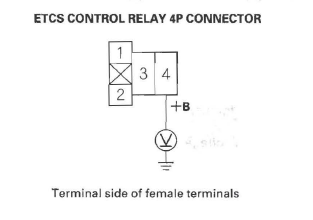
Is there battery voltage? YES-Go to step 11.
NO-Replace the under-hood fuse/relay box, then go to step 22.
11. Turn the ignition switch OFF.
12. Jump the SCS line with the HDS.
13. Disconnect PCM connector C (44P).
14. Check for continuity between ETCS control relay 4P connector terminal No.3 and PCM connector terminal C1.
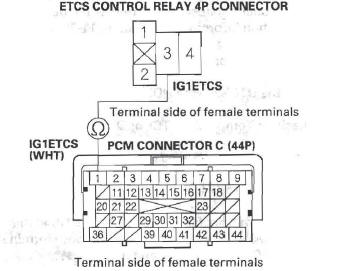
Is there continuity? YES-Go to step 15.
NO-Repair open in the wire between the PCM (C1) and the ETCS control relay, then go to step 23.
15. Disconnect PCM connector A (44P).
16. Check for continuity between ETCS control relay 4P connector terminal No.2 and PCM connector terminal A20.
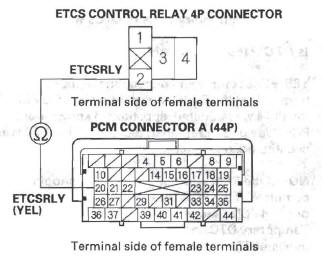
Is there continuity? YES-Go to step 28.
NO-Repair open in the wire between the PCM (A20) and the ETCS control relay, then go to step 23.
17. Remove the ETCS control relay (F) from the under-hood fuse/relay box.
18. Jump the SCS line with the HDS.
19. Disconnect PCM connector C (44P).
20. Check for continuity between PCM connector terminal C1 and body ground.
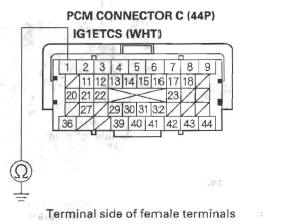
Is there continuity? YES-Repair short in the wire between the PCM (C1) and the ETCS control relay, then go to step 23.
NO-Go to step 21.
21. Check for continuity between ETCS control relay 4P connector terminal No.4 and body ground.
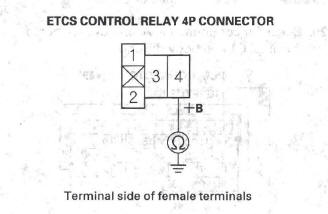
Is there continuity? YES-Replace the under-hood fuse/relay box, then go to step 23.
NO-Go to step 28.
22. Turn the ignition switch OFF.
23. Reconnect all connectors.
24. Turn the ignition switch ON (II).
25. Reset the PCM with the HDS.
26. Do the PCM idle learn procedure.
27. Check for Temporary DTCs or DTCs with the HDS.
Is DTC P1659 indicated? YES-Check for poor connections or loose terminals at the ETCS control relay and the PCM, then go to step 1.
NO-Troubleshooting is complete. If any other Temporary DTCs or DTCs are indicated, go to the indicated DTC's troubleshooting.
28. Reconnect all connectors.
29. Update the PCM if it does not have the latest software, or substitute a known-good PCM.
30. Check for Temporary DTCs or DTCs with the HDS.
Is DrC P1659 indicated? YES-Check for poor connections or loose terminals at the ETCS control relay and the PCM. If the PCM was updated, substitute a known-good PCM, then recheck. If the PCM was substituted, go to step 1.
NO-If the PCM was updated, troubleshooting is complete. If the PCM was substituted, replace the original PCM. If any other.
Temporary DTCs or DTCs are indicated, go to the indicated DTC's troubleshooting.

