Honda CR-V: Immobilizer System
Component Location Index
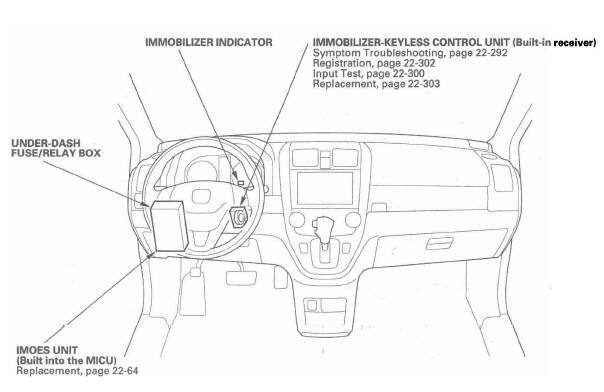
- IMMOBILIZER INDICATOR
- IMMOBILIZER-KEYLESS CONTROL UNIT (Built-in receiver)
- UNDER-DASH FUSE/RELAY BOX
- IMOES UNIT (Built into the MICU)
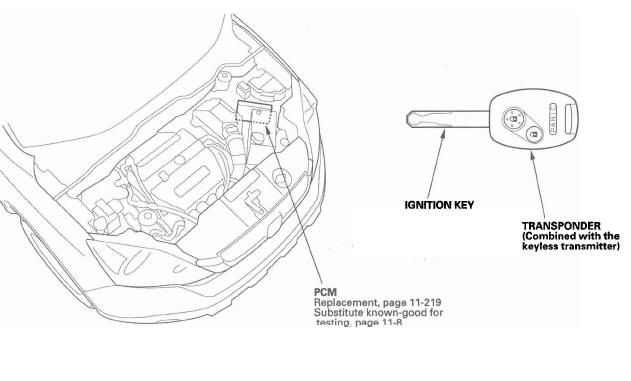
- PCM
- IGNITION KEY
- TRANSPONDER (Combined with the keyless transmitter)
System Description
The vehicle is equipped with an immobilizer system that will disable the vehicle unless a programmed ignition key is used.
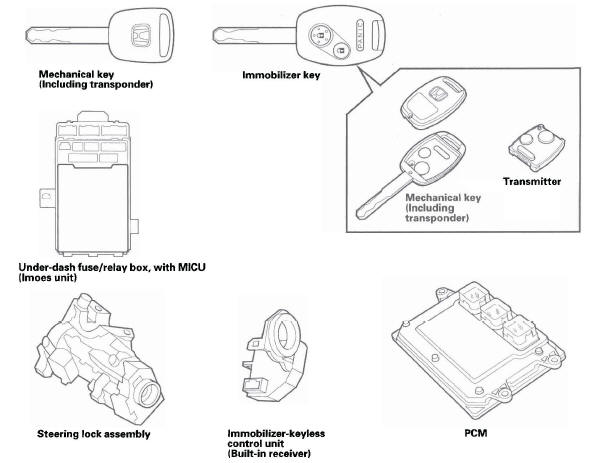
This system consists of a transponder combined with a keyless transmitter, an immobilizer-keyless control unit, the MICU (has built-in imoes unit), an immobilizer indicator, and the PCM.
When the immobilizer key (programmed by the HDS) is inserted into the ignition switch and turned to the ON (II) position, the immobilizer-keyless control unit sends power to the transponder in the ignition key. The transponder then sends a coded signal back to the immobilizer-keyless control unit which then sends a coded signal to the PCM and the MICU (imoes unit).
The PCM and MICU (imoes unit) identify this coded signal, then voltage is supplied to the fuel pump.
If the wrong key has been used or the code was not received or recognized by the unit, the indicator will quickly flash once, then it will blink until the ignition switch is turned OFF. When the ignition switch is turned to the LOCK (0) position, the immobilizer system indicator does not illuminate. This is unique to the type 6 system.
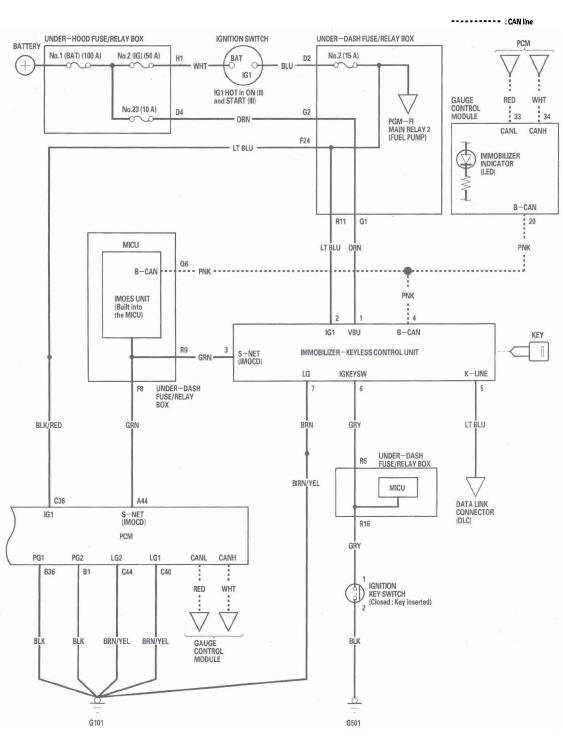
Circuit Diagram
DTC Troubleshooting
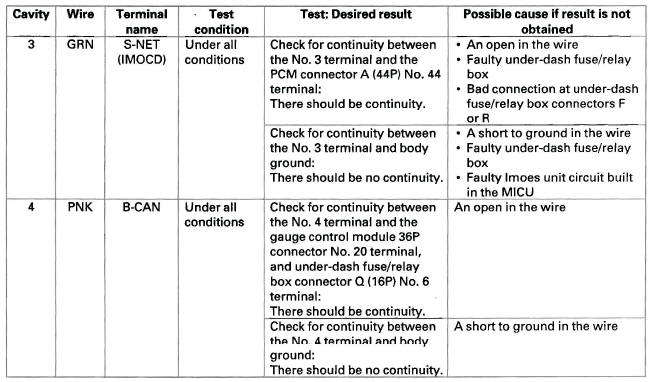
DTC B1905: Immobilizer-Keyless Control Unit Lost Communication with MICU (DRLOCKSW Message)
NOTE: If you are troubleshooting multiple DTCs, be sure to follow the instructions in B-CAN System Diagnosis Test Mode A/
1. Clear the DTCs with the HDS.
2. Turn the ignition switch OFF, and then back ON (II).
3. Wait for 6 seconds or more.
4. Check for DTCs with the HDS.
Is DTC B1905 indicated? YES-Go to step 5.
NO-Intermittent failure, the system is OK at this time. Check for loose or poor connections between the immobilizer-keyless control unit and the MICU.
5. Check for DTCs with the HDS.
Are DTCs B1155, B1156, B1157, B1159, B1160, and B1188 all indicated with DTC B1905 at the same time? YES-Faulty MICU; replace the under-dash fuse/ relay box.
NO-Replace the immobilizer-keyless control unit.
DTC B1906: Immobilizer-Keyless Control Unit Lost Communication with Gauge Control Module (A/T Message)
NOTE: If you are troubleshooting multiple DTCs, be sure to follow the instructions in B-CAN System Diagnosis Test Mode A.
1. Clear the DTCs with the HDS.
2. Turn the ignition switch OFF, and then back ON (II).
3. Wait for 6 seconds or more.
4. Check for DTCs with the HDS.
Is DTC B1906 indicated? YES-Go to step 5.
NO-Intermittent failure, the system is OK at this time. Check for loose or poor connections between the gauge control module and the immobilizer-keyless control unit.
5. Select the BODY ELECTRICAL system select menu, then enter the UNIT INFORMATION menu.
6. Check the condition of the gauge control module from the CONNECTED UNIT.
Is NOT AVAILABLE indicated? YES-Go to step 7.
NO-Replace the gauge control module.
7. Turn the ignition switch OFF.
8. Disconnect the gauge control module 36P connector.
9. Turn the ignition switch ON (II).
10. Measure voltage between the gauge control module 36P connector No. 18 and No. 36 terminals and body ground individually.
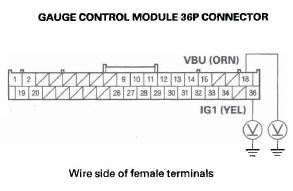
Is there battery voltage? YES-Go to step 11.
NO-Check the No. 23 (10 A) fuse in the under-hood fuse/relay box and the No. 10 (7.5 A) fuse in the under-dash fuse/relay box. If the fuse is blown, replace the fuse and recheck the DTCs. If the fuses are OK, repair an open in the wire between the under-dash fuse/relay box and the gauge control module.
11. Turn the ignition switch OFF.
12. Check for continuity between the gauge control module 36P connector No. 15 and No. 19 terminals and body ground individually.
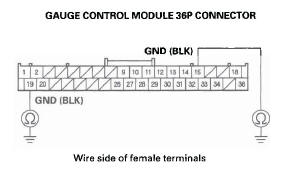
Is there continuity? YES-Go to step 13.
NO- Repair an open in the wire or poor ground (G501).
13. Disconnect the under-dash fuse/relay box connector Q (16P).
14. Check for continuity between the under-dash fuse/ relay box connector Q (16P) No.6 terminal and the gauge control module 36P connector No. 20 terminal.
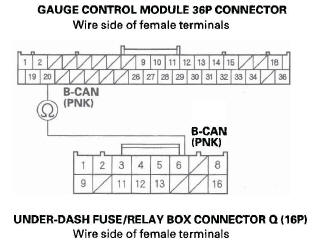
Is there continuity? YES- Replace the gauge control module.
NO-Repair an open in the wire between the MICU and the gauge control module.
Symptom Troubleshooting Information
General Check Before Troubleshooting
Before troubleshooting the immobilizer system, check the following general items and solve any if applicable:
- The battery is low; charge the battery fully, then troubleshoot the immobilizer system.
- The ignition key is not a genuine Honda part; use the Honda-approved key blank, register the key, then troubleshoot the immobilizer system.
- A key ring, keys, or a key case is used; remove the key from it, and troubleshoot the immobilizer system with a key only.
- An aftermarket electrical part is attached; remove it, then troubleshoot the immobilizer system.
Symptom Troubleshooting Using the Immobilizer Indicator Lighting Pattern
The pattern of the immobilizer indicator can help troubleshoot the condition of the immobilizer system. Following are descriptions of the four possible patterns.
Normal operation
If the immobilizer code is identified, the immobilizer indicator quickly flashes once when the ignition switch is turned ON (II).
The immobilizer indicator does not come on when the ignition switch is turned OFF.
Immobilizer code is not identified
If the immobilizer code is not identified, the immobilizer indicator will quickly flash once, then will blink until the ignition switch is turned OFF. When the ignition switch is turned OFF, the indicator will blink ten times, then go OFF.
The state of the immobilizer key registration and the IMOCD line can be checked by doing a SYSTEM CHECK with the HDS.
Immobilizer indicator does not come on
If the immobilizer indicator does not come on after turning the ignition switch ON (11), an open or short in the F-CAN lines between the PCM and the gauge control module. Watch the malfunction indicator lamp (MIL). If the MIL stays on, go to the PGM-FI system troubleshooting.
Immobilizer indicator does not go off
If the immobilizer indicator does not go off after turning the ignition switch ON (II), do the gauge control module self-diagnostic function. If the indicator drive circuit is OK, do the SYSTEM CHECK with the HDS.
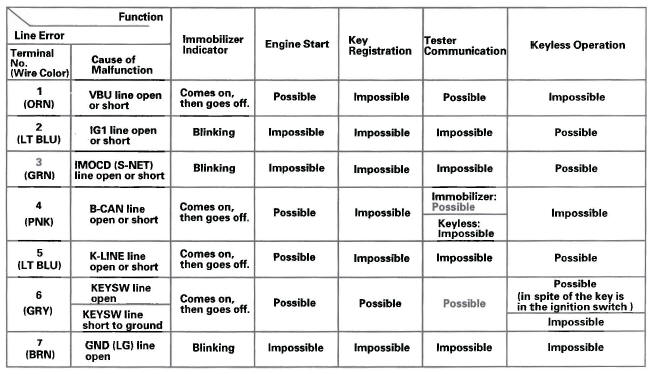
Symptom Troubleshooting Using Malfunctioning Circuit Functions
If a malfunction occurs in the immobilizer circuit, use the table to cross-reference the malfunction criteria to the line(s) that should be checked table:
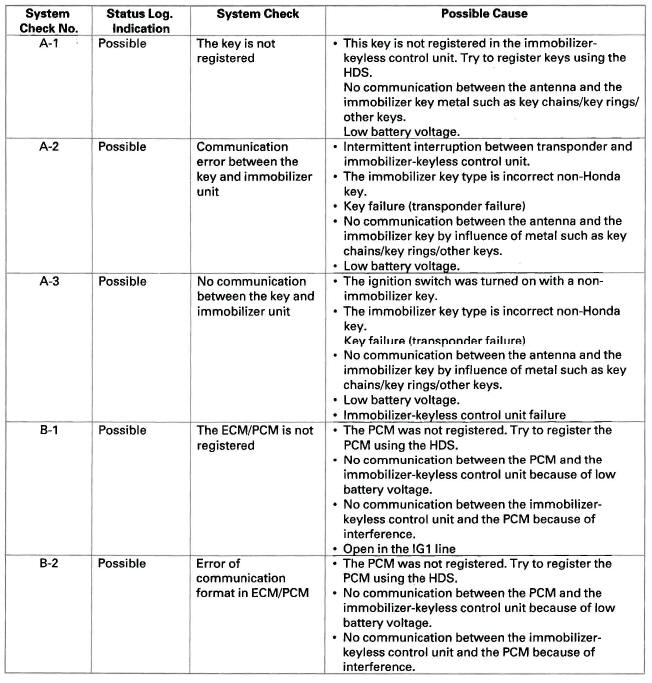
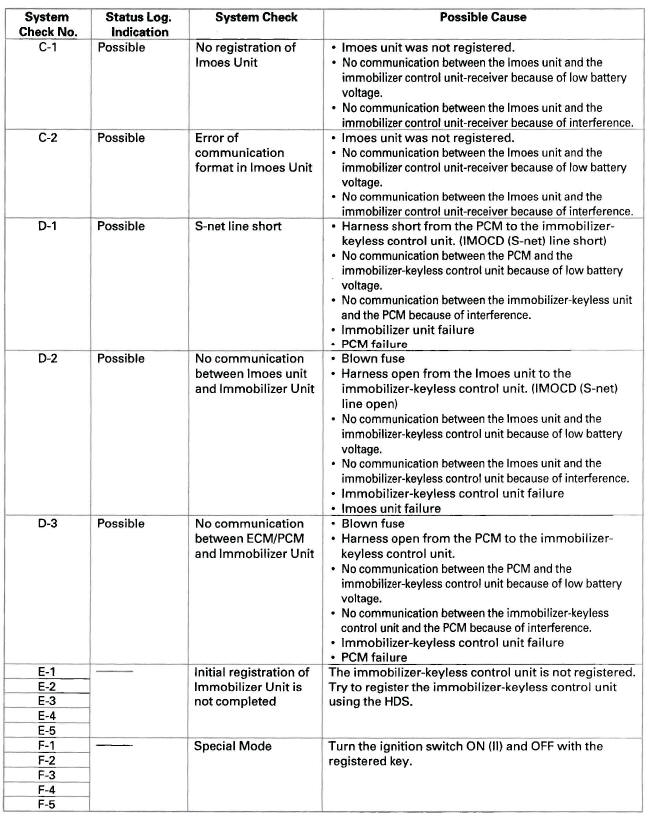
System Check and Status Log
NOTE: The HDS can be used to:
- Check the state of the immobilizer key registration and the IMOCD line by doing a SYSTEM CHECK.
- Check the number of times the immobilizer control unit-receiver doesn't permit the engine to run by checking the STATUS LOG.
1. Connect the HDS to the data link connector, then turn the ignition switch ON (II) and follow the prompts to the MAIN MENU.
NOTE: If the HDS does not communicate with the vehicle, go to the DLC circuit troubleshooting.
2. At the MAIN MENU, enter IMMOBILIZER, then select the IMMOBILIZER SETUP.
3. Do the SYSTEM CHECK. If there is a system check number, do the troubleshooting for the item indicated.
4. Check the status log using the HDS. Troubleshoot the line with the highest counts. If all the lines are "0" zero, the problem may not be caused by the immobilizer system, check for ignition or fuel problems.
NOTE: Once repaired, clear the status log by removing the No. 23 (10 A) fuse in the under-hood fuse/relay box or disconnecting the battery.
Symptom Troubleshooting
1. Troubleshoot the immobilizer system by the order of the priority shown:
Immobilizer indicator blinks
NOTE: Before troubleshooting, check the items listed in "General Check before Troubleshooting".
1. Turn the ignition switch OFF.
2. Connect the HDS, then turn the ignition switch ON (II).
3. From the main menu, enter IMMOBILIZER, then select the IMMOBILIZER SETUP.
4. Select the SYSTEM CHECK.
Is the SYSTEM CHECK indicated? YES-Troubleshoot the immobilizer system according to the result of the SYSTEM CHECK.
NO-Go to step 5.
5. Turn the ignition switch OFF.
6. Enter the vehicle, and remove the ignition key from the ignition switch, then close the all doors.
7. Operate the keyless transmitter LOCK and UNLOCK several times in the vehicle.
Do the door lock actuators work normally? YES-Go to step 8.
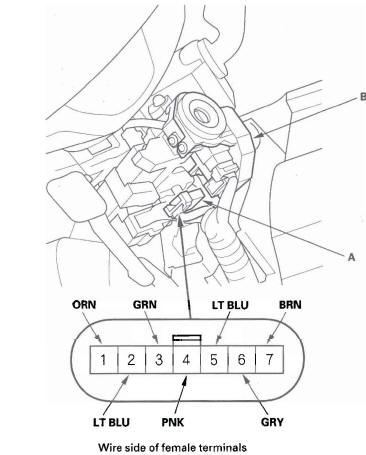
NO-Check for a poor ground and/or an open in the wire between the immobilizer-keyless control unit 7P connector No.7 terminal and body ground (G101).
8. Turn the ignition switch ON (II).
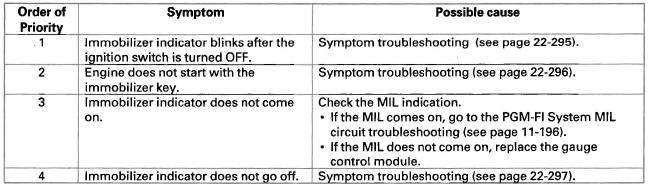
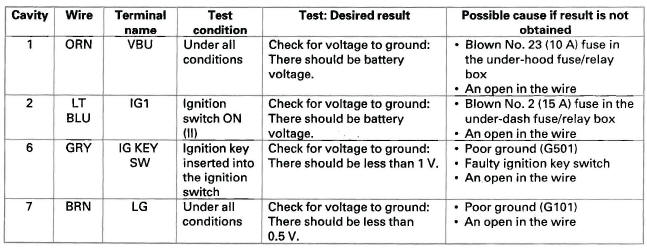
9. Back probe and measure voltage between the immobilizer-keyless control unit 7P connector No.2 terminal and body ground.
Is there battery voltage? YES-Go to step 10.
NO-Check for a blown No.2 (15 A) fuse in the under-dash fuse/relay box. If the fuse is OK, repair open in the LT BLU wire between the under-dash fuse-relay box and the immobilizer-keyless control unit.
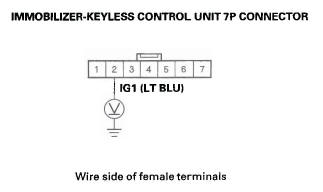
10. Back probe and measure voltage between the immobilizer-keyless control unit 7P connector No.7 terminal and body ground.
Is there 0.5 V or more? YES-Repair poor connection or open between the immobilizer-keyless control unit 7P connector No.7 terminal and G101.
NO-Replace the immobilizer-keyless control unit.
Engine does not start with the immobilizer key
NOTE: Before troubleshooting, check the items listed in "General Check before Troubleshooting".
1. Turn the ignition switch OFF.
2. Turn the ignition switch ON (II), and check the immobilizer indicator.
Does the indicator quickly flash once? YES-Go to step 3.
NO-Go to step 6.
3. Turn the ignition switch to START (III).
Does the starter motor run? YES-Go to step 4.
NO-Go to Starting System, and check the starter motor.
4. Try to start the engine with the immobilizer key.
Does the engine start? YES-Go to step 5.
NO-Go to the PGM-FI System Symptom Troubleshooting.
5. Wait for a few minutes with the engine running.
Does the engine stop? YES-Go to the PGM-FI System Symptom Troubleshooting.
NO-The system is OK at this time.
6. Check to see if the immobilizer indicator comes on and blinks.
Does the indicator blink? YES-Go to step 12.
NO-Go to step 7.
7. Disconnect the 7P connector from the immobilizer-keyless control unit. Wait for a few minutes with the engine running.
8. Check to see if the immobilizer indicator goes off.
Does the indicator go off? YES-Substitute a known-good immobilizer-keyless control unit and/or PCM, then register it and recheck.
NO-Go to step 9.
9. Turn the ignition switch OFF.
10. Disconnect the gauge control module 36P connector.
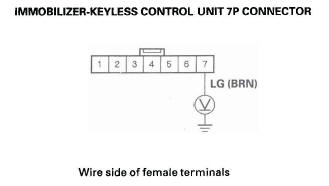
11. Check for continuity between the immobilizer-keyless control unit 7P connector No.4 terminal and body ground.
Is there continuity? YES- Repair a short to ground in the PNK wire.
NO-Faulty immobilizer indicator; replace the gauge control module.
12. Turn the ignition switch OFF.
13. Jump the SCS with the HDS.
14. Disconnect the PCM connector A (44P).
15. Check for continuity between the immobilizer-keyless control unit 7P connector No.3 terminal and body ground.
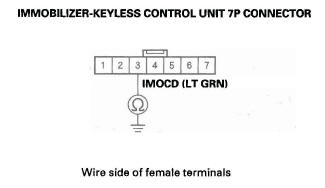
Is there continuity? YES-Repair a short to ground in the LT GRN wire.
NO-Substitute a known-good immobilizer-keyless control unit and/or PCM, then register it and recheck.
Immobilizer indicator does not go off
1. Turn the ignition switch OFF.
2. Connect the HDS to the data link connector.
3. Turn the ignition switch ON (II).
4. Enter the IMMOBILIZER, then select the IMMOBILIZER INFORMATION.
5. Do the SYSTEM CHECK with the HDS.
Is N-1 OK indicated? YES-Replace the gauge control module.
NO-Substitute a known-good immobilizer-keyless control unit, then register it and recheck. If the symptom goes away, replace the original immobilizer-keyless control unit.
System Check
1. Connect the HDS to the data link connector.
2. Turn the ignition switch ON (II).
3. Monitor the System Check in the Immobilizer Info with the HDS.
4. If the HDS displays the "Normal", the immobilizer system is OK. If the HDS displays any other messages, check as follows:
Immobilizer-Keyless Control Unit Input Test
NOTE: Before testing, troubleshoot the B-CAN System Diagnosis Test Mode A, and check the No. 23 (10 A) fuse in the under-hood fuse/relay box and the No. 10 (7.5 A) fuse in the under-dash fuse/relay box.
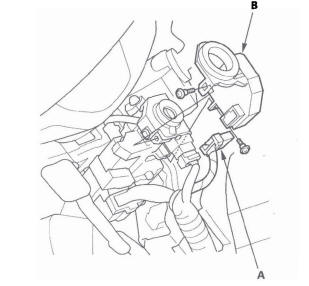
1. Remove the driver's dashboard lower cover.
2. Remove the steering column covers.
3. Disconnect the7P connector (A) from the immobilizer-keyless control unit (B).
4. Inspect the connector and socket terminals to be sure they are all making good contact.
- If the terminals are bent, loose or corroded, repair them as necessary, and recheck the system.
- If the terminals look OK, go to step 5.
5. With the connector still disconnected, make these input tests at the connector.
- If any test indicates a problem, find and correct the cause, then recheck the system.
- If all the input tests prove OK, go to step 6.
6. Reconnect the connector, and make these input tests at the connector.
- If any test indicates a problem, find and correct the cause, then recheck the system.
- If all the input tests prove OK, replace the immobilizer-keyless control unit.
NOTE: After replacing the immobilizer-keyless control unit, do the immobilizer registration.
Immobilizer Key Registration
NOTE:
- The HDS is required for registration of the immobilizer keys.
- Programming the immobilizer also programs the keyless transmitter.
- Check for aftermarket electrical equipment that can cause problems with transponder operation.
- The immobilizer control unit-receiver can store up to six immobilizer Keys.
Add one new key/Keyless transmitter
1. Have a registered key, a new immobilizer key, and the first password from the in system.
2. Connect the HDS to the data link connector.
3. Turn the ignition switch ON (II).
4. Select "IMMOBILIZER" from the "SYSTEM SELECT" menu.
5. Select "Add and Delete keys", then "Add 1 key".
6. Do the registration according to the instructions on the HDS screen.
7. Check if the engine can be started by the newly registered key.
Add and Delete keys/Keyless transmitters, Then select Delete or Add keys
1. Have all registered keys, all new keys, and the first password.
2. Connect the HDS to the data link connector.
3. Turn the ignition switch ON (II).
4. Select "IMMOBILIZER" from the "SYSTEM SELECT" menu.
5. Select "Add and Delete Keys", or "Delete or Add Multiple Keys".
6. Do the registration according to the instruction of HDS screen.
7. Check if the engine can be started by all the registered keys.
All keys are lost
1. Prepare all new keys and have the immobilizer PCM code.
2. Connect the HDS to the data link connector.
3. Turn the ignition switch ON (II).
4. Select "IMMOBILIZER" from the "SYSTEM SELECT" menu.
5. Select "Add and Delete keys", then "ALL KEYS LOST".
6. Do the registration according to the instruction of HDS screen.
7. Check if the engine can be started by all the registered keys.
Immobilizer-Keyless Control Unit Replacement
1. Remove the driver's dashboard lower cover.
2. Remove the steering column covers.
3. Disconnect the 7P connector (A) from the immobilizer-keyless control unit (B).
Body Electrical
Special Tools
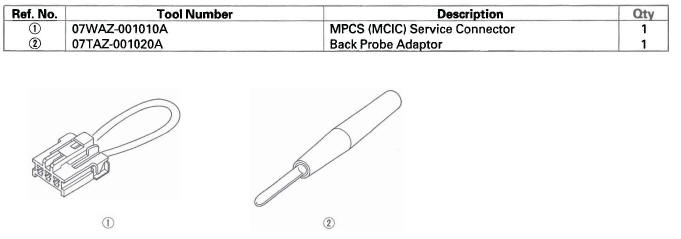
- MPCS (MCIC) Service Connector
- Back Probe Adaptor
READ NEXT:
 Audio System
Component Location Index
LEFT REAR DOOR SPEAKER
AUDIO REMOTE SWITCH (Except LX model)
LEFT TWEETER (Except LX model)
DRIVER'S DOOR SPEAKER
AUDIO UNIT
NAVIGATION UNIT
RIGHT TWEETER
(Except LX
System Description
Overview
The audio unit acts as the "processor" for all audio functions. Select audio
functions from the audio unit, the audio
remote (on the steering wheel), or by using the navigation voice control
SEE MORE:
A/C Condenser Fan High Speed Circuit Troubleshooting
NOTE:
Do not use this troubleshooting procedure if the
radiator fan and/or A/C compressor is inoperative.
Refer to the symptom troubleshooting index.
Before doing symptom troubleshooting, check for
powertrain DTCs.
1. Check the No.6 (20 A) and No. 15 (7.5 A) fuses in
the under-hood fuse/rela
Customer Service Information
Honda dealership personnel are
trained professionals. They should
be able to answer all your questions.
If you encounter a problem that your
dealership does not solve to your
satisfaction, please discuss it with
the dealership’s management. The
service manager or general manager
can
