Honda CR-V: Door Lock
Door Lock Actuator Test
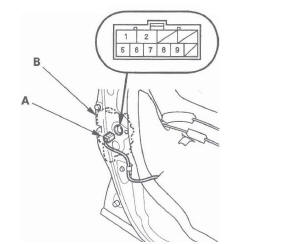
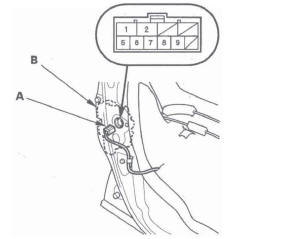
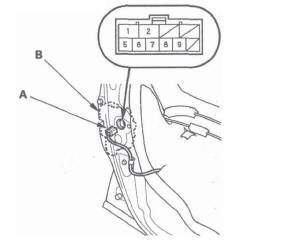
Driver's Door and Left Rear Door
1. Remove the door panel.
- Front
- Rear
2. Disconnect the 10P connector (A) from the actuator (B).
NOTE: The illustration shows the driver's door.
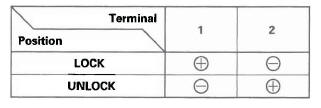
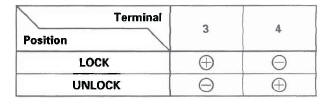
3. Check the actuator operation by connecting power and ground according to the table. To prevent damage to the actuator, apply battery voltage only momentarily.
4. If the actuator does not operate as specified, replace it.
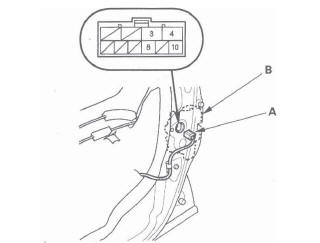
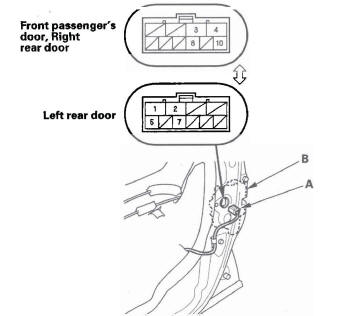
Front Passenger's Door and Right Rear Door
1. Remove the door panel.
- Front
- Rear
2. Disconnect the 1 OP connector (A) from the actuator (B).
NOTE: The illustration shows the front passenger's door.
3. Check the actuator operation by connecting power and ground according to the table. To prevent damage to the actuator, apply battery voltage only momentarily.
4. If the actuator does not operate as specified, replace it.
Door Lock Knob Switch Test
Driver's Door
1. Remove the driver's door panel.
2. Disconnect the 10P connector (A) from the actuator (B).
3. Check for continuity between the terminals.
- There should be continuity between the No.6 and No.5 terminals when the door lock knob switch is in the LOCK position and no continuity when the switch is in the UNLOCK position.
- There should be continuity between the No.7 and No.5 terminals when the door lock knob switch is in the UNLOCK position and no continuity when the switch is in the LOCK position.
4. If the continuity is not as specified, replace the door lock actuator.
Passenger Doors (With Security)
1. Remove the passenger's door panel.
- Front
- Rear
2. Disconnect the 10P connector (A) from the actuator (B).
3. Check for continuity between the terminals.
There should be continuity between the No.8 [No.7] and No. 10 [No.5] terminals when the door lock knob switch in the UNLOCK position and no continuity when the switch is in the LOCK position.
[ ] : Left rear door
4. If the continuity is not specified, replace the door lock actuator.
Door Lock Switch Test
Driver's Door
NOTE: The driver's door lock switch is built into the power window master switch.
1. Remove the power window master switch and disconnect its connector.
2. Check for continuity between the power window master switch 22P connector terminals.
- There should be continuity between the No. 17 and No. 12 terminals when the door lock switch is in the LOCK position.
- There should be no continuity between the No. 17 and No. 12 terminals when the door lock switch is in the UNLOCK position.
- There should be continuity between the No. 19 and No. 12 terminals when the door lock switch is in the UNLOCK position.
- There should be no continuity between the No. 19 and No. 12 terminals when the door lock switch is in the LOCK position.
3. If the continuity is not as specified, replace the power window master switch.
Front Passenger's Door
NOTE: The front passenger's door lock switch is built into the front passenger's power window switch.
1. Remove the front passenger's power window switch.
NOTE: The illustration shows the front passenger's door.
2. Check for continuity between the front passenger's power window switch 8P connector terminals.
- There should be continuity between the No.1 and No.2 terminals when the door lock switch is in the LOCK position.
- There should be no continuity between the No.1 and No.2 terminals when the door lock switch is in the UNLOCK position.
- There should be continuity between the No.2 and No.6 terminals when the door lock switch is in the UNLOCK position.
- There should be no continuity between the No.2 and No.6 terminals when the door lock switch is in the LOCK position.
3. If the continuity is not as specified, replace the front passenger's power window switch.
Door Key Cylinder Switch Test
1. Remove the driver's door panel.
2. Disconnect the 10P connector (A) from the key cylinder switch (B).
3. Check for continuity between the terminals.
- There should be continuity between the No.9 and No.5 terminals when the door key cylinder switch is in LOCK position. (With security)
- There should be no continuity between the No.9
and No.5 terminals when the door key cylinder
switch is in the neutral or UNLOCK position.
(With security)
- There should be continuity between the No.8 and No.5 terminals when the door key cylinder switch is in UNLOCK position.
- There should be no continuity between the No.8 and No.5 terminals when the door key cylinder switch is in the neutral or LOCK position.
4. If the continuity is not as specified, replace the door latch/actuator assembly.
Hood Switch Test
1. Open the hood.
2. Disconnect the 2P connector from the hood switch.
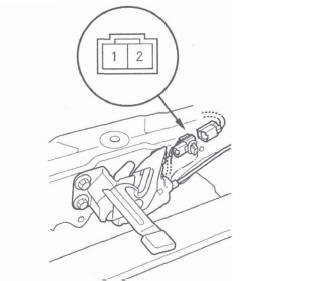
3. Check for continuity between the terminals.
- There should be continuity between the No.1 and No.2 terminals when the hood is opened (latch released).
- There should be no continuity between the No. 1 and No.2 terminals when the hood is closed (latch pushed down).
4. If the continuity is not as specified, replace the hood latch assembly.
Tailgate Release Actuator Test
1. Open the tailgate, and remove the tailgate trim.
2. Disconnect the 2P connector from the tailgate release actuator.
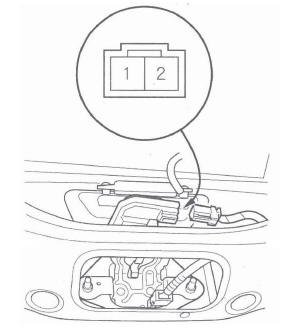
3. Check the actuator operation by connecting power to the No.2 terminal and ground to the No.1 terminal momentarily. The actuator should work.
4. If the actuator does not work, replace the tailgate latch switch/release actuator assembly.
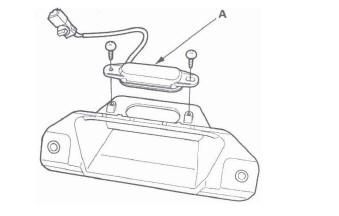
Tailgate Outer Handle Switch Test/Replacement
1. Open the tailgate, and remove the tailgate trim.
2. Disconnect the 2P connector from the tailgate outer handle switch.
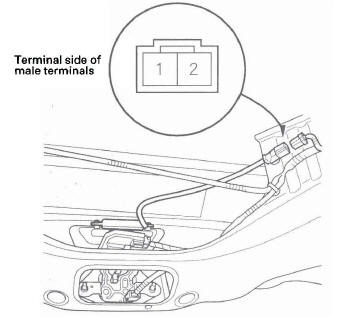
3. Check for continuity between the No.1 terminal and No.2 terminals.
- There should be continuity with the outer handle lever pulled.
- There should be no continuity with the outer handle lever released.
4. If the continuity is not as specified, remove the outer handle, then replace the tailgate outer handle switch (A).
Transmitter Test
NOTE:
- If the doors unlock or lock with the transmitter, but the LED on the transmitter does not come on, the LED is faulty; replace the transmitter.
- If any door is open, you cannot lock the doors with the transmitter.
- If you unlocked the doors with the transmitter, but do not open any of the doors within 30 seconds, the doors relock automatically.
- The doors do not lock or unlock with the transmitter if the ignition key is inserted in the ignition switch.
With HDS
1. Press the lock or unlock button five or six times to reset the transmitter.
- If the locks work, the transmitter is OK.
- If any of the transmitter buttons does not work, replace the transmitter, then problem and register the transmitter.
- If the locks don't work, go to step 2.
2. Connect the HDS to the data link connector.
3. Select KEYLESS from the BODY ELECTRICAL menu, then select INSPECTION, then the KEYLESS CHECK.
4. Press the lock, unlock, or panic button and check the response on the screen of the HDS.
NOTE: The door lock actuators mayor may not cycle when receiving input from the transmitter.
- If KEYLESS ENTRY TRANSMITTER CODE IS RECEIVED is indicated, the transmitter is OK.
- If DIFFERENT KEYLESS ENTRY TRANSMITTER
CODE IS RECEIVED is indicated, the transmitter is
not registered to the vehicle, if necessary,
reprogram and register the transmitter.
If KEYLESS ENTRY TRANSMITTER CODE IS NOT RECEIVED is indicated, go to step 5.
5. Open the transmitter, and check for water damage.
- If you find any water damage, replace the transmitter, then reprogram and register the transmitter.
- If there is no water damage, go to step 6.
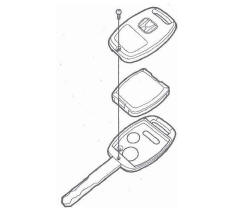
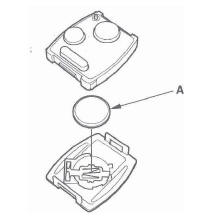
6. Replace the transmitter battery (A) with a new one, and press the lock or unlock button and check the response on the screen of the HDS.
- If KEYLESS ENTRY TRANSMITTER CODE IS RECEIVED is indicated, the transmitter is OK.
- If KEYLESS ENTRY TRANSMITTER CODE IS NOT RECEIVED is indicated, go to step 7.
7. Use a different known-good keyless transmitter assembly and repeat steps 3 and 4.
NOTE: The keyless transmitter does not need to be programmed to the vehicle for this test.
- If (DIFFERENT) KEYLESS ENTRY TRANSMITTER CODE IS RECEIVED is indicated, replace the keyless transmitter and do the immobilizer system registration.
- If KEYLESS ENTRY TRANSMITTER CODE IS NOT RECEIVED is indicated, the immobilizer-keyless control unit is faulty, replace it and do the immobilizer system registration.
NOTE: As the keyless transmitter is combined with the immobilizer transponder, so when the transponder is registered by the HDS, the keyless transmitter programming is completed automatically.
Without HDS
1. Start the engine.
- If the engine does not start, go to the immobilizer system troubleshooting.
- If the engine starts, go to step 2.
2. Press the lock or unlock button five or six times to reset the transmitter.
- If the locks work, the transmitter is OK.
- If the locks don't work, go to step 3.
3. Open the transmitter, and check for water damage.
- If you find any water damage, replace the transmitter.
- If there is no water damage, go to step 4.

4. Replace the transmitter battery (A) with a new one, and try to lock and unlock the doors with the transmitter by pressing the lock or unlock button five or six times.
- If the doors lock and unlock, the transmitter is OK.
- If the doors don't lock and unlock, go to step 5.

5. Reprogram and register the transmitter, then try to lock and unlock the doors.
- If the doors lock and unlock, the transmitter is OK.
- If the doors don't lock and unlock, substitute a known-good transmitter and recheck. If still not operating, replace the immobilizer-keyless control unit.
READ NEXT:
 Horns
Horns
Component Location Index
HORN
HORN SWITCH
HORN RELAY CIRCUIT
(Built into the MICU)
CABLE REEL
UNDER-DASH FUSE/RELAY BOX
Circuit Diagram
Horn Switch Test
1. Remove the steering column c
Exterior Lights
Component Location Index
DAYTIME RUNNING LIGHTS CIRCUIT
HEADLIGHTS
FRONT SIDE MARKER/PARKING/
TURN SIGNAL LIGHTS
HIGH MOUNT BRAKE LIGHT
LICENSE PLATE LIGHT
TAILLIGHT and BRAKE LIGHT
REA
System Description
Headlights System Description
The headlight system is composed of the MICU, the headlight and
dimmer/flash-to-pass switches (inside the
combination light switch), the left and right headlights, and t
SEE MORE:
Cleaning the Seat Belts
Dirt build-up in the loops of the seat
belt anchors can cause the belts to
retract slowly. Wipe the insides of
the loops with a clean cloth
dampened in mild soap and warm
water or isopropyl alcohol.
If your seat belts get dirty, use a soft
brush with a mixture of mild soap
and warm
Symptom Troubleshooting
VSA activation indicator does not go off, and
no DTCs are stored
1. Turn the ignition switch ON (II), and watch the VSA
activation indicator.
Does VSA activation indicator go off within 2 seconds? YES-The system is OK at
this time.
NO-Go to step 2.
2. Turn the ignition switch OFF.
3. Disconnect
