Honda CR-V: Horns
Component Location Index
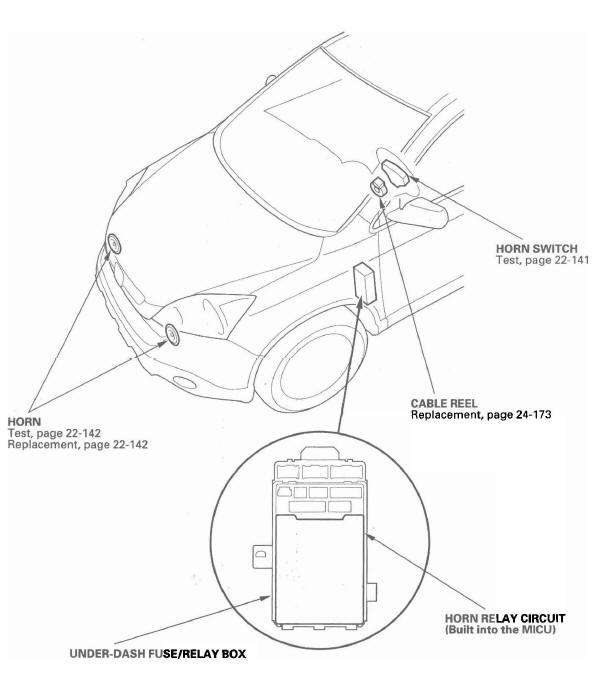
- HORN
- HORN SWITCH
- HORN RELAY CIRCUIT (Built into the MICU)
- CABLE REEL
- UNDER-DASH FUSE/RELAY BOX
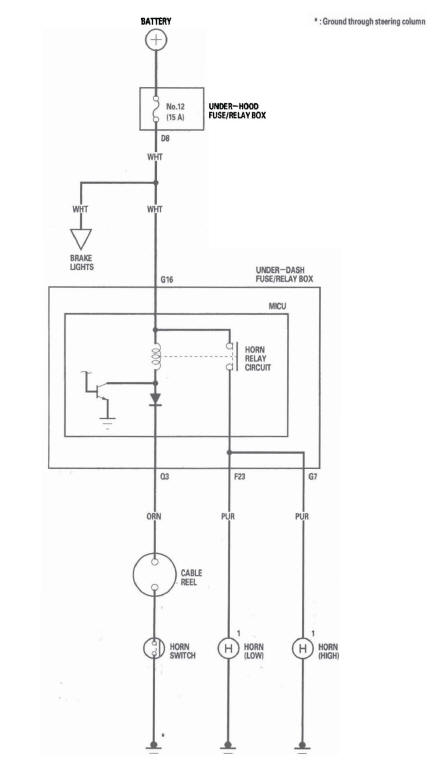
Circuit Diagram
Horn Switch Test
1. Remove the steering column covers.
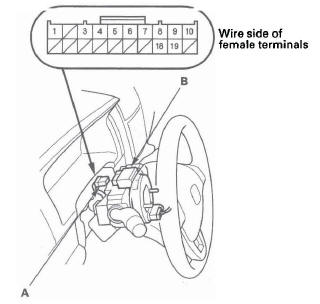
2. Disconnect the dashboard wire harness 20P connector (A) from the cable reel (B).
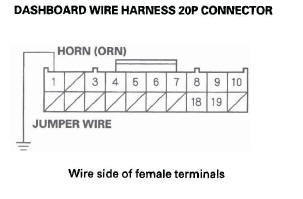
3. Using a jumper wire, connect the dashboard wire harness 20P connector No.1 terminal to body ground. The horns should sound.
- If the horns sound, go to step 4.
- If the horns do not sound, check these items:
- No. 12 (15 A) fuse in the under-hood fuse/relay box.
- Horn.
- MICU.
- An open in the wire.
4. Reconnect the dashboard wire harness 20P connector (A) to the cable reel (B).
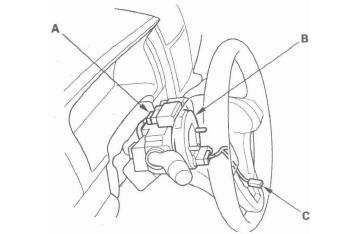
5. Remove the driver's airbag assembly, and disconnect the horn switch 1P positive terminal (C) from the driver's airbag.
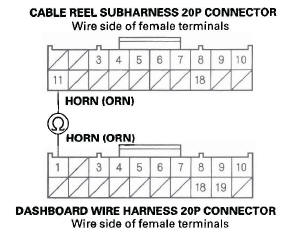
6. Check for continuity between the dashboard wire harness 20P connector No.1 terminal and the cable reel subharness 20P connector No. 11 terminal.
- If there is continuity, go to step 7.
- If there is no continuity, replace the cable reel.
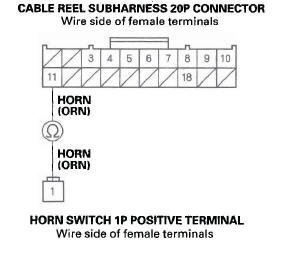
7. Check for continuity between the cable reel subharness 20P connector No. 11 terminal and the horn switch 1P positive terminal.
- If there is continuity, check the installation of the
driver's airbag assembly and the steering wheel.
If OK, replace the driver's airbag assembly.
- If there is no continuity, repair an open in the wire.
Horn Test/Replacement
1. Remove the front bumper.
2. Disconnect the 1P connector (A) from the horn (B).
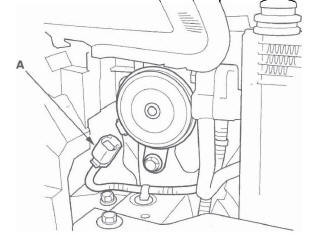
3. Test the horn by connecting battery power to the terminal (A) and grounding the bracket (B). The horn should sound.
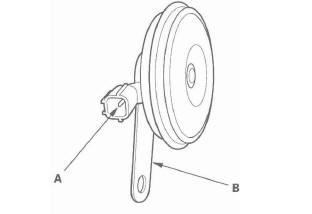
4. If it fails to sound, replace it.
READ NEXT:
 Exterior Lights
Component Location Index
DAYTIME RUNNING LIGHTS CIRCUIT
HEADLIGHTS
FRONT SIDE MARKER/PARKING/
TURN SIGNAL LIGHTS
HIGH MOUNT BRAKE LIGHT
LICENSE PLATE LIGHT
TAILLIGHT and BRAKE LIGHT
REA
System Description
Headlights System Description
The headlight system is composed of the MICU, the headlight and
dimmer/flash-to-pass switches (inside the
combination light switch), the left and right headlights, and t
DTC Troubleshooting
DTC B1078: Daytime Running Lights Signal
Error (Canada)
DTC B1079: Daytime Running Lights Signal
Error (USA)
NOTE: If you are troubleshooting multiple DTCs, be
sure to follow the instructions in B-CAN
SEE MORE:
Opening and Closing the Hood
1. Park the vehicle, and set the
parking brake. Pull the hood
release handle located under the
lower left corner of the dashboard.
The hood will pop up slightly.
2. Reach in between the hood and
the front grille with your fingers.
The hood latch handle is above
the ‘‘H’’ log
Adjusting the Sound
Press the SOUND (TUNE) knob
repeatedly to display the BASS,
TREBLE, FADER, BALANCE, and
SVC (speed-sensitive volume
compensation) settings.
BASS - Adjusts the bass.
TREBLE - Adjusts the treble.
FADER - Adjusts the front-to-back strength of the sound.
BALANCE - Adjusts the
side-toside s
