Honda CR-V: Component Replacement/Inspection After Deployment
NOTE:
- Before doing any SRS repairs, use the HDS SRS menu method to check for DTCs; refer to the DTC Troubleshooting Index for the less obvious deployed parts (seat belt tensioners, front impact sensors, side airbag sensors, etc.)
- Do not replace the ODS unit unless it is physically damaged or a specific fault was found during DTC troubleshooting.
After a collision where the seat belt tensioners deployed, replace these items:"
- SRS unit
- Seat belt tensioners
- Seat belt buckle tensioners
- Front impact sensors
After a collision where the front airbag(s) deployed, replace these items:
- SRS unit
- Deployed airbag(s)
- Seat belt tensioners
- Seat belt buckle tensioners
- Front impact sensors
After a collision where the side airbag(s) deployed, replace these items:
- SRS unit
- Deployed side airbag(s)
- Side impact sensor(s) (first) for the side(s) that deployed
- Side impact sensor(s) (second) for the side(s) that deployed
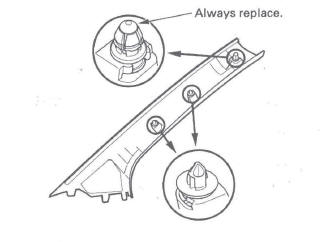
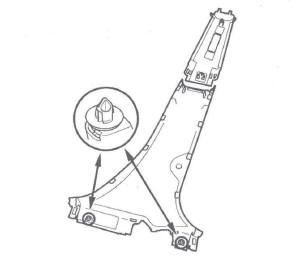
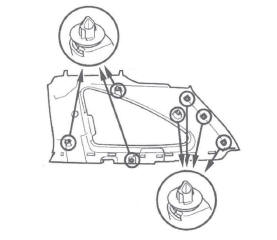
- B-pillar lower trim
- Complete seat frame
- All related trim clips
After a collision1where the side curtain airbag(s).
deployed, replace these items:
- SRS unit
- Deployed side curtain airbag(s)
- Seat belt tensioner(s) for the side(s) that deployed
- Seat belt buckle tensioner(s) for the side(s) that deployed'
- Side impact sensor(s) (first) for the side(s) that deployed
- Side impact sensor(s) (second) for the side(s) that deployed
- Roof trim
- A-pillar trim
- B-pillar upper trim
- B-pillar lower trim
- C-pillar trim
- Front grab handle
- Rear grab handle
- All related trim clips
- Sunvisor
After a moderate to severe side or rear collision, inspect for any damage on the side curtain airbag or other related components. Replace components as needed.
A-pillar trim
B-pillar trim
C-Pillar trim
During the repair process, inspect these areas:
- Inspect all the SRS wire harnesses. Replace, do not repair, any damaged harnesses.
- Inspect the cable reel for heat damage. If there is any damage, replace the cable reel.
After the vehicle is completely repaired, turn the ignition switch ON (II). If the SRS indicator comes on for about 6 seconds and then goes off, the SRS is OK. If the indicator does not function properly, use the HDS SRS Menu Method to read the DTC. If you cannot retrieve a code, go to SRS Symptom Troubleshooting.
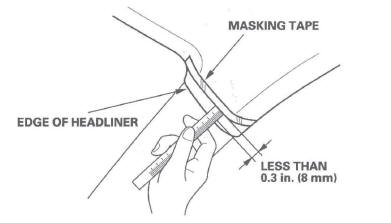
Checking and Adjusting the Headliner/Piliar Trim Overlap
To prevent the side curtain airbag from deploying and damaging the pillar trim, the overlap between the headliner and pillar trim must be less then 0.3 in.
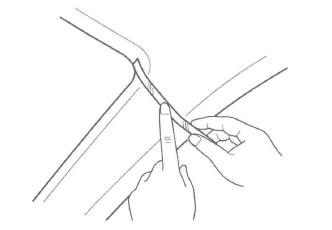
(8 mm). To check the overlap, do this: 1. Install the headliner (A) and the pillar trim (B).
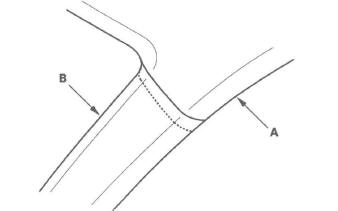
2. Using masking tape on the headliner, mark the upper edge of each pillar trim.
3. Remove the pillar trim, and measure the headliner overlap.
- If the overlap is less than 0.3 in. (8 mm), remove the tape, and install the pillar trim.
- If the overlap is more than 0.3 in. (8 mm), go to step 4.
4. Carefully trim the headliner with a utility knife, reducing the overlap to less than 0.3 in. (8 mm).
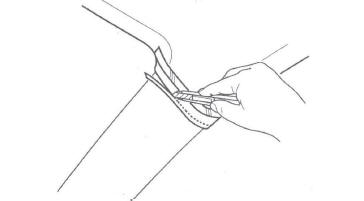
5. Remove the tape, and install the pillar trim.
READ NEXT:
 Driver's Airbag Replacement
Removal
1. Disconnect the negative cable from the battery and
wait at least 3 minutes before beginning work.
2. Remove the access panel (A) from the steering
wheel, then disconnect the driver's airba
Front Passenger's Airbag Replacement
Removal
1. Disconnect the negative cable from the battery, and
wait at least 3 minutes before beginning work.
2. Remove the passenger's vent panel.
3. Remove the dashboard center upper panel.
4. Re
Side Airbag Replacement
NOTE: Review the seat replacement procedure before doing repairs or service.
Removal
1. Disconnect the negative cable from the battery, and
wait at least 3 minutes before beginning work.
2. Disconnec
SEE MORE:
APP Sensor Signal Inspection
NOTE:
This procedure checks the APP sensor in its fully
closed position. In any other position, the APP sensor
stores DTCs which are covered in other
troubleshooting procedures.
Check for Temporary DTCs or DTCs with the HDS
before doing this procedure. If any DTCs are
indicated, troubleshoot
DTC P0706: Open in Transmission Range
Switch Circuit
NOTE:
Before you troubleshoot, record all freeze data and any on-board
snapshot, and review General Troubleshooting Information.
This code is caused by an electrical circuit problem
and cannot be caused by a mechanical problem in the
transmission.
1. Clear the DTC with the HDS.
2. 4WD model
