Honda CR-V: Symptom Troubleshooting
No picture is displayed
NOTE: Always check the connectors for poor connections or loose terminals between the audio unit, audio disc changer, navigation unit, and XM receiver.
1. Check the No. 23 (10 A) fuse in the under-hood fuse/relay box and No. 34 (7.S A) fuse in the under-dash fuse/relay box, and reinstall the fuse if it is OK.
Is the fuse OK? YES-Go to step 2.
NO-Replace the fuse and recheck.
2. Turn the ignition switch to ACC (I).
3. Operate the radio, and listen to the audio.
Can you hear the audio? YES-Go to step 4.
NO-Refer to audio system troubleshooting.
4. Turn the ignition switch ON (II).
5. Eject the navigation DVD.
Is the DVD the correct color (turquoise)? YES-Go to step 6.
NO-Replace the DVD.
6. Inspect the DVD read surface for damage or dirt.
Is it damaged or dirty? YES-Clean the DVD, or replace it if needed.
Reinstall the DVD and recheck.
NO-Go to step 7.
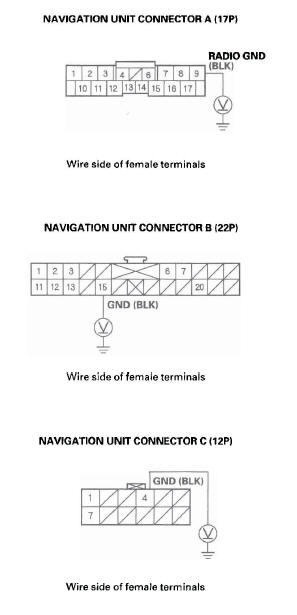
7. Measure the voltage between navigation unit connector A (17P) terminals No. 14 and body ground, and between terminal No. 17 and body ground, and navigation unit connector C (12P) No.1 terminal and body ground.
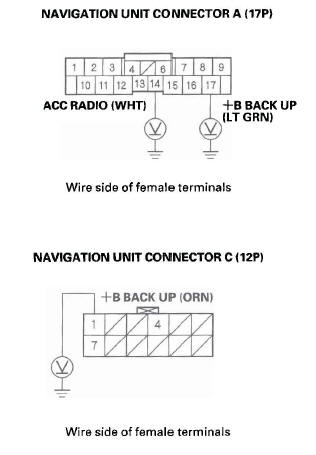
Is there battery voltage on both terminals? YES-Go to step 8.
NO-Repair open in the wire between the under-hood fuse/relay box and the navigation unit.
8. Measure the voltage between the navigation unit connector A (17P) terminal No.9 and body ground, and between navigation unit connector C (12P) terminal No.4 and body ground.
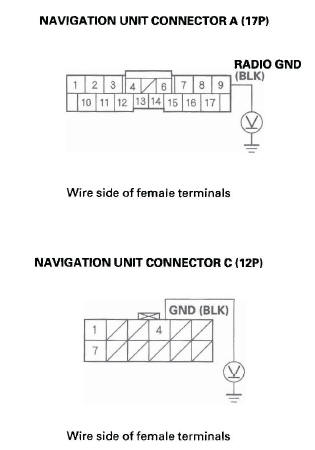
Is there less than 0.2 V? YES-Replace the navigation unit.
NO-Repair open or high resistance in the wire between the navigation unit and body ground (G502 and G504).
Picture is missing a color or tone or is an odd color
NOTE:
- Always check the connectors for poor connections or loose terminals.
- Before troubleshooting, get the navigation system 4-digit anti-theft code.
- After troubleshooting, enter the navigation system 4-digit anti-theft code.
1. Go into the Diagnostic Menu and use "RGB Color" test under Monitor Check.
Are the red, green, and blue circles shown? YES-If the image does not change and the circles are OK. The system is OK at this time. Check the set-up menu for color choices.
NO-Replace the navigation unit.
Picture has lines/rolls/other issues or is an odd color
NOTE:
- Always check the connectors for poor connections or loose terminals.
- Before troubleshooting, get the navigation system anti-theft code.
- After troubleshooting, enter the navigation system anti-theft code.
1. Eject the navigation DVD.
Is the DVD the correct color (turquoise)? YES-Go to step 3.
NO-Replace the DVD.
2. Inspect the DVD read surface for damaged or dirt.
Is it damaged or dirty? YES-Clean the DVD, or replace it if needed.
Reinstall the DVD and recheck.
NO-Go to step 3.
3. Check for electronic aftermarket accessories (possibly hidden) mounted near the navigation unit.
Are there any electronic accessories? YES-Disable the accessories, and recheck.
NO-Go to step 4.
4. Go into the Diagnostic mode, and use the "RGB Color" test under Monitor Check.
Is the picture missing a red, green or blue color circle? YES-Do the troubleshooting for picture is missing a color or tone or is an odd color.
NO-Go to step 5.
5. Turn the ignition switch to the ACC (I) position and observe the navigation picture.
Did the image improve? YES-Check for sources of electrical noise, such as poor battery connection, alternator, defective battery, aftermarket accessories or cell phone, and poor terminal fits at the display or control unit.
NO-Replace the navigation unit.
Navigation display buttons do not work or respond properly
NOTE:
- Always check connectors for poor contact and poor pin fits.
- Before troubleshooting, get the navigation anti-theft code.
- Before troubleshooting, write down all the XM radio presets, and re-enter them after repairs are complete.
- Always verify the concern and compare the system operation to a known-good vehicle with the same software loaded whenever possible. If the concern is duplicated in the known-good vehicle, then it can be considered a characteristic of the system.
1. Turn the ignition switch ON (II).
Does the navigation display turn on? YES-Replace the navigation unit.
NO-Refer to troubleshooting for no picture is displayed.
GPS icon is white or not shown
NOTE:
- Make sure the vehicle is parked outside and away from buildings.
- Refer to GPS Information for real-time satellite reception display.
- Check for window tinting above the GPS antenna and any non-OEM accessories mounted near the navigation unit or GPS antenna.
1. Check for metallic window tint on the windshield and electronic aftermarket accessories (possibly hidden) mounted near the GPS antenna or the navigation unit.
Is there metallic window tint or electronic accessories? YES-Remove tint or the accessories and recheck.
NO-Go to step 2.
2. Go into the Diagnostic Menu and use the "Navi System Link" test to check the GPS antenna.
Is the "GPS Ant" icon red? YES-Use the "Navi ECU" test under Unit Check to check for a kinked, crushed, or disconnected GPS antenna wire. If necessary, try a known-good GPS antenna. If icon is still red, replace the navigation unit.
NO-Check that nothing is blocking the GPS antenna located behind the hazard warning switch and recheck. Substitute a known-good navigation unit, and recheck.
Voice guidance cannot be heard, is broken up, or there is too much static
NOTE:
- Always check that the volume setting and voice feedback are turned ON.
- Always check the connectors for poor connection or loose terminals.
- Before troubleshooting, make sure you have the navigation system 4-digit anti-theft code, then write down the XM radio presets.
- After troubleshooting, enter the navigation system anti-theft code, then enter the XM radio presets.
1. Press the display unit SET-UP button.
2. Check the volume setting for the navigation system.
Is it set to OFF? YES-Set the volume to an audible level.
NO-Go to step 3.
3. Check the radio operation.
Can you hear the radio? YES-Go to step 4.
NO-Troubleshoot the audio system.
4. Go into the Diagnostic Menu, and use the "Navi System Link" test to check the radio.
Is the" Radio" icon red? YES-Replace the navigation unit.
NO-Go to step 5.
5. Check the voice control switch.
Is voice control switch OK? YES-Replace the navigation unit.
NO-Replace the voice control switch unit.
Voice recognition does not work
NOTE:
- Always check the connector for poor connection or loose terminals.
- Before troubleshooting, make sure you have the navigation system 4-digit anti-theft code, then write down the XM radio presets.
- After troubleshooting, enter the radio and navigation system anti-theft codes, then enter the XM radio presets.
Before assuming that a voice complaint is hardware related, ensure that the voice control system is being operated correctly.
- Adjust the air flow from the air conditioning vents so that they do not blow against the microphone on the ceiling.
- Set the fan speed to low (1 or 2).
- Make sure you are on the correct screen when trying
to issue a voice command. For instance, the
command "Find the nearest Italian Restaurant" only
works on a Map screen.
(See the Navigation System Manual for a complete list of allowed voice commands for the information being displayed.)
- Close the windows, moonroof, and doors.
- Keep background noise and conversations to a minimum.
- Pause after pressing the TALK button, then give a voice command clearly in a natural speaking voice. If the system cannot recognize your command, speak louder.
- If the microphone picks up voices other than yours, the system may not interpret your voice commands correctly.
- If you speak a command with something in your mouth, or your voice is too husky, the system may misunderstand your command.
- Compare the system operation with a known-good vehicle. Have more than one person test the system operation. If the known-good vehicle performs the same, it is a characteristic of the system.
1. Go into the Diagnostic Menu and use the "Mic Level" test under Functional Setup to check the operation of the TALK and BACK buttons.
Are the TALK and BACK buttons operational? YES-Go to step 2.
NO-Check for an open, or short to ground on the navigation unit connector D (5P) terminal No.4.
2. Use the "Mic Level" diagnostic under Functional Setup to check the operation of the microphone.
Is the microphone operational? YES-Check the operation of the voice control system (see the Navigation System Manual) and compare system operation with a known-good vehicle.
NO-Go to step 3.
3. Check the voice control switch.
Is voice control switch OK? YES-Check for a loose front map light (microphone) assembly. If OK, check for an open, or short to ground on navigation unit connector D (5P) terminals No.1, No.2, and No. 5. If the wire is OK, substitute a known-good microphone assembly.
NO-Replace the voice control switch.
Vehicle position icon constantly leaves road, moves erratically, or is very far from actual position
1. Check the GPS icon on the navigation picture.
Is the GPS icon on the map screen? YES-Do the troubleshooting for GPS icon is white or not shown.
NO-Go to step 2.
2. Go into the Diagnostic Menu, and use the "Yaw Rate" test to check the yaw rate sensor.
3. Go into the Diagnostic Menu, and use the "Car Status" test to check the vehicle speed pulse.
Are the yaw rate sensor and vehicle speed pulse OK? YES-The problem may be a normal characteristic.
Check to see if the problem occurs in the same place. If it does, the problem could be in the database. Compare to a known-good vehicle under the same conditions. If you can duplicate the problem, report it. Refer to the Customer Assistance section of the navigation system manual, "Reporting Errors".
NO-If the problem is the yaw rate sensor, replace the navigation unit. If the problem is the vehicle speed pulse, troubleshoot the vehicle speed signal circuit.
DVD screen error messages
NOTE:
- Check the navigation system manual for a list of common DVD screen error messages and the probable causes.
- Go into the Diagnostic Menu, and use the "Car Status" test to check the status of the display
- Check that the correct colored disc is installed.
1. Eject the navigation DVD.
Is the DVD the correct color (turquoise)? YES-Go to step 2.
NO-Replace the DVD.
2. Check the DVD-ROM reading surface for scratches.
Are there scratches? YES-Replace the DVD-ROM.
NO-If the problem occurs occasionally when the system is cold, this is normal. If the problem occurs frequently when driving, replace the navigation unit.
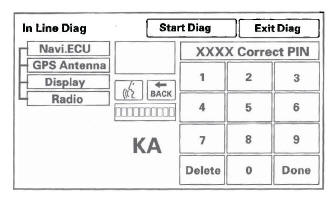
System always comes up in in-line diagnostic mode
1. When a navigation control unit is powered up for the first time at the factory, the "factory diagnosis" screen (In Line Diag) appears. Normally the factory does the steps necessary to verify proper operation and terminate the "factory diagnostic." Until the proper confirmation sequence is done, the screen appears every time the vehicle is started.
Display day/night mode does not work
NOTE:
- Always check the connectors for poor connection or loose terminals.
- Before troubleshooting, get the navigation system anti-theft code.
- After troubleshooting, enter the navigation system anti-theft code.
- In the set-up/colors menu, make sure that both the day and night map background colors are not set to white.
- Full brightness on the instrument panel brightness control causes the system to stay in the day mode, even when the lights are on.
1. Make sure the instrument panel brightness control is not on full brightness. Turn the headlights on, and adjust the dash brightness to the middle range.
2. Change the day/night mode under Set-up to "Auto" and recheck.
Does the display change to day and night modes when turning the headlights on and off? YES-The system is OK at this time.
NO-Go to step 3.
3. Go into the Diagnostic Menu, and use the "Car Status" test to check for an ILL signal.
Is the "ILL" signal OK? YES-Replace the navigation unit.
NO-Check the ILL + circuit between the navigation unit and No. 14 (7.5 A) fuse in the under-dash fuse/relay box.
System locks up or freezes constantly
NOTE: Check that the correct colored DVD is installed.
1. Start the engine, turn the ignition switch OFF, then turn the ignition switch ON (II).
Does the system reboot? YES-The system is OK at this time.
NO-Make sure the DVD has the correct color label (turquoise). Check the DVD for scratches or damage, and the navigation unit for water damage. If OK, go into the Diagnostic Menu, and do all of the "Unit Check" tests (see page 23-125) and "Car Status" tests (see page 23-127). Also check for low battery charge or poor charging system performance.
Vehicle icon wanders across the map when driving (does not follow a displayed road) or map or vehicle ICON spins
NOTE: This symptom is caused by a defective yaw rate sensor. Do this diagnostic when the vehicle is cold and warm.
1. Go into the Diagnostic Menu, and do the "Yaw Rate" test and "Car Status" tests.
Are the values correct? YES-The system is OK.
NO-Replace the navigation unit.
Vehicle icon moves by itself when parked
NOTE:
- Always check the connectors for poor connection or loose terminals.
- Before troubleshooting, get the navigation system anti-theft code, then write down the XM radio presets.
- After troubleshooting, re-enter the anti-theft code, and re-initialize the navigation system, then enter the XM radio presets.
1. Start the engine.
2. From the main menu, select places, then select any destination. and begin the trip.
3. With the vehicle parked, watch the vehicle icon on the display.
Does the vehicle position icon move by itself? YES-Replace the navigation unit.
NO-The system is OK at this time.
Navigation stays on with ignition switch off
NOTE:
- Always check the connectors for poor connection or loose terminals.
- Before troubleshooting, get the navigation system anti-theft code, then write down the XM radio presets.
- After troubleshooting, re-enter the anti-theft code, and re-initialize the navigation system, then enter the XM radio presets.
- Check for aftermarket accessories that use the same power circuit. A feedback can cause this problem.
1. Remove the key from the ignition switch.
Does the navigation screen stay on? YES-Go to step 2.
NO-The system is OK at this time.
2. The vehicle may have been used as a demonstration vehicle at an event like an auto show. In these events, power is often jumpered to the navigation system so that the ignition key is not needed in the vehicle. At the end of the show, the jumper wire may not have been removed. Check the navigation unit connector A (17P) for a "non-factory" jumper wire in series with the factory cable.
Is there a jumper wire? YES-Remove the jumper wire, and re-test. Return the jumper wire to Tech Line.
NO-Go to step 3.
3. Check if the audio unit works.
Does the audio unit work with the ignition switch off? YES-Troubleshoot the ACC circuit (navigation connector A (17P) terminal No. 14) for a short to power with another circuit.
NO-Replace the navigation unit.
Navigation cannot control audio/disc
1. Make sure the anti-theft code for the navigation system is entered.
2. Go into the Diagnostic Menu, and use the "Navi System Link" test.
Is the" Radio" icon red? YES-Do the troubleshooting for voice guidance cannot be heard.
NO-Go to step 3.
3. Substitute a known-good navigation unit (see page 23-140), and recheck.
Can the navigation control audio? YES-Replace the navigation unit.
NO-Do the audio system troubleshooting.
Navigation cannot control XM radio
- Review the audio system symptom diagnostic section.
- If you can only turn to channels 000, 001, 174, and 247, make sure the audio unit is set to the channel mode (see owner's manual), if it is set to channel mode, call XM satellite radio customer support and check the account activation status.
1. Substitute a known-good navigation unit (see page 23-140), and recheck.
Can the navigation control the XM radio? YES-Replace the navigation unit.
NO-Do the audio system troubleshooting.
Navigation frequently asks for anti-theft code and needs GPS initialization
1. Check the No. 23 (10 A) and No. 17 (15 A) fuses in the under-hood fuse/relay box and the No. 34 (7.5 A) fuse in the under-dash fuse/relay box.
Are the fuse OK? YES-Go to step 2.
NO-Replace the fuse.
2. Turn the ignition switch ON (II).
3. Measure the voltage between navigation unit connector A (17P) terminal No. 14 and body ground, between terminal No. 17 and body ground, and between navigation unit connector C (12P) terminal No.1 and body ground.
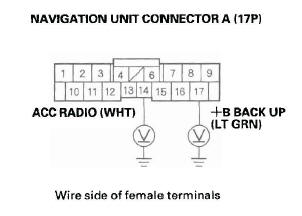
Is there battery voltage on al/ terminals? YES-Go to step 4.
NO-Repair open in the wire between the appropriate fuse/relay box and the navigation unit.
4. Measure the voltage between navigation unit connector A (17P) terminal No.9 and body ground, between navigation unit connector C (12P) terminal No.4 and body ground, and between navigation unit connector B (22P) terminal No. 15 and body ground.
Is there less than 0.1 V? YES-Replace the navigation unit.
NO-Repair open in the wire between the navigation unit and body ground (G502) (see page 22-28), or navigation connector C (12P) and body ground (G504).
OPEN/CLOSE function of the display does not work
NOTE:
- Make sure nothing is lodged behind the display.
- If the display's "Open/Close" button does not work, you must manually open the display to obtain the customer's navigation DVD, Audio CD, and PC card.
1. Press the OPEN/CLOSE button.
Does the display open and/or close normally? YES-The system is OK at this time.
NO-Replace the navigation unit.
Navigation display will not close
NOTE: Check for, and remove, any objects or debris jammed behind the display.
1. Check the CD slot. Look for foreign objects, stuck CD, broken or sticking slot.
Is the CD slot OK? YES-Go to step 2.
NO-Replace the navigation unit.
2. Check the PC Card.
Is the PC Card fully seated? YES-Go to step 3.
NO-Reseat the card or remove it. If it still won't close, replace the navigation unit.
3. Check the PC card.
Does the PC card have its memory clip properly installed? YES-Go to step 4.
NO-Remove the card. The door won't close if the memory chip is missing or improperly installed.
4. Press the OPEN/CLOSE button.
Does the display open and/or close normally? YES-The system is OK at this time.
NO-Replace the navigation unit.
Navigation display does not open or opens partway
NOTE: Check for, and remove, any objects or debris jammed behind the display.
1. Press the OPEN/CLOSE button.
Does the unit beep? YES-Go to step 2.
NO-Replace the navigation unit.
2. Press the OPEN/CLOSE button.
Does the display open normally? YES-The system is OK at this time.
NO-Replace the navigation unit.
READ NEXT:
 System Diagnostic Mode
Start-up procedure and Diagnosis Menu
1. Turn the ignition switch to the ON (II) position.
Press and hold the Menu, the Map/Guide, and the
Cancel buttons. Keep them pressed for
approximately 3 second
CD, DVD, and PC Card Removal/Installation
If the display will not open, use this procedure to
manually open the display and remove the CD, DVD,
and/or the PC card.
1. Remove the navigation unit from the vehicle.
2. On the bench, carefully p
Navigation Unit Removal/Installation
SRS components are located in this area. Review the SRS component location.
Also review the precautions and procedures in the SRS section before doing repairs or
service.
NOTE:
Put on gloves to pro
SEE MORE:
Evaporator Core
Replacement
1. Recover the refrigerant with a recovery/recycling/ charging station.
2. Remove the bolt from the A/C line clamp, and
remove the receiver line (A) from the clips (B).
3. Remove the nut, then disconnect the A/C lines (A)
from the evaporator core.
4. Remove the stud bolt.
5. Remove the blower un
Unlocking the Tailgate
If the power door lock system cannot
unlock the tailgate, unlock it
manually.
Place a cloth on the top side of the
cover to prevent scratches, then use
a small flat-tip screwdriver to remove
the cover on the back of the tailgate.
Push the release lever to the lower
right as sho
