Honda CR-V: Navigation Unit Removal/Installation
SRS components are located in this area. Review the SRS component location.
Also review the precautions and procedures in the SRS section before doing repairs or service.
NOTE:
- Put on gloves to protect your hands.
- Take care not to scratch the dashboard and related parts.
- Lay a workshop towel under the parts when working on them to protect the face panel from scratches or other damage.
- Do not work in a dusty or dirty place.
- Discharge static electricity from your body before and during the work.
- Do not touch the circuit board(s) with your bare hands.
- Do not work with dirty hands.
- Be careful not to fold the flat plate cable.
- Do not touch the terminal connector of the flat plate cable with your bare hands. (If you have touched it, wipe it off thoroughly.)
- Before replacing the navigation unit, make sure to remove the customer's navigation DVD, and their audio CD, or PC card. Remanufactured navigation units do not come with a navigation DVD. Re-install the customer's navigation DVD, audio CD, and audio PC card into the new remanufactured unit. If the navigation display won't open, manually remove the navigation DVD, audio CD, and PC card.
1. Make sure you have the 4-digit anti-theft code for the navigation system, then write down the XM radio presets.
2. Remove the center vent and HVAC control unit.
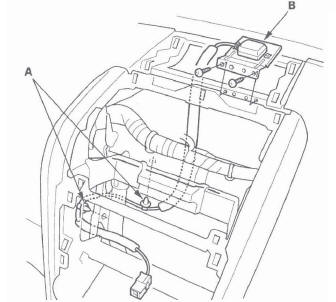
3. Remove the navigation unit mounting bolts (A).
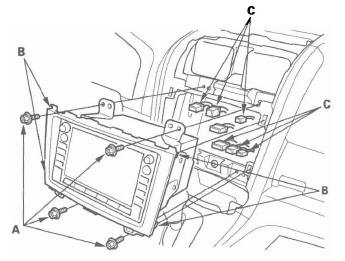
4. Pull the navigation unit away from the dashboard to release the locking clips (B), then disconnect the connectors (C).
5. Remove the bolts, screws, and the brackets (A), then remove the center panel (B).

6. Install the navigation unit in the reverse order of removal, and note these items:
- Make sure all connectors and the antenna lead are secure.
- Enter the anti-theft code for the navigation unit, then enter the XM radio presets.
Voice Control Switch Test
1. Remove the voice control switch.
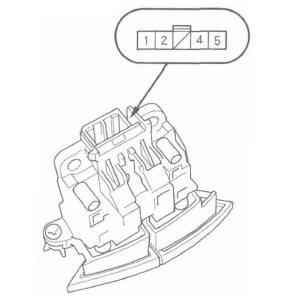
2. Measure the resistance between the No.2 and No. 3 terminals in each switch position according to the table.

3. If the resistance is not as specified, replace the voice control switch.
4. Use a diode tester between the terminals in each switch position according to the table.

5. If the diode test is bad, replace the switch.
Voice Control Switch Replacement
1. Remove the steering wheel.
2. Remove the voice control switch.
3. Install the voice control switch in the reverse order of removal.
Microphone Replacement
1. Remove the front individual map light lens (A).
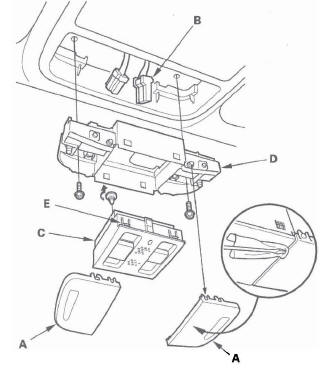
2. Disconnect the 3P connector (B) from the microphone.
3. Carefully pry off the microphone (C) from the map light housing (D) while pressing in on the retaining tabs (E).
4. Install the microphone in the reverse order removal.
Rearview Camera Removal/Installation
1. Remove the tailgate lower trim panel.
2. Disconnect the connector (A) from the rearview camera (B), then remove the wire harness clip (C).
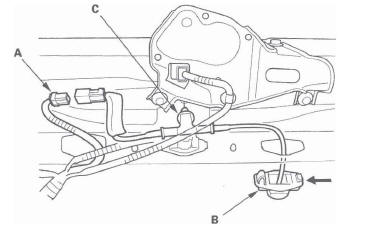
3. Remove the rearview camera.
4. Install the rearview camera in the reverse order of removal.
GPS Antenna Removal/Installation
1. Remove the navigation unit.
2. Remove the center upper lid.
3. Remove the wire harness clips (A), screws and GPS antenna (B).
4. Install the antenna in the reverse order of removal.
Audio, Navigation, and Telematics
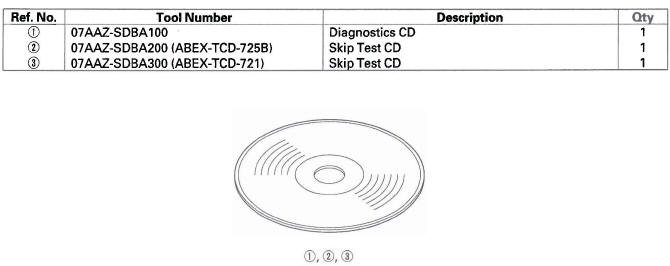
Special Tools
-
Diagnostics CD
-
Skip Test CD
-
Skip Test CD
READ NEXT:
 Seat Belts
Component Location Index
REAR CENTER SEAT BELT
REAR CENTER SEAT BELT BUCKLE and
LEFT REAR SEAT BELT BUCKLE
REAR SEAT BELT
FRONT SEAT BELT
FRONT SEAT BELT BUCKLES
RIGHT FRONT SEAT BELT LOWER A
SRS (Supplemental Restraint System)
Component Location Index
SRS INDICATOR
SIDE AIRBAG CUTOFF INDICATOR
MEMORY ERASE
SIGNAL (MES)
CONNECTOR (2P)
(YELLOW)
CABLE REEL
PASSENGER'S AIRBAG CUTOFF INDICATOR
FRONT PASSENGER'S AIRB
SEE MORE:
DTC P1658: ETCS Control Relay ON
Malfunction
NOTE: Before you troubleshoot. record all freeze data and any on-board
snapshot, and review the general troubleshooting information.
1. Turn the ignition switch ON (II).
2. Do the ETCS TEST in the INSPECTION MENU with
the HDS.
Is the RELAY circuit OK? YES-Intermittent failure, the system is OK a
Voice Control System
You can select the AUX mode by
using the navigation system voice
control buttons, but cannot operate
the play mode functions.
iPods compatible with your audio
system using the USB adapter cable
are:
Use only compatible iPods with the
latest software. iPods that are not
compatible
