Honda CR-V: Seat Belts
Component Location Index
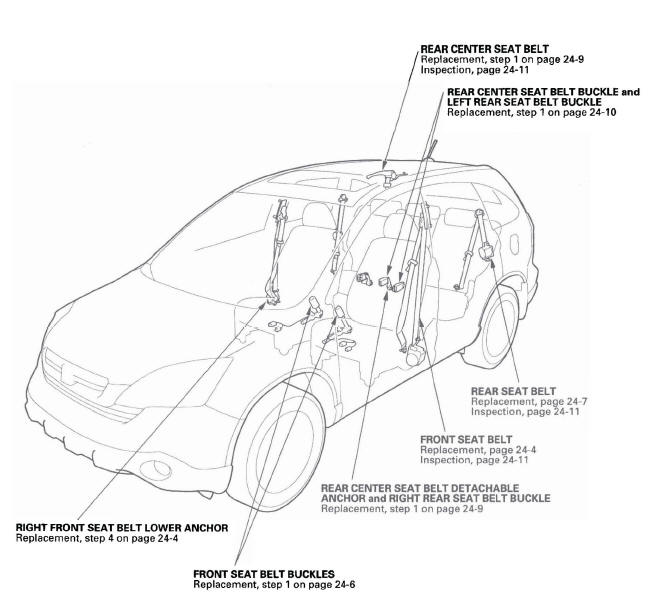
- REAR CENTER SEAT BELT
- REAR CENTER SEAT BELT BUCKLE and LEFT REAR SEAT BELT BUCKLE
- REAR SEAT BELT
- FRONT SEAT BELT
- FRONT SEAT BELT BUCKLES
- RIGHT FRONT SEAT BELT LOWER ANCHOR
Front Seat Belt Replacement
Special Tools Required
KTC trim tool set SOJATP2014 *
* Available through the American Honda Tool and Equipment Program; call 888-424-6857
SRS components are located in this area. Review the SRS component locations and the precautions and procedures before doing repairs or service.
NOTE:
- Use the appropriate tool from the KTC trim tool set to avoid damage when prying components.
- Take care not to tear the seams or damage the seat covers.
- Put on gloves to protect your hands. Check the front seat belts for damage, and replace them if necessary. Be careful not to damage them during removal and installation.
Front Seat Belt
1. Make sure you have the anti-theft code for the audio and navigation system (if equipped), then write down the XM audio presets (if equipped).
2. Disconnect the negative cable from the battery, and wait at least 3 minutes before beginning work.
3. Slide the front seat forward fully.
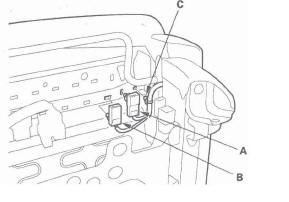
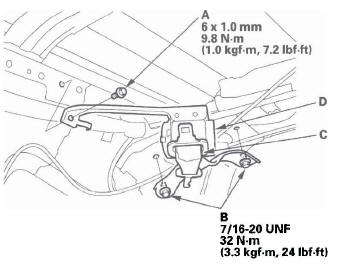
4. Carefully pry up on the bottom edge of the anchor cover (A) to release the hooks, and remove the cover.
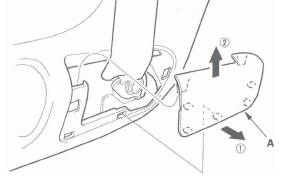
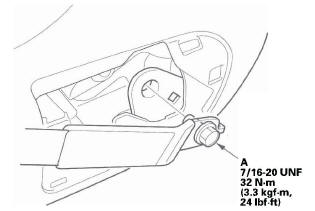
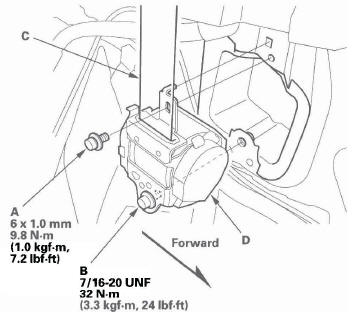
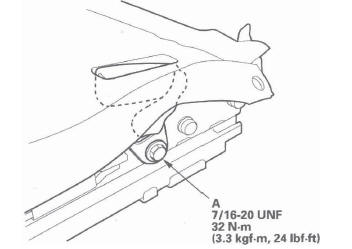
5. Remove the lower anchor bolt (A).
6. Remove the B-pillar lower trim panel.
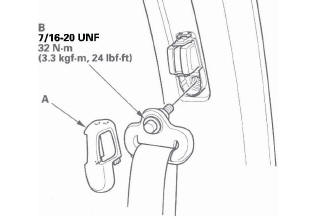
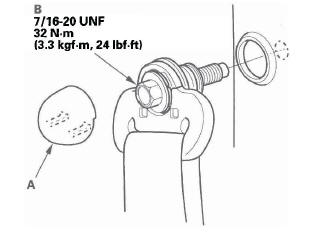
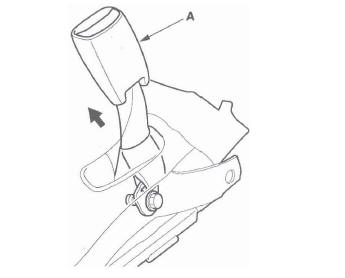
7. Remove the upper anchor cover (A), and remove the upper anchor bolt (B).
8. Disconnect the seat belt tensioner connector (A) from the retractor (B). Remove the upper retractor mounting bolt (C) and the lower retractor bolt (D), then remove the front seat belt (E) and retractor.
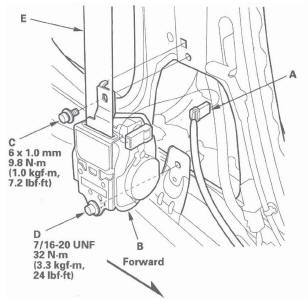
9. Remove the B-pillar upper trim (see step 4).
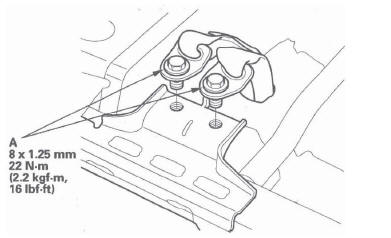
10. Remove the shoulder anchor adjuster (A).

11. Install the seat belt in the reverse order of removal, and note these items:
- Apply liquid thread lock to the anchor bolts before reinstallation.
- Tighten the bolts by hand first, then tighten to the specified torque.
- Check that the retractor locking mechanism functions.
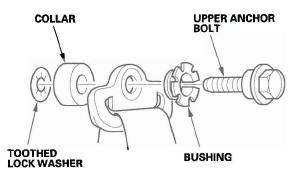
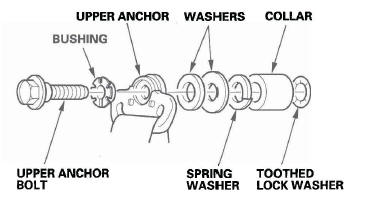
- Assemble the washers, collar, and bushing on the upper and lower anchor bolts as shown.
- If the seat belt tensioner has been deployed, replace the B-pillar lower seal with a new one.
- Before installing the anchor bolts, make sure there are no twists or kinks in the seat belt.
- Make sure the seat belt tensioner connector and the seat belt buckle tensioner connector are plugged in properly.
- Reconnect the negative cable to the battery.
- Enter the anti-theft codes for the audio and navigation system (if equipped), then enter the XM audio presets (if equipped).
- Set the clock (without navigation system).
Check for any DTCs that may have been set during repairs, and clear them.
Upper anchor bolt installation
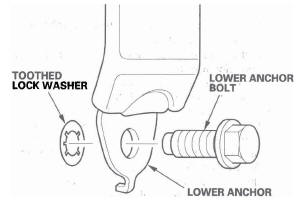
Lower anchor bolt installation
Seat Belt Buckle
1. Make sure you have the anti-theft code for the audio and navigation system (if equipped), then write down the XM audio presets (if equipped).
2. Disconnect the negative cable from the battery, and wait at least 3 minutes before beginning work.
3. Remove the front seat.
4. Passenger's seat for some models: Remove the center table.
5. Remove the recline inner cover (see step 5).
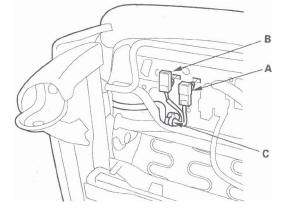
6. Disconnect the seat subharness connector (A).
Detach the seat belt buckle tensioner connector (B) and harness clip (C).
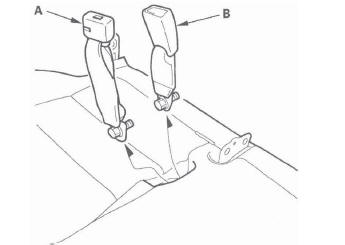
Driver's seat
Passenger's seat
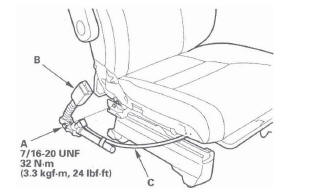
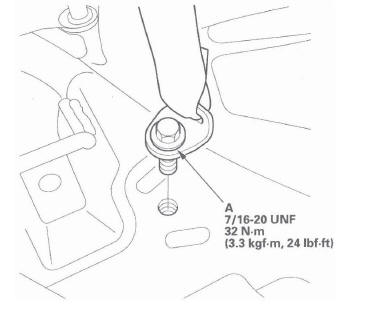
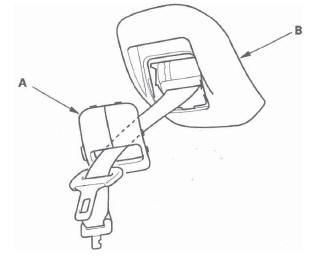
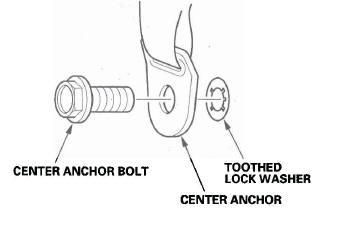
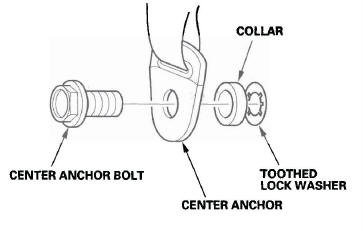
7. Remove the center anchor bolt (A), and remove the seat belt buckle (B).
8. Pull the seat belt switch/tensioner harness (C) out through the space between the seat cushion and the seat linkage (driver's seat), or the hole in the seat track (passenger's seat).
9. Install the buckle in the reverse order of removal, and note these items:
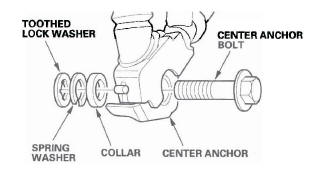
- Assemble the washers on the center anchor bolt as shown.
- Apply liquid thread lock to the anchor bolt before reinstallation.
- Tighten the bolt by hand first, then tighten to the specification with a torque wrench.
- Apply liquid thread lock to the seat mounting bolts before reinstallation.
- Reconnect the negative cable to the battery.
- Enter the anti-theft codes for the audio and navigation system (if equipped), then enter the XM audio presets (if equipped).
- Set the clock (without navigation system).
- Check for any DTCs that may have been set during repairs, and clear them.
- Do the power window control unit reset procedure.
Center anchor bolt installation
Rear Seat Belt Replacement
NOTE: Check the rear seat belts for damage, and replace them if necessary. Be careful not to damage them during removal and installation.
Rear Seat Belt
1. Fold the rear seat up.
2. Remove the cargo area side trim panel.
3. Pull the carpet back as necessary, and remove the lower anchor bolt (A).
4. Remove the upper anchor cap (A), and remove the upper anchor bolt (B).
5. Remove the retractor mounting self-tapping screw (A), and the retractor bolt (B), then remove the rear seat belt (C) and retractor (D).
6. Install the seat belt in the reverse order of removal, and note these items:
- Assemble the washers, collar, and bushing on the upper anchor bolt as shown.
- Check that the retractor locking mechanism functions as described.
- Apply liquid thread lock to the anchor bolts before reinstallation.
- Tighten the bolts by hand first, then tighten to the specified torque.
- Before installing the anchor bolts, make sure there are no twists or kinks in the seat belt.
Upper anchor bolt installation
Rear Center Seat Belt
NOTE: Take care not to tear the seams or damage the headliner.
1. Remove the cap (A) from the retractor cover (B).
2. Remove the headliner.
3. Remove the retractor mounting bolt (A) and retractor anchor bolts (B), then remove the center seat belt (C) and retractor (D).
4. If necessary, replace the retractor cover (see step 9).
5. Install the center seat belt and retractor in the reverse order of removal, and note these items:
- Check that the retractor locking mechanism functions.
- Apply liquid thread lock to the retractor anchor bolt before reinstallation.
Rear Center Seat Belt Detachable Anchor and Right Rear Seat Belt Buckle
1. Remove the rear seat.
2. Remove the undercover from the rear seat.
3. Remove the center anchor bolts (A) from under the seat cushion.
4. Pull the rear center seat belt detachable anchor (A) and right rear seat belt buckle (B) out.
5. Install the anchor and buckle in the reverse order of removal, and note these items:
- Assemble the washer on the center anchor bolt as shown.
- Apply liquid thread lock to the anchor bolts before reinstallation.
- Make sure there are no twists or kinks in the anchor, center belt, and seat belt buckle.
Center anchor bolt installation
Rear Center Seat Belt Buckle and Left Rear Seat Belt Buckle
1. Fold the rear seat up (one side).
2. Remove the outer cover, right rear seat, left rear seat.
3. Remove the center anchor bolt (A).
4. Pull the rear center seat belt buckle (A) (right rear seat) or left rear seat belt buckle (left rear seat) out.
5. Install the buckle in the reverse order of removal, and note these items:
- Assemble the collar and washer on the center anchor bolt as shown.
- Apply liquid thread lock to the anchor bolt before reinstallation.
- Make sure there are no twists or kinks in the seat belt buckle.
Center anchor bolt installation
Inspection
For a front seat belt retractor with a seat belt tensioner, review the SRS component locations and the precautions and procedures before doing repairs or service.
Retractor
1. Before installing the retractor, check that the seat belt can be pulled out freely.
2. Make sure that the seat belt does not lock when the retractor (A) is leaned slowly up to 15 º from the mounted position. The seat belt should lock when the retractor is leaned over 40º. Do not attempt to disassemble the retractor.
Front
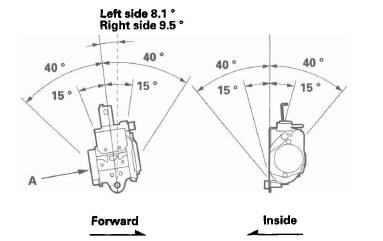
Rear
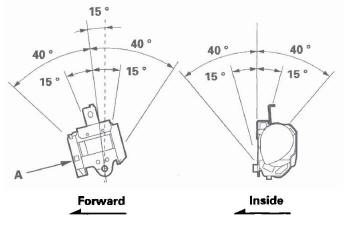
Rear center

3. Replace the seat belt with a new assembly if there is any abnormality. Do not disassemble any part of the seat belt for any reason.
In-vehicle
1. Check that the seat belt is not twisted or caught on anything.
2. After installing the anchors, check for free movement on the anchor bolts. If necessary,.ren'1ove the anchor bolts and check that the washers and other parts are not damaged or improperly installed.
3. Check the seat belts for damage or discoloration.
Clean with a shop towel if necessary. Use only soap and water to clean.
NOTE: Dirt buildup in the loops of the upper anchors can cause the seat belts to retract slowly.
Wipe the inside of the loops with a clean cloth dampened in isopropyl alcohol.
4. Check that the seat belt does not lock when pulled out slowly. The seat belt is designed to lock only during a sudden stop or impact.
5. Make sure that the seat belt will retract automatically when released.
6. For front and rear passenger's seat belts, check the seat belt retractor locking mechanism ALR (automatic locking retractor). This function is for securing child seats:
- Pull the seat belt all the way out to engage the ALR. The seat belt should retract with a soft, ratcheting sound, but not extend. This is normal.
- To disengage the ALR, release the seat belt and allow it to fully retract, then pull the seat belt out part-way. The seat belt should retract and extend normally.
7. Replace the seat belt with a new assembly if there is any abnormality. Do not disassemble any part of the seat belt for any reason.
READ NEXT:
 SRS (Supplemental Restraint System)
Component Location Index
SRS INDICATOR
SIDE AIRBAG CUTOFF INDICATOR
MEMORY ERASE
SIGNAL (MES)
CONNECTOR (2P)
(YELLOW)
CABLE REEL
PASSENGER'S AIRBAG CUTOFF INDICATOR
FRONT PASSENGER'S AIRB
Precautions and Procedures
General Precautions
Please read the following precautions carefully before
servicing the airbag system. Observe the instructions
described in this manual, or the airbags could
accidentally deploy and
General Troubleshooting Information
DTC (Diagnostic Trouble Codes)
The self-diagnostic function of the SRS system allows it
to locate the causes of system problems and then store
this information in memory. For easier troubleshooting,
t
SEE MORE:
DTC P0776: A/T Clutch Pressure Control
Solenoid Valve B Stuck OFF
NOTE: Before you troubleshoot, record all freeze data and any on-board
snapshot, and review General Troubleshooting Information.
1. Warm up the engine to normal operating
temperature (the radiator fan comes on).
2. Make sure that the transmission is filled to the
proper level, and check for fluid
To Select a File from Folder and File Lists
You can also select a folder or file by
using the VOL/SELECT knob. Push
the VOL/SELECT knob to switch
the display to the folder or file list,
then turn the VOL/SELECT knob to
select a folder or file. Press the
VOL/SELECT knob to set your
selection.
Pressing the
button goes back
to
