
Honda CR-V: Seat Heaters
If equipped
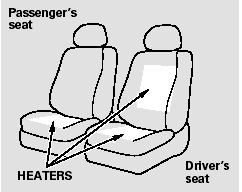
Both front seats are equipped with seat heaters. The passenger seat only has heaters in the seat bottom because of the side airbag cutoff system.
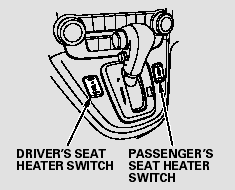
The ignition switch must be in the ON (II) position to use the heaters.
Push the top of the switch, HI, to rapidly heat up the seat. After the seat reaches a comfortable temperature, select LO by pushing the bottom of the switch. This will keep the seat warm.
In the HI setting, the heater turns off when the seat gets warm, and turns back on after the seat’s temperature drops.
In the LO setting, the heater runs continuously. It does not cycle with temperature changes.
Follow these precautions when using the seat heaters:
Use the HI setting only to heat the seats quickly, because it draws large amounts of current from the battery.
If the engine is left idling for an extended period, do not use the seat heaters, even on the LO setting. It can weaken the battery, causing hard starting.
READ NEXT:
 Power Windows
Turn the ignition switch to the ON
(II) position to raise or lower any
window. To open the window, push
the switch down and hold it. Release
the switch when you want to stop the
window.
Moonroof
If equipped
The moonroof can be tilted up in the
back for ventilation, or it can be slid
back into the roof. Use the switch on
the front ceiling to operate the
moonroof. You must turn the
Mirrors
Keep the inside and outside mirrors
clean and adjusted for best visibility.
Be sure to adjust the mirrors before
you start driving.
The inside mirror has day and night
positions. The night
SEE MORE:
Differential Reassembly
Exploded View
Special Tools Required
Holder handle 07JAB-001020A
Companion flange holder 07RAB-TB4010B
1. Apply differential fluid to the rubber pinion of the
ATF strainer (A), then install the ATF strainer, the
magnet (B), the dowel pins (C), and the oil pump
pin (D), in the differential carri
DTC P0453: FTP Sensor Circuit High Voltage
NOTE: Before you troubleshoot, record all freeze data and any on-board
snapshot, and review the general troubleshooting information.
1. Turn the ignition switch ON (II).
2. Clear the DTC with the HDS.
3. Turn the ignition switch OFF.
4. Remove the fuel fill cap.
5. Turn the ignition switch ON
