Honda CR-V: Mirrors
Keep the inside and outside mirrors clean and adjusted for best visibility.
Be sure to adjust the mirrors before you start driving.
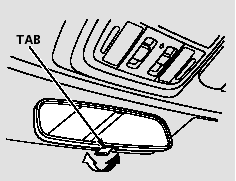
The inside mirror has day and night positions. The night position reduces glare from headlights behind you.
Flip the tab on the bottom edge of the mirror to select the day or night position.
Adjusting the Power Mirrors
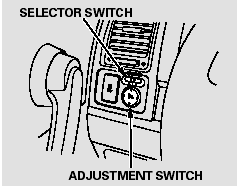
1. Turn the ignition switch to the ON (II) position.
2. Move the selector switch to L (driver’s side) or R (passenger’s side).
3. Push the appropriate edge of the adjustment switch to move the mirror right, left, up, or down.
4. When you finish, move the selector switch to the center (off) position. This turns the adjustment switch off to keep your settings.
Power Mirror Heaters
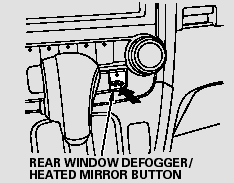
If equipped
The outside mirrors are heated to remove fog and frost. With the ignition switch in the ON (II) position, turn on the heaters by pressing the button. The indicator in the button comes on as a reminder.
Press the button again to turn the heaters off. Pressing this button also turns the rear window defogger on and off.
READ NEXT:
 Interior Convenience Items
Interior Convenience Items
Dual Deck Cargo Shelf
If equipped
The dual deck cargo shelf will
separate the storage area into two
storage areas. On the upper area,
you can store small and light items.
You should place heavy items in the
l
Beverage Holders
Be careful when you are using the
beverage holders. A spilled liquid
that is very hot can scald you or your
passengers. Liquid can also spill
from the door pocket beverage
holders when you o
SEE MORE:
DTC 11-1x/4x ("x" can be 0 thru 9 or A thru F) :
Open or Increased Resistance in Driver's
Airbag First/Second Inflator
DTC 11-1x ("x" can be 0 thru 9 or A thru F):
Open or Increased Resistance in Driver's
Airbag First Inflator
DTC 11-4x ("x" can be 0 thru 9 or A thru F):
Open or Increased Resistance in Driver's
Airbag Second Inflator
Special Tools Required
SRS inflator simulator 07SAZ-TB4011A
SRS simulator lead J
To Select a Play Mode
To select a play mode, push the
AUDIO button to show the audio
display, then touch the PLAY MODE
icon on the display.
Select the desired mode by touching
the appropriate icon, or move the
joystick, then press ENT.
After you select the play mode, the
display changes to t
