Honda CR-V: Reclining the Front Seats
You can recline the seat-backs on the front seats so they are level with the rear seat cushions, making a large cushioned area. To do this:
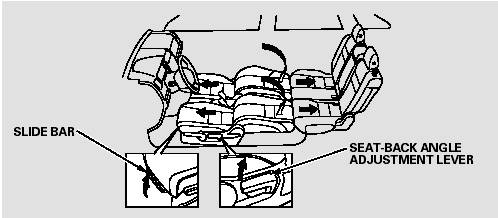
EX-L and Canadian EX models
Only the passenger’s side can be level as follows.
1. Adjust the rear seats as far back as possible.
2. Remove the front head restraints, and store them securely.
3. Adjust the front seats forward as far as possible. Pull up the seatback angle adjustment lever and pivot the seat-back backward until it is level with the rear seat cushion.
EX-L and Canadian EX models
The seat-back of the power adjustable driver’s seat cannot be level. Do not push the seat-back down forcibly.
4. Adjust the rear seat-back to the desired position.
Reverse this procedure to return the front and rear seats to the upright position. Make sure you install the head restraints and securely lock the seats before driving.
When you return the seat-back to its upright position, hold the seat-back to keep it from going up too quickly.
READ NEXT:
 Folding the Rear Seats Down
Each rear seat-back can be folded
down separately to give more cargo
room. With either of the outer seatbacks
folded-down, you can still
carry a passenger in the rear seat.
With the center se
Folding the Rear Seat Forward
The left and right rear seats can be
folded up separately to make room
for cargo.
To fold the rear seat forward:
Remove any items from the seat
before you fold up the seat cushion.
1. Pul
Detachable Anchor
The seat belt in the rear center seat
is equipped with a detachable anchor.
This allows the center seat belt to be
unlatched when the rear center seat
back is folded down or the right side
re
SEE MORE:
DTC 71-2x ("x" can be 0 thru 9 or A thru F):
Short in Driver's Seat Position Sensor
NOTE: Before doing this troubleshooting procedure,
review SRS Precautions and Procedures.
1. Erase the DTC memory.
2. Turn the ignition switch ON (II), and check that the
SRS indicator comes on for about 6 seconds and
then goes off.
Does the SRS indicator stay on, and is DTC 71-2x
indicated?
YES-G
General Troubleshooting Information
System Indicator
This system has four indicators:
ABS indicator (A)
Brake system indicator (B)
VSA indicator (C)
VSA activation indicator (D)
When the system detects a problem, it will turn the
appropriate indicators on. Depending on the failure, the
VSA modulator-control unit determines whic
