Honda CR-V: Pump Pressure Test
Pump Pressure Test with T/N 07406-0010001
Special Tools Required
- P/S joint adapter (pump) 07ZAK-S7C0100
- P/S joint adapter (hose) 07ZAK-S7C0200
- P/S pressure gauge 07406-0010001
Check the fluid pressure as follows to determine whether the trouble is in the pump or steering gearbox.
1. Check the power steering fluid level.
2. Disconnect the pump outlet hose (A) from the pump outlet with care so as not to spill the power steering fluid on the frame and other parts, then install the P/S joint adapter (pump) on the pump outlet (B).
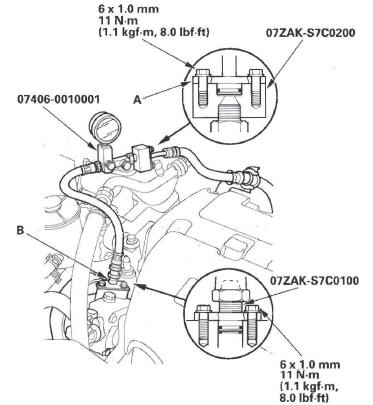
3. Connect the P/S joint adapter (hose) to the P/S pressure gauge, then connect the pump outlet hose to the P/S joint adapter (hose).
4. Install the P/S pressure gauge to the P/S joint adapter (pump).
5. Fully open the shut-off valve (A).
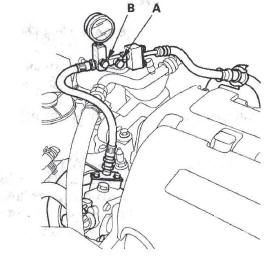
6. Fully open the pressure control valve (B).
7. Start the engine, and let it idle.
8. Turn the steering wheel from lock-to-lock several times to warm the fluid to operating temperature at 158 ºF (70 ºC).
9. Measure steady-state fluid pressure while the engine is idling. If the pump is in good condition, the gauge should read no more than 1,470 kPa (15 kgf/cm2, 213 psi).
If it reads high, check for:
- Clogged or deformed feed or return line between the pump and the steering gearbox.
- Clogged valve body unit.
10. Close the shut-off valve, then close the pressure control valve gradually until the pressure gauge needle is stable. Read the pressure.
NOTICE
Do not keep the shut-off valve closed more than 5 seconds or the pump could be damaged by overheating.
11. Immediately open the shut-off valve fully.
If the pump is in good condition, the gauge should read at least 7,350-8,050 kPa (75-82 kgf/cm2, 1,070-1,170 psi). A low reading means pump output is too low for full assist. Repair or replace the pump.
Pump Pressure Test with T/N 07406-001000A or T/N 07406-001A101
Special Tools Required
- P/S joint adapter (pump) 07ZAK-S7C0100
- P/S joint adapter (hose) 07ZAK-S7C0200
- P/S pressure gauge 07406-001000A or 07406-001A 101
Check the fluid pressure as follows to determine whether the trouble is in the pump or steering gearbox.
1. Check the power steering fluid level.
2. Disconnect the pump outlet hose (A) from the pump outlet with care so as not to spill the power steering fluid on the frame and other parts, then install the P/S joint adapter (pump) on the pump outlet (B).

3. Connect the P/S joint adapter (hose) to the P/S pressure gauge, then connect the pump outlet hose to the P/S joint adapter (hose).
4. Install the P/S pressure gauge to the P/S joint adapter (pump).
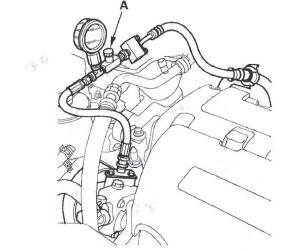
5. Open the shut-off valve (A) fully.
6. Start the engine, and let it idle.
7. Turn the steering wheel from lock-to-lock several times to warm the fluid to operating temperature at 158ºF (70 ºC).
8. Measure steady-state fluid pressure while the engine is idling. If the pump is in good condition, the gauge should read no more than 1,470 kPa (15 kgf/cm2, 213 psi).
If it reads high, check for:
- Clogged or deformed feed or return line between the pump and the steering gearbox.
- Clogged valve body unit.
9. Close the shut-off valve gradually, and read the pressure.
NOTICE
Do not keep the shut-off valve closed more than 5 seconds or the pump could be damaged by overheating.
10. Immediately open the shut-off valve fully.
If the pump is in good condition, the gauge should read at least 7,350-8,050 kPa (75-82 kgf/cm2, 1,070- 1,170 psi). A low reading means pump output is too low for full assist. Repair or replace the pump.
Fluid Leakage Inspection

Fluid Replacement
Check the reservoir (A) at regular intervals, and add the recommended fluid as necessary. Always use Honda Power Steering Fluid. Using any other type of power steering fluid or automatic transmission fluid can cause increased wear and poor steering in cold weather.
NOTE: If the fluid is contaminated, the screen in the reservoir may be partially blocked. Replace the reservoir if necessary.
System capacity:
0.99 L (1.05 US. qt) at disassembly
Reservoir capacity:
0.29 L (0.31 US. qt)
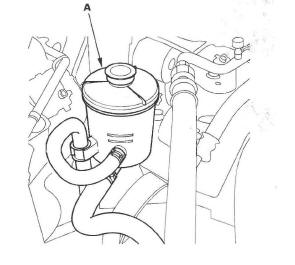
1. Remove the reservoir from its holder. Raise the reservoir, then disconnect the return hose (A) to drain the reservoir. Take care not to spill the fluid on the body and parts. Wipe off any spilled fluid at once.
NOTE: Inspect the reservoir screen for any debris. If the reservoir screen is clogged, replace the reservoir.
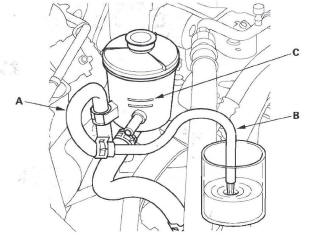
2. Connect a hose (B) of suitable diameter to the disconnected return hose, and put the hose end in a suitable container.
3. Start the engine, let it run at idle, and turn the steering wheel from lock-to-lock several times.
When fluid stops running out of the hose, shut off the engine. Discard the fluid.
4. Reinstall the return hose on the reservoir.
5. Fill the reservoir to the upper level line (C).
6. Start the engine and run it at fast idle, then turn the steering from lock-to-lock several times to bleed air from the system.
7. Recheck the fluid level and add some if necessary.
Do not fill the reservoir beyond the upper level line.
8. If the fluid is contaminated, dark, or discolored, repeat the procedure as necessary.
Power Steering Hose, Line, and Pressure Switch Replacement
Note these items during installation:
- Connect each hose to the corresponding line securely until it contacts the stop on the line. Install the clamp or adjustable clamp at the specified distance from the hose end as shown.
- Check all clamps for deterioration or deformation; replace the clamps with new ones if necessary.
- Add the recommended power steering fluid to the specified level on the reservoir and check for leaks.

READ NEXT:
 Pump
Pump
Pump Replacement
1. Place a suitable container under the vehicle.
2. Drain the power steering fluid from the reservoir.
3. Remove the drive belt (A) from the pump pulley.
4. Cover the auto-tensione
Steering Wheel
Steering Wheel Removal
SRS components are located in this area. Review the SRS component locations and the
precautions and procedures before
doing repairs or service.
1. Make sure you have the anti-t
Steering Column
Steering Column Removal and Installation
SRS components are located in this area. Review the
SRS component locations and the
precautions and procedures before
doing repairs or service.
Removal
NOTICE
SEE MORE:
PSP Switch Signal Circuit Troubleshooting
1. Start the engine, and let it idle.
2. Align the steering wheel straight ahead.
3. Check the PSP SWITCH in the DATA LIST with the
HDS.
Does it indicate ON?
YES-Go to step 4.
NO-Go to step 14.
4. Turn the steering wheel to the full lock position.
5. Check the PSP SWITCH in the DATA LIST with t
DTC Troubleshooting
DTC B1078: Daytime Running Lights Signal
Error (Canada)
DTC B1079: Daytime Running Lights Signal
Error (USA)
NOTE: If you are troubleshooting multiple DTCs, be
sure to follow the instructions in B-CAN System
Diagnosis Test Mode A.
1. Turn the ignition switch ON (II).
2. Pull the parking brake lever
