Honda CR-V: General Information
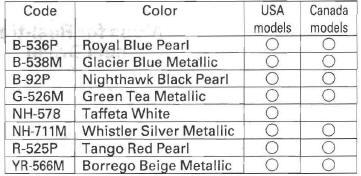
Chassis and Paint Codes
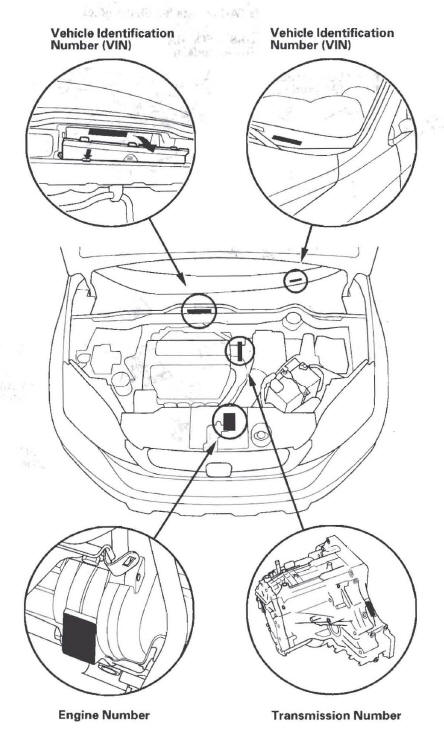
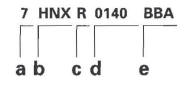
Vehicle Identification Number
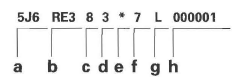
- Manufacturer, Make and Type of Vehicle
- 5J6: Honda of America Mfg., Inc., U.S.A.
Honda Multipurpose passenger vehicle - JHL: Honda Motor Co., Ltd.
Honda Multipurpose passenger vehicle
- 5J6: Honda of America Mfg., Inc., U.S.A.
- Line, Body and Engine Type
- RE3: CR-V 2WD/K24Z1
- RE4: CR-V 4WD/K24Z1
- Body Type and Transmission Type
- 8: 5-door/5-speed Automatic
- Vehicle Grade (Series)
- 3: LX
- 5: EX
- 7: EX-L
- Check Digit
- Model Year
- 7: '07
- Factory Code
- L: East Liberty, Ohio Plant, USA
- C: Saitama Factory in Japan
- Serial Number
- 000001-: USA Models
- 800001-: Canada Models
Engine Number
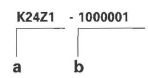
- Engine Type
K24Z1: 2.4 L DOHC i-VTEC Sequential Multiport Fuel-injected engine - Serial Number
1000001-: Producted in Ohio plant
1410001-: Producted in Saitama factory (4WD)
1740001-: Producted in Saitama factor (2WD)
Transmission Number
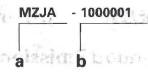
- Transmission Type
MZJA: 5-speed Automatic (2WD)
MZHA: 5-speed Automatic (4WD) - Serial Number
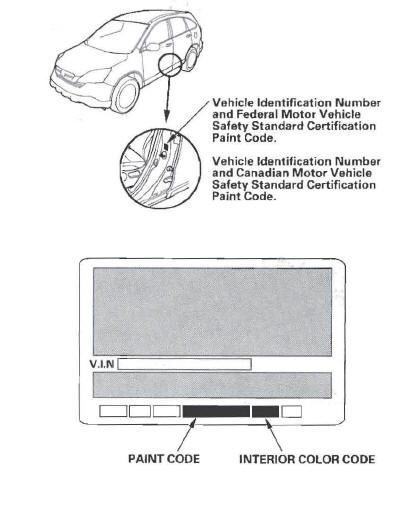
Paint Code
Identification Number Locations
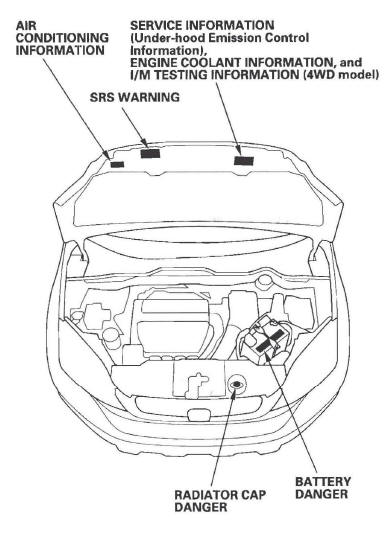
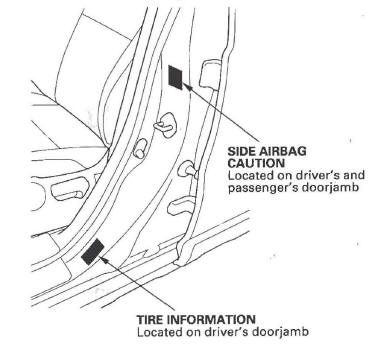
Danger/Warning/Caution Label Locations
Front Passenger's Compartment:
NOTE: FRONT PASSENGER (CHILD SEAT) AIRBAG WARNING TAG is installed on the glove box in the USA models.
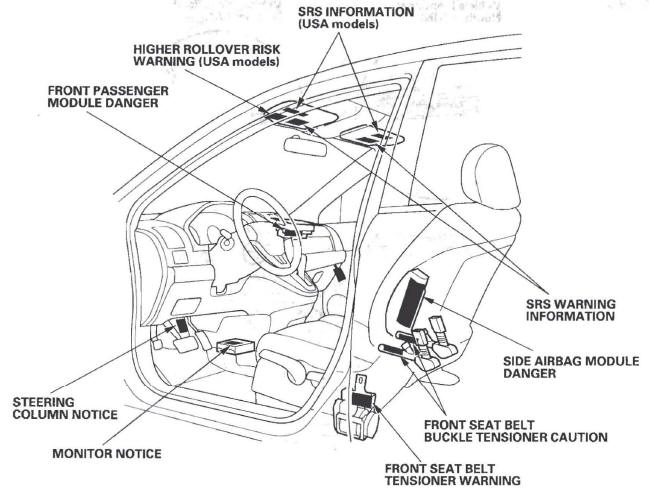
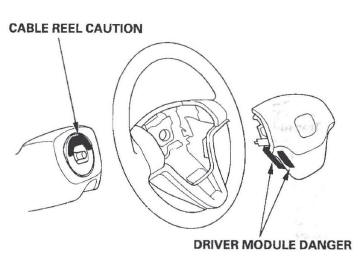
Steering Wheel:
Rear Passenger's Compartment:
Doorjamb:
Under-hood Emission Control Label
Emission Group Identification
Example:
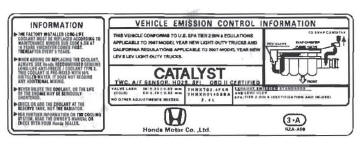
THIS VEHICLE CONFORMS TO U.S. EPA TIER 2 BIN 5 REGULATIONS APPLICABLE TO 2007 MODEL YEAR NEW LIGHT-DUTY TRUCKS AND CALIFORNIA REGULATIONS APPLICABLE TO 2007 MODEL YEAR NEW LEV II ULEV LIGHT-DUTY TRUCKS.
Test Group and Evaporative Family
Test Group:

- Model Year
7: '07 - Manufacturer Subcode
HNX: HONDA - Family Type
T: LDT - Displacement Group
- Sequence Characters
Evaporative Family:
- Model Year
7: '07 - Manufacturer Subcode
HNX: HONDA - Family Type
R: EVAP/ORVR - Canister Work Capacity
- Sequence Characters
Lift and Support Points
NOTE: If you are going to remove heavy components such as the suspension or the fuel tank from the rear of the vehicle, first support the front of the vehicle with tall safety stands. When substantial weight is removed from the rear of the vehicle, the center of gravity can change, causing the vehicle to tip forward on the lift.
Vehicle Lift
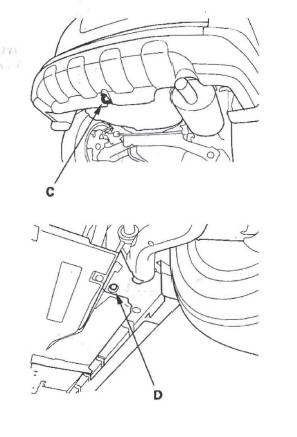
1. Position the lift blocks (A) under the vehicle's front support points (B) and rear support points (C).
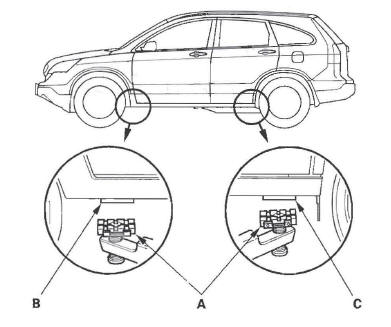
2. Raise the lift a few inches, and rock the vehicle gently to be sure it is firmly supported.
3. Raise the lift to its full height, and inspect the vehicle support points for solid contact with the lift blocks.
Safety Stands
To support the vehicle on safety stands, use the same support points (B and C) as for a vehicle lift. Always use safety stands when working on or under any vehicle that is supported only by a jack.
Floor Jack
1. When lifting the front of the vehicle, set the parking brake. When lifting the rear of the vehicle, put the shift lever in the P position.
2. Block the wheels that are not being lifted.
3. Position the floor jack under the front jacking bracket (A) or the rear jacking bracket (B). Center the jacking bracket on the jack lift platform (C), and jack up the vehicle high enough to fit the safety stands under it.
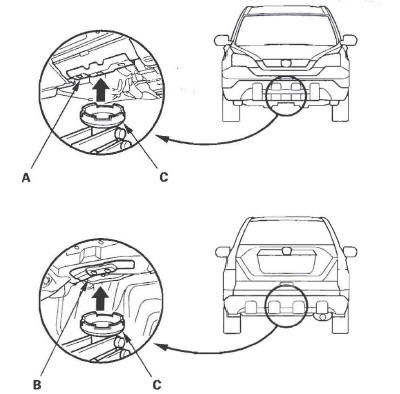
4. Position the safety stands under the support points, and adjust them so the vehicle is level.
5. Lower the vehicle onto the stands.
Towing
If the vehicle needs to be towed, call a professional towing service. Never tow the vehicle behind another vehicle with a rope or chain. It is very dangerous.
Emergency Towing
There are three popular methods of towing a vehicle.
Flat-bed Equipment - The operator loads the vehicle on the back of a truck. This is the best way of transporting the vehicle.
To accommodate flat-bed equipment, the vehicle is equipped with front towing hooks (A), front tie down hook slots (B), rear towing hook (C), and rear tie down hook slots (D).
The rear towing hook can be used with a winch to pull the vehicle onto the truck, and the tie down hook slots can be used to secure the vehicle to truck:
Front:
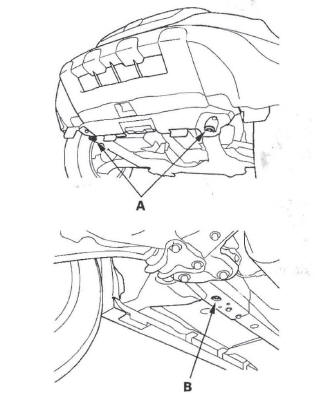
Rear:
Wheel Lift Equipment - The tow truck uses two pivoting arms that go under the tires (front or rear) and lifts them off the ground. The other two wheels remain on the ground. Never tow the vehicle with wheel lift equipment.
Sling-type Equipment - The tow truck uses metal cables with hooks on the ends. These hooks go around parts of the frame or suspension, and the cables lift that end of the vehicle off the ground. The vehicle's suspension and body can be seriously damaged if this method of towing is attempted. This method of towing the vehicle is unacceptable.
The only recommended way of towing the CR-V is on a flat-bed truck. Towing the 4WD CR-V with only two wheels on the ground will damage parts of the 4WD system. The 2WD CR-V may also be towed with the front wheels off the ground, or with all four wheels on the ground.
If the 2WD CR-V cannot be transported by a flat-bed, it should be towed with the front wheels off the ground. If the vehicle is damaged, and the vehicle must be towed with the front wheels on the ground, or if the vehicle is towed with all four wheels on the ground, do this.
- Release the parking brake.
- Start the engine.
- Shift to the D position, then to the N position.
- Turn off the engine.
- Leave the ignition switch in the ACCESSORY (I) position so the steering wheel does not lock.
- Make sure all accessories are turned off to minimize battery current draw.
It is best to tow the vehicle no farther than 50 miles (80 km), and keep the speed below 35 mph (55 km/h).
NOTICE
- Improper towing preparation will damage the transmission. Follow the above procedure exactly. If you cannot shift the transmission or start the engine, the vehicle must be transported on a flat-bed.
- Trying to lift or tow the vehicle by the bumpers will cause serious damage. The bumpers are not designed to support the vehicle's weight.
Parts Marking
To deter vehicle theft, certain major components are marked with the vehicle identification number (VIN).
Original parts have self-adhesive labels. Replacement body parts have generic self-adhesive labels. These labels should not be removed. The original engine or transmission VIN plates are not transferable to the replacement engine or transmission.
NOTE: Be careful not to damage the parts marking labels during body repair. Mask the labels before repainting the part.
Precautions for Real-time 4WD (Four-wheel Drive)
Under normal conditions, the vehicle is in 2WD (front-wheel drive). However, the system will instantly transmit appropriate driving force to the rear wheels (depending on the driving force of the front wheels and the road conditions).
The Real-time 4WD-Dual Pump System does not have a manual switch to disable the 4WD system. Whenever service work requires spinning the front or rear wheels with the engine, always lift up and support the vehicle so all four wheels are off the ground.
Specifications
Standards and Service Limits
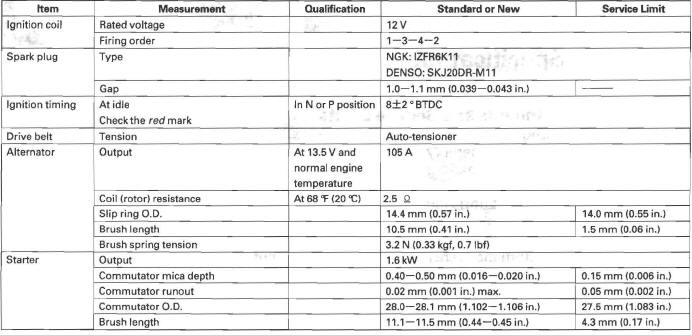
Engine Electrical
Engine Assembly

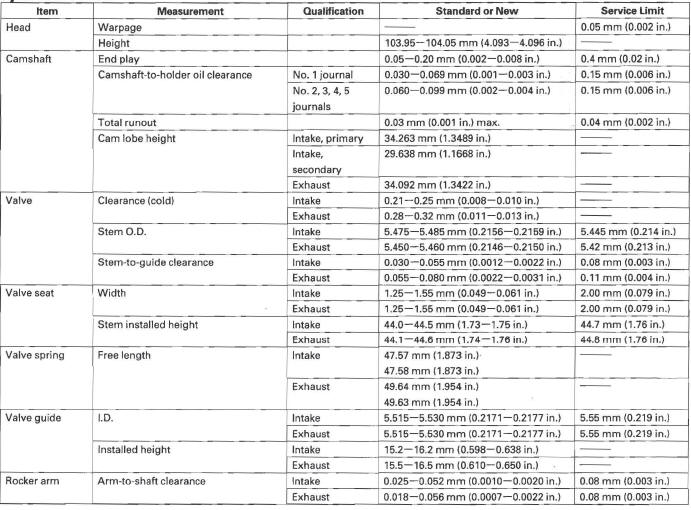
Cylinder Head
Engine Block

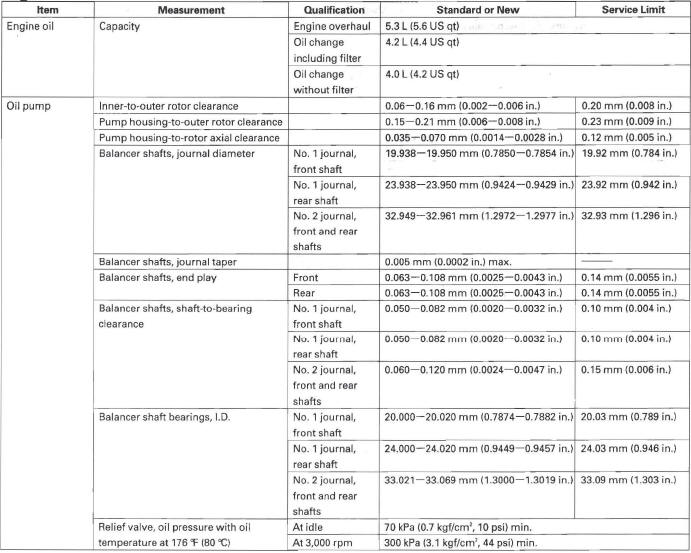
Engine Lubrication
Cooling System
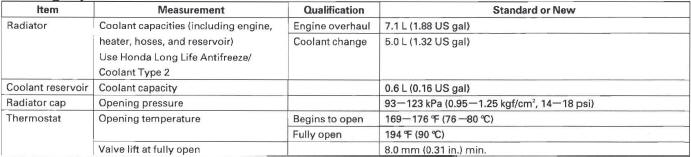
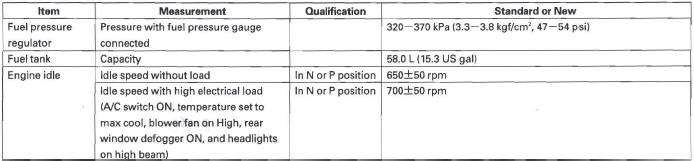
Fuel and Emissions
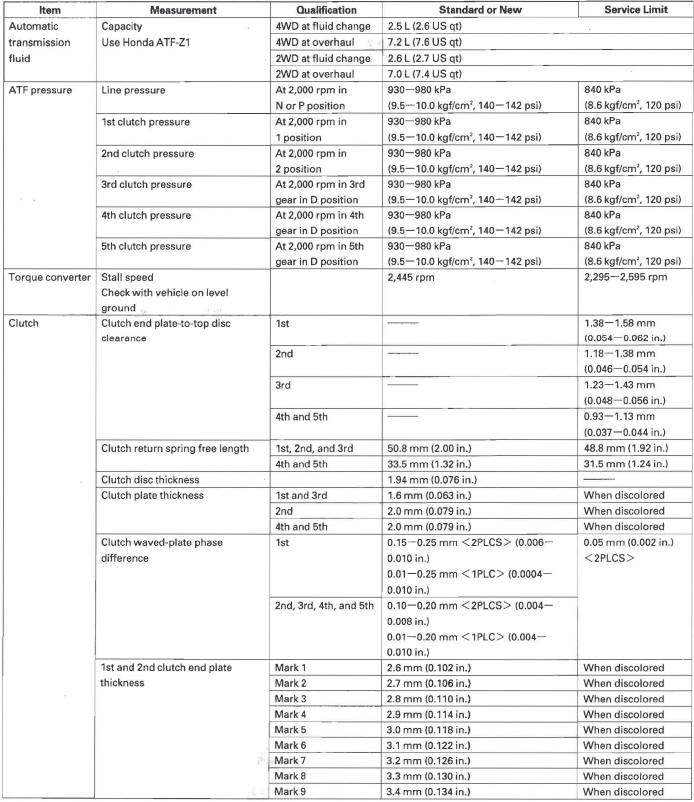
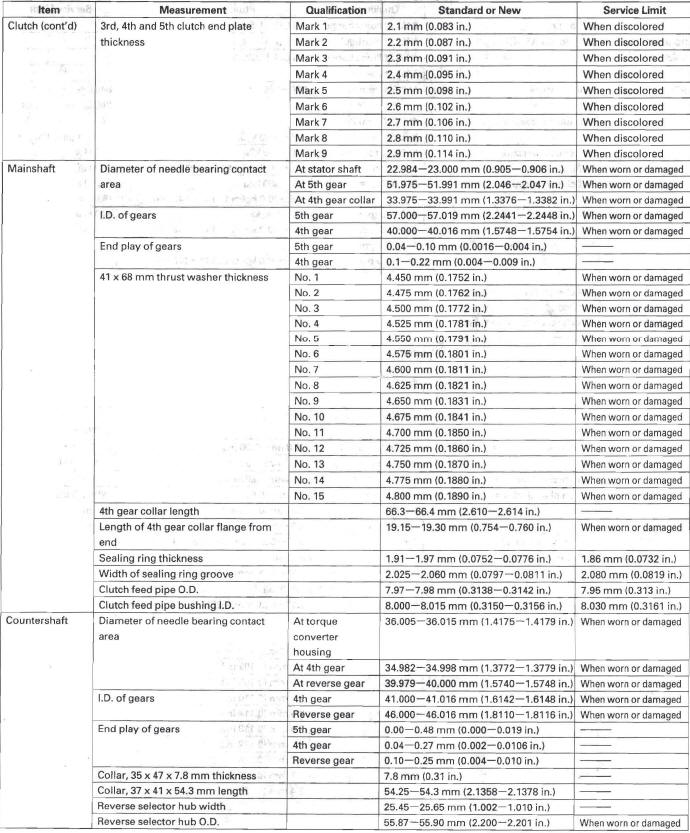
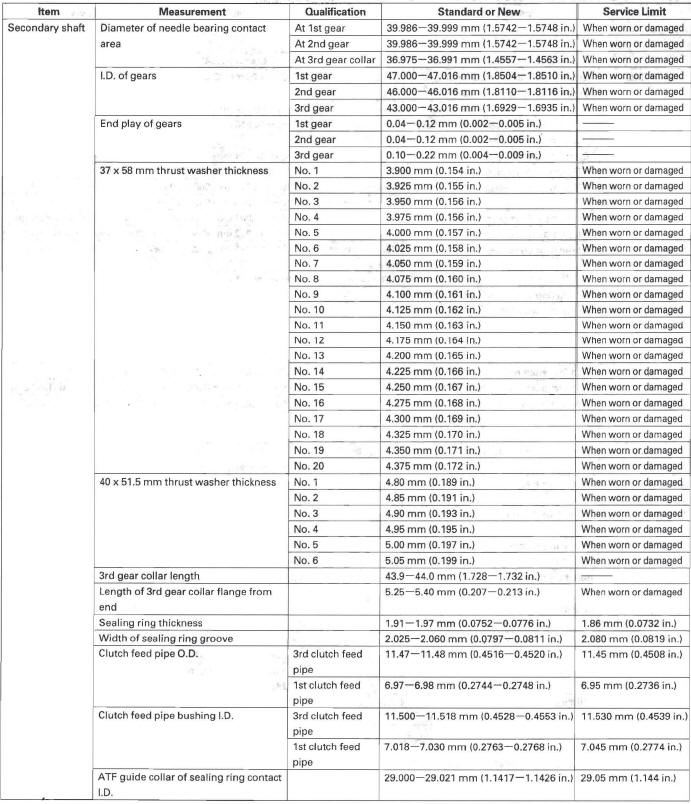
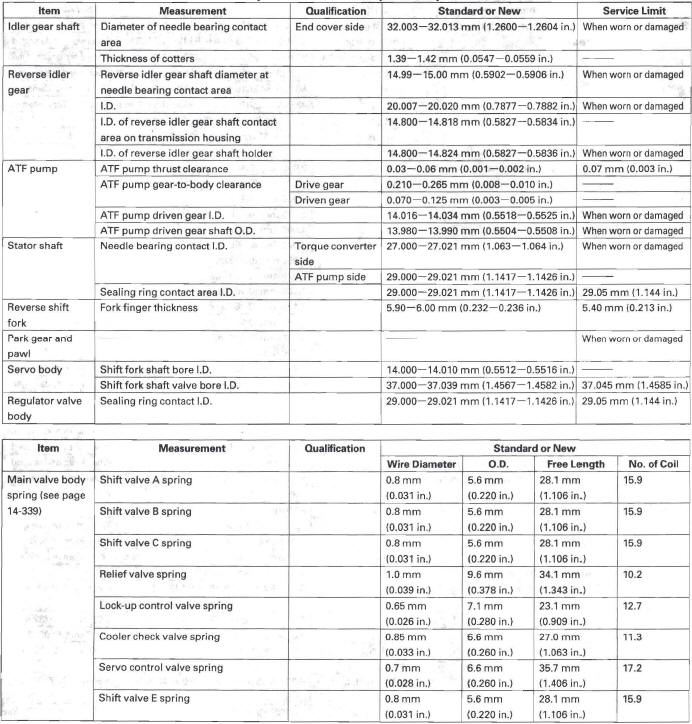
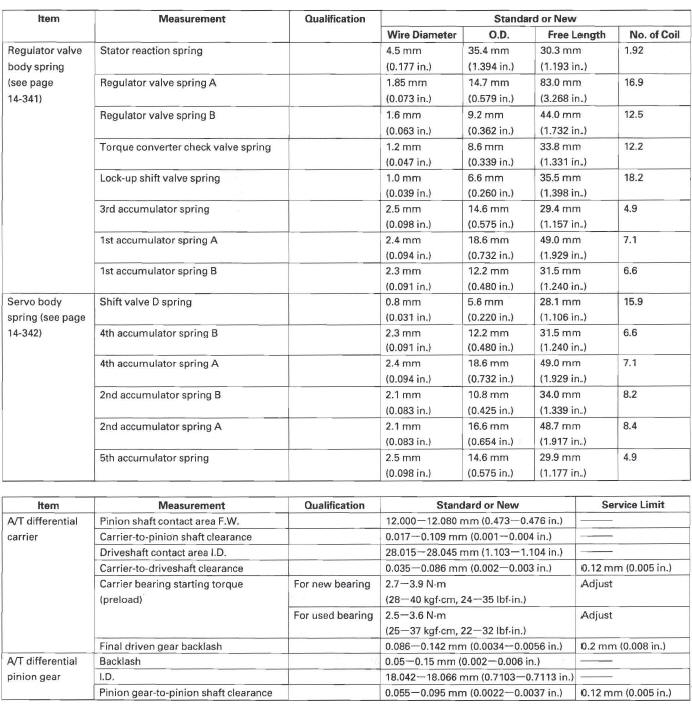
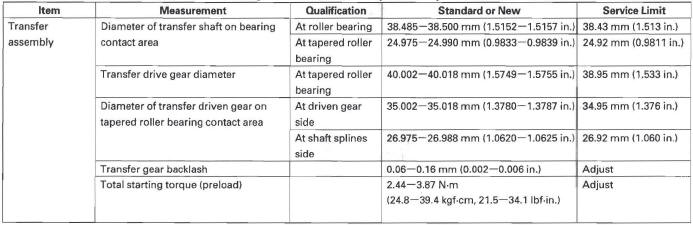
Automatic Transmission and A/T Differential
Rear Differential

Steering
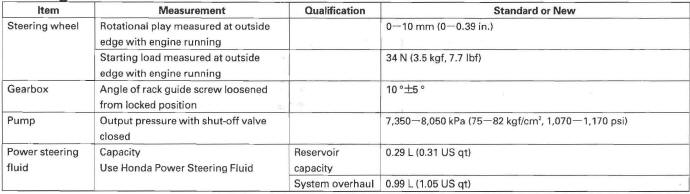
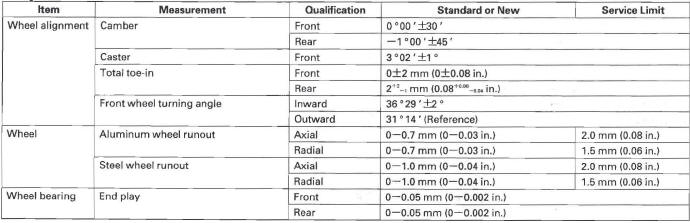
Suspension
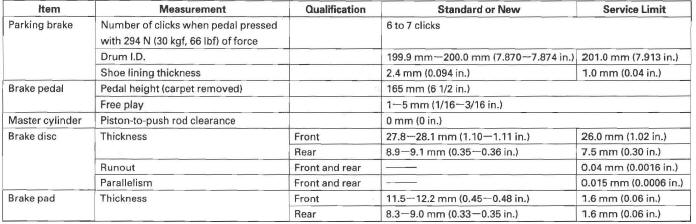
Brakes
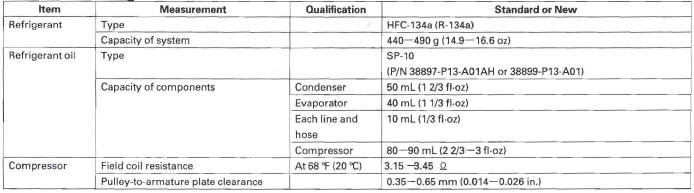
Air Conditioning
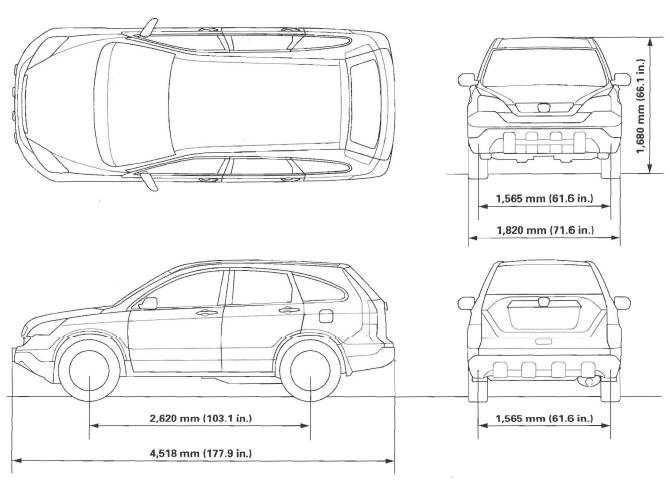
Design Specifications
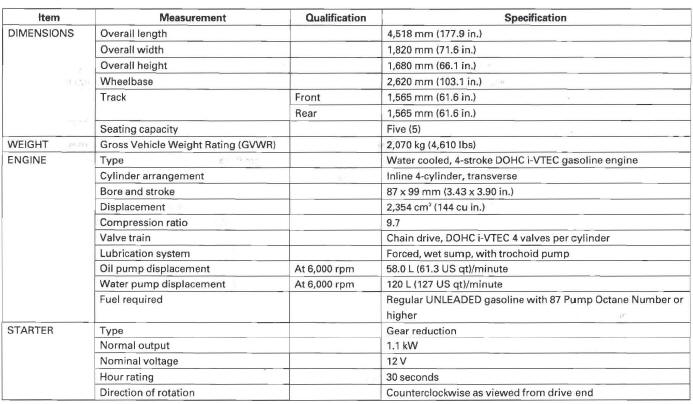
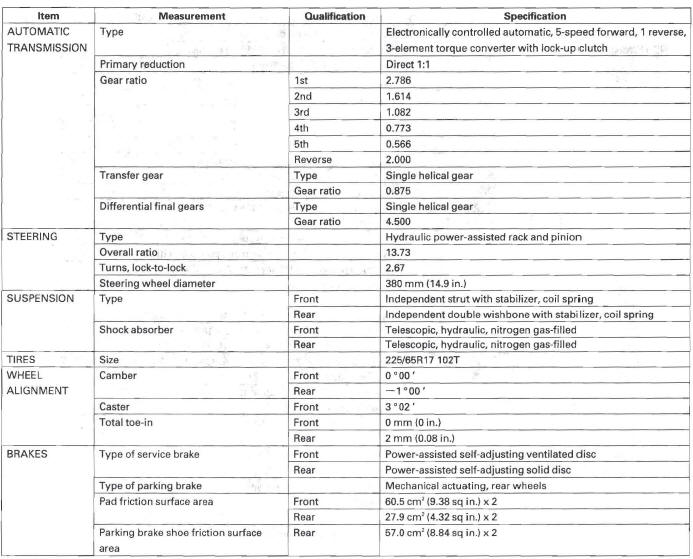

Body Specifications
READ NEXT:
 Maintenance
Lubricants and Fluids
For details of lubrication points and type of lubricants to be applied, refer
to the illustrated index and various work procedures (such as
Assembly/Reassembly, Replacement, Ove
Starting System
Component Location Index
STARTER CUT RELAY
UNDER-DASH
FUSE/RELAY BOX
STARTER
Starter Circuit Troubleshooting
Performance Test
Removal and Installation
Overhaul
SEE MORE:
Transmission Mount Replacement
1. Loosen the upper torque rod mounting bolt (A).
2. Remove the air cleaner housing assembly.
3. Remove the powertrain control module (PCM)
cover, then remove the three bolts securing the
PCM.
4. Remove the PCM bracket.
5. Support the transmission with a jack and wood
block under the transmissio
Lap/Shoulder Belt
The lap/shoulder belt goes over
your shoulder, across your chest,
and across your hips.
To fasten the belt, insert the latch
plate into the buckle, then tug on the
belt to make sure the buckle is
latched (see page for how to
properly position the belt).
To unlock the belt, press the re
