Honda CR-V: Dual Pump System Function Test
Starting and accelerating in forward gears (4WD mode)
NOTE: Do not test repeatedly or the fluid will overheat.
1. Lift up the vehicle so all four wheels are off the ground.
2. Make a mark (A) on either No.1 or No.2 propeller shaft (B).
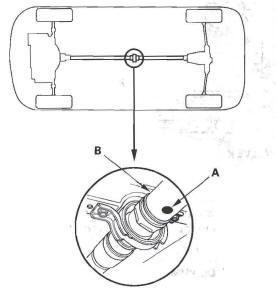
3. Start the engine, and let it run until it warms up (the radiator fan comes on at least twice).
4. With the engine at idle, shift to the 1 position.
5. Apply the parking brake firmly to lock the rear wheels, and look at the rotation of the propeller shaft.
- If it takes more than 10 seconds to rotate one time, the 4WD system is normal.
- If it takes less than 10 seconds to rotate one time, there is a problem in the 4WD system. Check the differential fluid first. If the differential fluid is normal, replace the torque control differential (TCD) case kit (front pump portion).
Starting and accelerating in reverse gear (4WD mode)
NOTE: Do not test repeatedly or the fluid will overheat.
1. Lift up the vehicle so all four wheels are off the ground.
2. Make a mark (A) on either No.1 or No.2 propeller shaft (B).
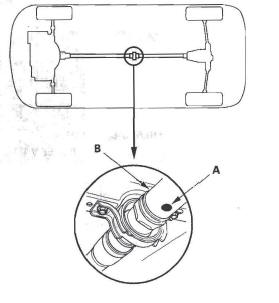
3. Start the engine, and let it run until it warms up (the radiator fan comes on at least twice).
4. With the engine at idle, shift to the R position.
5. Apply the parking brake firmly to lock the rear wheels, and measure the time it takes the propeller shaft to rotate 10 times.
- If the measured time is more than 10 seconds, the 4WD system is normal.
- If the time is less than 10 seconds, there is a problem in the 4WD system. Check the differential fluid. If the differential fluid is normal, replace the torque control differential (TCD) case kit (front pump portion).
Decelerating in forward gears (2WD mode)
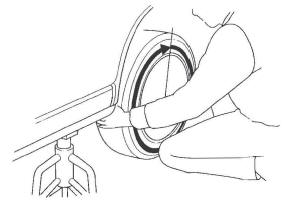
1. Block the front wheels (A), raise the left rear wheel, and support it with a safety stand (B) as shown.
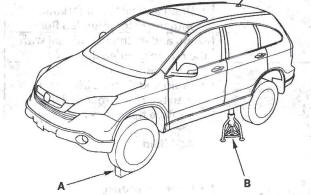
2. Hold the tire, and turn it counterclockwise continuously for more than one rotation.
- If the rotation of the wheel does not gradually feel heavy while rotating, the 2WD system when decelerating in a forward gear is normal.
- If the rotation of the wheel gradually feels heavy, there is a problem in the system. Check the differential fluid. If the fluid is normal, replace the torque control differential (TCD) case kit.
Decelerating in reverse gears (4WD mode)
1. Block the front wheels (A), raise the left rear wheel, and support it with a safety stand (B) as shown:
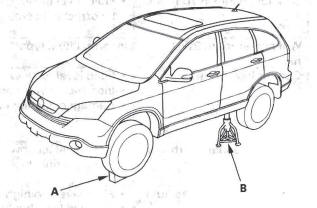
2. Hold the tire, and turn it clockwise continuously for more than one rotation.
- If the wheel does not rotate, the 4WD system when decelerating in reverse gear is normal.
- If the wheel rotates, there is a problem in the system. Check the differential fluid. If the fluid is normal, replace the torque control differential (TCD) case kit.
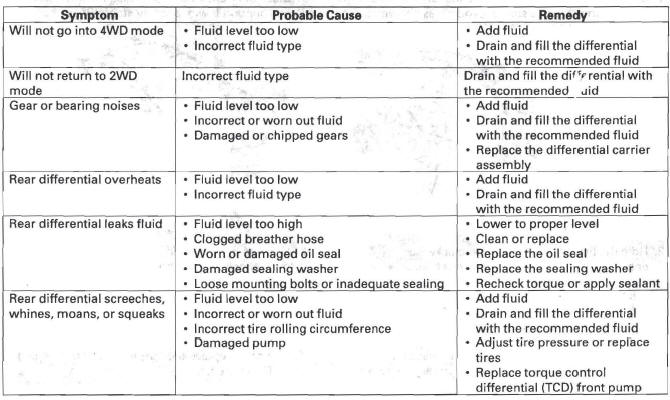
Symptom Troubleshooting Index
Most problems in the unit are to be diagnosed by identifying noises from the gears or bearings.
Be careful during diagnosis not to confuse differential noises with those from other drivetrain components.
READ NEXT:
 Rear Differential Fluid Inspection and
Replacement
Rear Differential Fluid Inspection and
Replacement
1. With the vehicle on level ground, inspect the
differential fluid with the ignition switch turned to
LOCK (0).
2. Use solvent and a brush to wash off any oil and dirt
from the differential fluid in
Differential Disassembly
Special Tools Required
Holder handle 07JAB-001020A
Companion flange holder 07RAB-TB4010B
1. Remove the drain plug (A) and the oil filler plug (B)
with sealing washers (C).
2. Raise the locknut ta
Differential Reassembly
Exploded View
Special Tools Required
Holder handle 07JAB-001020A
Companion flange holder 07RAB-TB4010B
1. Apply differential fluid to the rubber pinion of the
ATF strainer (A), then install the A
SEE MORE:
Evaporator Core
Replacement
1. Recover the refrigerant with a recovery/recycling/ charging station.
2. Remove the bolt from the A/C line clamp, and
remove the receiver line (A) from the clips (B).
3. Remove the nut, then disconnect the A/C lines (A)
from the evaporator core.
4. Remove the stud bolt.
5. Remove the blower un
Precautions and Procedures
General Precautions
Please read the following precautions carefully before
servicing the airbag system. Observe the instructions
described in this manual, or the airbags could
accidentally deploy and cause damage or injuries.
Except when doing electrical inspections, always turn
the ignition swit
