Honda CR-V: Changing a Flat Tire
If you have a flat tire while driving, stop in a safe place to change it.
Drive slowly along the shoulder until you get to an exit or an area to stop that is far away from the traffic lanes.

The vehicle can easily roll off the jack, seriously injuring anyone underneath.
Follow the directions for changing a tire exactly, and never get under the vehicle when it is supported only by the jack.
1. Park the vehicle on firm, level, and non-slippery ground. Put the transmission in Park. Apply the parking brake.
If you are towing a trailer, unhitch the trailer.
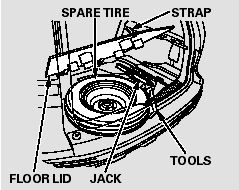
2. Turn on the hazard warning lights, and turn the ignition switch to the LOCK (0) position. Have all passengers get out of the vehicle while you change the tire.
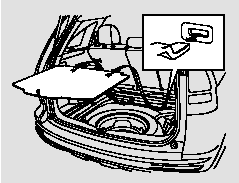
3. Open the tailgate. Raise the cargo area floor lid by lifting up with the strap, and remove it from cargo area by disengaging the tabs.
When you store the flat tire in the spare tire well, do not reinstall the cargo area floor lid forcibly. This will damage the tabs on the lid.
4. Take the tool kit out of the spare tire.
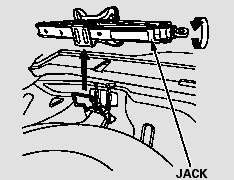
5. Take the jack out of the spare tire area.
Turn the jack’s end bracket counterclockwise to loosen it, then remove the jack by lifting it straight up.
6. Unscrew the wing bolt and take the spare tire out of its well.
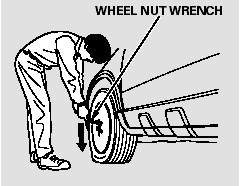
7. Loosen each wheel nut 1/2 turn with the wheel nut wrench.
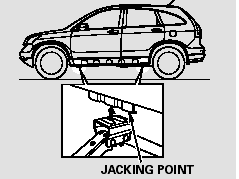
8. Place the jack under the jacking point nearest the tire you need to change. Turn the end bracket clockwise until the top of the jack contacts the jacking point. Make sure the jacking point tab is resting in the jack notch.
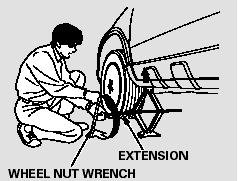
9. Use the extension and the wheel nut wrench as shown to raise the vehicle until the flat tire is off the ground.
10. Remove the wheel nuts, then remove the flat tire. Handle the wheel nuts carefully; they may be hot from driving. Place the flat tire on the ground with the outside surface facing up.
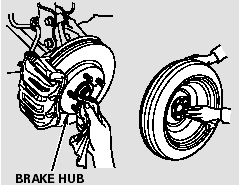
11. Before mounting the spare tire, wipe any dirt off the mounting surface of the wheel and hub with a clean cloth. Wipe the hub carefully; it may be hot from driving.
12. Put on the spare tire. Put the wheel nuts back on finger-tight, then tighten them in a crisscross pattern with the wheel nut wrench until the wheel is firmly against the hub. Do not try to tighten the wheel nuts fully.
13. Lower the vehicle to the ground, and remove the jack.
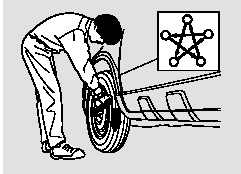
14. Tighten the wheel nuts securely in the same crisscross pattern. Have the wheel nut torque checked at the nearest automotive service facility.
Tighten the wheel nuts to:
80 lbf·ft (108 N·m , 11 kgf·m)
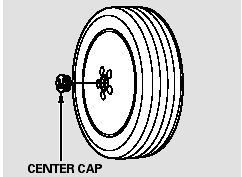
Except LX model
15. Remove the center cap before storing the flat tire.
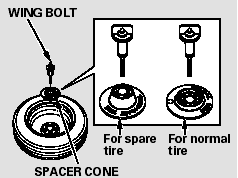
16. Place the flat tire face down in the spare tire well.
17. Remove the spacer cone from the wing bolt, turn it over, and put it back on the bolt.
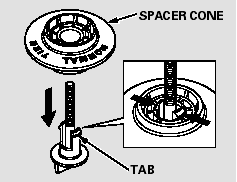
To remove the spacer cone, squeeze the tabs on the wing bolt to disengage it from the center of the spacer cone, then pull the bolt downward.
To install the wing bolt to the spacer cone, reverse this procedure.
18. Secure the flat tire by screwing the wing bolt back into its hole.
19. Store the jack in its holder. Turn the jack’s end bracket to lock it in place. Store the tools, and place the cover on the flat tire of the cargo area.

Loose items can fly around the interior in a crash and could seriously injure the occupants.
Store the wheel, jack, and tools securely before driving.
20. Store the center cap in the spare tire well. Make sure it does not get scratched or damaged.
21. Close the tailgate.
22. Your vehicle’s original tire has a tire pressure monitoring system sensor. To replace a tire, refer to Changing a Tire with TPMS.

