Honda CR-V: To Play an iPod
This audio system can play the audio files on the iPod with the same controls used for the in-dash disc changer. To play an iPod, connect it to the USB adapter cable in the upper glove box by using your dock connector, then press the CD/AUX or AUX button. The ignition switch must be in the ACCESSORY (I) or ON (II) position. The iPod will also be recharged with the ignition switch in these positions.
The system will only play songs stored on the iPod with iTunes.
iPod and iTunes are registered trademarks owned by Apple Inc.
iPods compatible with your audio system using the USB adapter cable are:
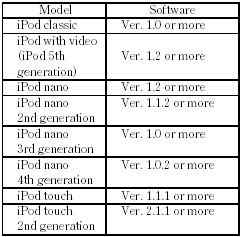
Use only compatible iPods with the latest software. iPods that are not compatible will not work in this audio unit.
NOTE:
Do not connect your iPod using a hub.
Do not keep the iPod in the vehicle. Direct sunlight and high heat will damage it.
Do not use an extension cable between the USB adapter cable equipped with your vehicle and your dock connector.
Some devices cannot be powered or charged via the USB adapter. If this is the case, use the accessory adapter to supply power to your device.
We recommend backing up your data before playing it.
READ NEXT:
 Connecting an iPod
1. Open the upper glove box.
2. Push the release button to release
the USB adapter cable.
3. Connect your dock connector to
the iPod correctly and securely.
4. Install the dock connecto
Text Data Display Function
Each time you press the TITLE
button the display mode switches
between the album name, the song
name, the artist name, or name off
(which turns off the text display).
The display shows up to
To Change or Select Files
Use the SKIP button while an iPod is
playing to change files.
SKIP - Each time you press the
(SKIP +) button, the system
skips forward to the beginning of the
next file. Press the (SKIP -)
SEE MORE:
General Troubleshooting Information
System Indicator
This system has four indicators:
ABS indicator (A)
Brake system indicator (B)
VSA indicator (C)
VSA activation indicator (D)
When the system detects a problem, it will turn the
appropriate indicators on. Depending on the failure, the
VSA modulator-control unit determines whic
DTC Troubleshooting
DTC B1026: Front Passenger's Door Lock
Switch Signal Error (LOCK/UNLOCK)
NOTE: If you are troubleshooting multiple DTCs, be
sure to follow the instructions in B-CAN System Diagnosis Test Mode A.
1. Clear the DTCs with the HDS.
2. Turn the ignition switch OFF, and then back ON (II).
3. Operate the
