Honda CR-V: Power Steering Fluid

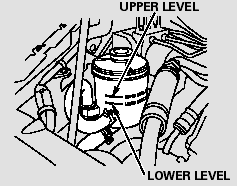
Check the level on the side of the
reservoir when the engine is cold.
The fluid should be between the
UPPER LEVEL and LOWER LEVEL.
If not, add power steering fluid to the
UPPER LEVEL.
Pour the fluid slowly and carefully so
you do not spill any. Clean up any
spills immediately; it could damage
components in the engine
compartment.
Always use Honda Power Steering
Fluid. You may use another power
steering fluid as an emergency
replacement, but have the power
steering system flushed and refilled
with Honda PSF as soon as possible.
A low power steering fluid level can
indicate a leak in the system. Check
the fluid level frequently, and have
the system inspected as soon as
possible.

Turning the steering wheel to f ull lef t
or right lock and holding it there can
damage the power steering pump.
READ NEXT:
The headlights were properly aimed
when your vehicle was new. If you
regularly carry heavy items in the
cargo area or pull a trailer,
readjustment may be required.
Adjustments should be done
Your vehicle has halogen headlight
bulbs. When replacing a bulb, handle
it by its base, and protect the glass
from contact with your skin or hard
objects. If you touch the glass, clean
it wi
SEE MORE:
Removal
1. Drain the engine coolant.
2. Remove the air cleaner housing.
3. Remove the harness holder (A) from the bracket,
then remove the harness holder bracket (B).
4. Remove the upper radiator hose (A), heater hose
(B), and water bypass hose (C).
5. Remove the air cleaner housing brackets.
6
SRS components are located in this area. Review the SRS component location.
Also review the precautions and procedures in the SRS section before doing repairs or
service.
NOTE:
Put on gloves to protect your hands.
Take care not to scratch the dashboard and related
parts.
Lay a workshop towel u
© 2016-2026 Copyright www.hcrv.net


