Honda CR-V: Changing the Engine Oil and Filter
Always change the oil and filter according to the maintenance messages shown on the information display. The oil and filter collect contaminants that can damage your engine if they are not removed regularly.
Changing the oil and filter requires special tools and access from underneath the vehicle. The vehicle should be raised on a service stationtype hydraulic lift for this service.
Unless you have the knowledge and proper equipment, you should have this maintenance done by a skilled mechanic.

1. Run the engine until it reaches normal operating temperature, then shut it off.
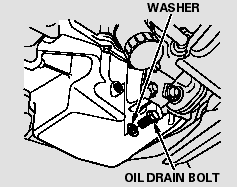
2. Open the hood, and remove the engine oil fill cap. Remove the oil drain bolt and washer from the bottom of the engine. Drain the oil into an appropriate container.

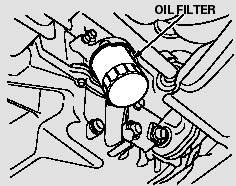
3. Remove the oil filter, and let the remaining oil drain. A special wrench (available from your dealer) is required.
Make sure the oil filter gasket is not stuck to the contacting surface of the engine. If it is, remove it before installing a new oil filter.
4. Install a new oil filter according to the instructions that come with it.
Make sure to clean off any dirt and dust on the contacting surface of a new oil filter.
5. Put a new washer on the drain bolt, then reinstall the drain bolt.
Tighten the drain bolt to:
29 lbf·ft (39 N·m , 4.0 kgf·m)
6. Refill the engine with the recommended oil.
Engine oil change capacity
(including filter):
4.4 US qt (4.2 l)
7. Replace the engine oil fill cap.
Start the engine. The oil pressure indicator should go out within 5 seconds. If it does not, turn off the engine, and check your work.
8. Let the engine run for several minutes, then check the drain bolt and oil filter for leaks.
9. Turn off the engine and let it sit for several minutes, then check the oil level on the dipstick. If necessary, add more oil.

Improper disposal of engine oil can be harmf ul to the environment. If you change your own oil, please dispose of the used oil properly. Put it in a sealed container and take it to a recycling center. Do not discard it in a trash bin or dump it on the ground.

