Honda CR-V: Moonroof
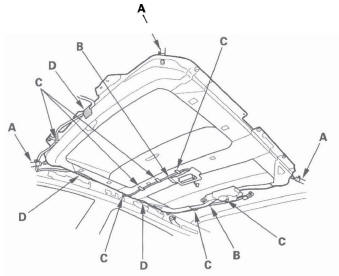
Component Location Index
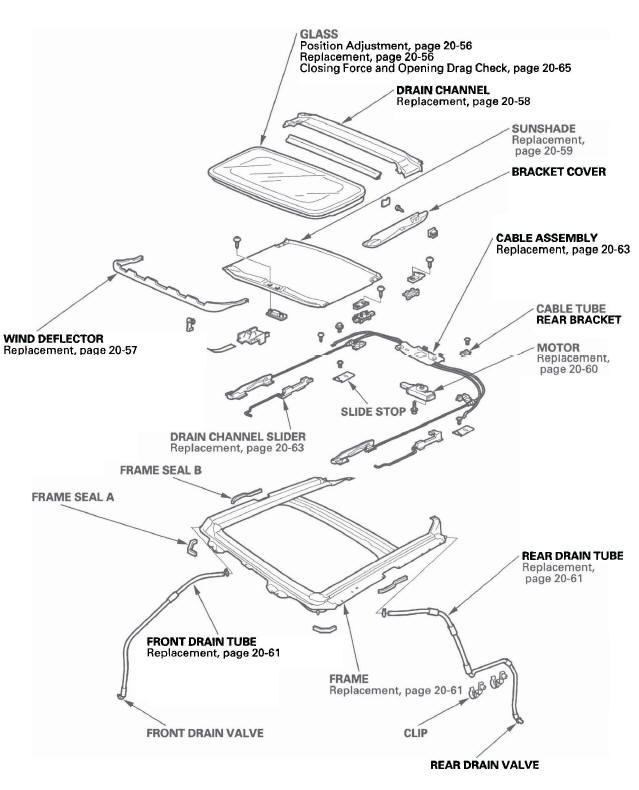
- GLASS
- DRAIN CHANNEL
- SUNSHADE
- CABLE ASSEMBLY
- CABLE TUBE
REAR BRACKET - MOTOR
- WIND DEFLECTOR
- REAR DRAIN TUBE
- REAR DRAIN VALVE
- FRAME
- CLIP
- FRONT DRAIN VALVE
- FRONT DRAIN TUBE
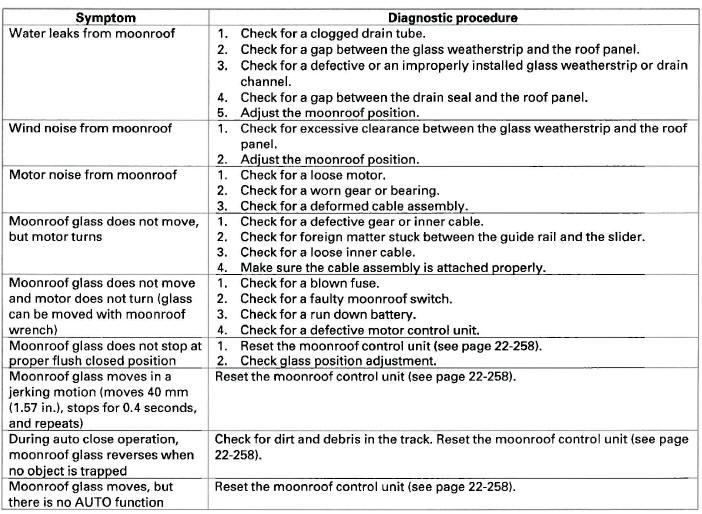
Symptom Troubleshooting Index
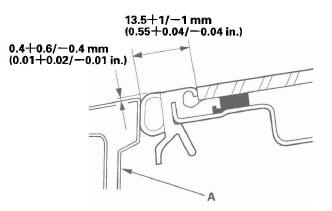
Glass Position Adjustment
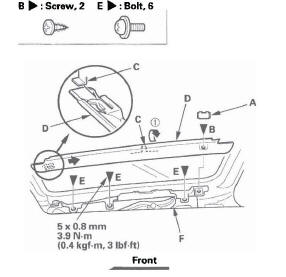
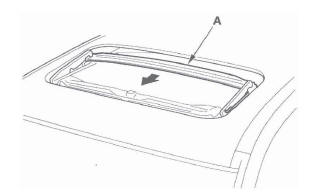
The roof panel (A) should be even with the glass weatherstrip (B), to within 0.4+0.6/-0.4 mm (0.01+0.02/-0.01 in.) all the way around, and should be to length of between the roof panel and glass, to within 13.5+1/-1 mm (0.55+0.04/-0.04 in). If not, make the following adjustment:
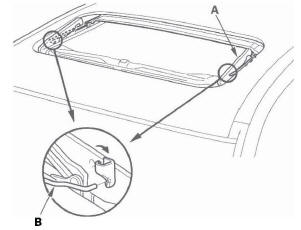
1. Remove the bracket cover.
2. Adjust the glass (A).
- Using a T25 TORX bit, slightly loosen the bolts.
- Move the glass up or down and forward or rearward.
- Tighten all bolts securely.
Fastener Locations
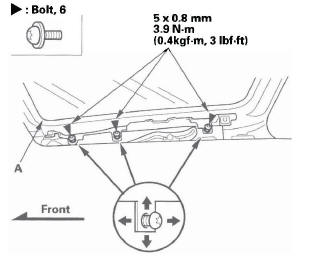
3. If necessary, repeat on the opposite side.
Glass Replacement
1. Close the glass fully.
2. Slide the sunshade all the way back.
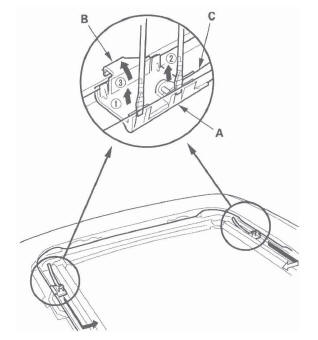
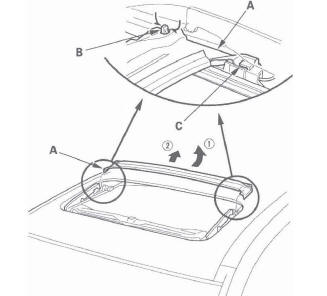
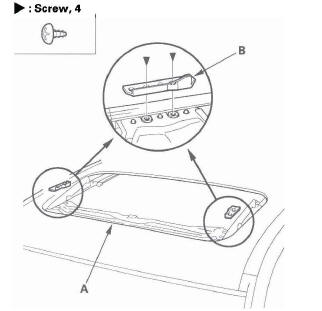
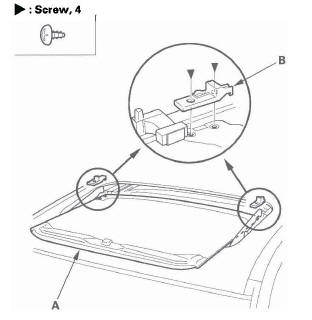
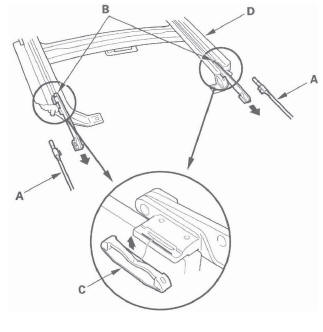
3. pry out the lid (A), remove the screws (B), and release the hooks (C), then remove both bracket covers (D). With a T25 TORX bit, remove the bolts (E) from both glass brackets (F).
Fastener Locations
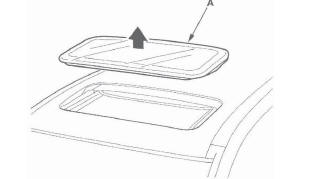
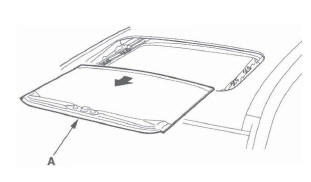
4. Remove the glass (A) by lifting it up. Do not damage the roof panel.
5. Install the glass in the reverse order of the removal, and adjust the glass position alignment.
6. Check for water leaks. Use free-flowing water from a hose without a nozzle. Do not use high-pressure water.
NOTE: It is normal for some water to seep past the moonroof into the moonroof frame, and exit through the drains.
Wind Deflector Replacement
1. Open the glass fully.
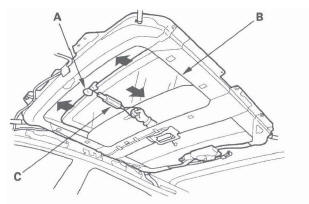
2. Remove the links (A) from both sides.

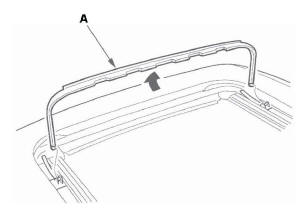
3. Remove the wind deflector (A).
4. Pry up on the deflector bases (A) and release the hooks (B), then remove the bases with springs (C) from both sides.
5. Install the deflector in the reverse order of removal.
Drain Channel Replacement
1. Remove the glass.
2. Move both glass brackets (A) with the moonroof switch to the position where the moon roof normally tilts up, and disconnect the drain channel rods (B) on both sides.
3. Slide the drain channel (A) forward.
4. Pull the rear edge of the drain channel (A) up while pushing both clips (B), and release the channel from both hooks (C) of the drain channel slider by pulling it rearward.
5. Remove the drain channel.
6. Install the channel in the reverse order of removal, and note these items:
- Push the clip portions into place securely.
- Check the glass position adjustment.
- If the moonroof glass was moved using the moon roof wrench, do the reset the moonroof control unit.
7. Check for water leaks. Let the water run freely from a hose without a nozzle. Do not use a high-pressure spray.
Sunshade Replacement
1. Remove the drain channel.
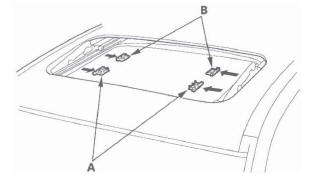
2. Slide the sunshade (A) until you can see both sunshade slider spacers (B).
Fastener Locations
3. Remove the screws, then remove both spacers.
4. While lifting the front portion of the sunshade (A), move the sunshade forward until you can see both sunshade rear hooks (B). Do not damage the sunshade and hooks.
5. Remove the screws, then remove both hooks.
6. Remove the sunshade (A).
7. Remove both front sunshade base sliders (A) and both rear sunshade base sliders (B).
8. Install the sunshade in the reverse order of removal, and check the glass position adjustment.
9. Check for water leaks. Let the water run freely from a hose without a nozzle. Do not use a high-pressure spray.
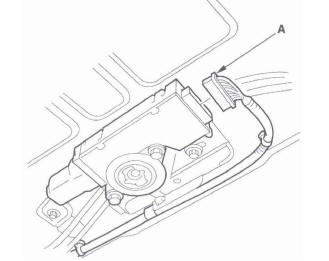
Motor Replacement
1. Remove the headliner.
2. Put on gloves to protect your hands. Disconnect the connector (A), and remove the bolts, then remove the motor (B).
Fastener Locations
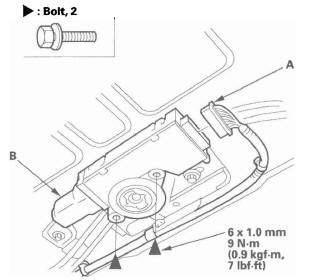
3. Install the motor in the reverse order of removal, and note these items:
- Make sure the connector is plugged in properly.
- Reset the moonroof control unit.
- Check the motor operation.
Frame and Drain Tube Replacement
SRS components are located in this area. Review the SRS component locations and the precautions and procedures before doing repairs or service.
1. Remove these items:
- Headliner
- Moonroof glass
2. Put on gloves to protect your hands. Disconnect the motor connector (A).
3. Disconnect the drain tubes (A).
4. Remove the interior harness (B) by detaching the harness clips (C) and removing the cushion tapes (D).
5. With an assistant holding the frame (A), remove the bolts, starting at the rear, and release the rear hooks (B) by moving the frame forward.
Fastener Locations
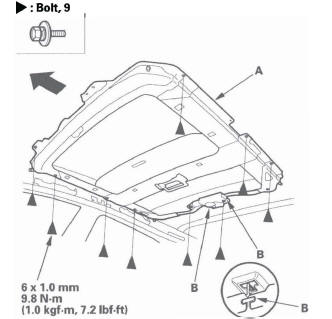
6. With the help of an assistant, carefully remove the frame through the front door opening. Take care not to scratch the interior trim and body, or tear the seat covers.
7. To remove a front drain valve (A) from the body, remove the kick panel, left or right, and the driver's dashboard undercover then remove the front drain tube (B).
8. To remove a rear drain valve (A) from the cargo area, remove these parts:
- Rear side trim panel
- Quarter-pillar glass trim
Using a clip remover, detach the clips (B), then remove the rear drain tube (C).
9. Install the frame and drain tube in the reverse order of removal, and note these items:
- Before installing the frame, clear the drain tubes and drain valves using compressed air.
- When installing, tie a string to the top end of the new drain tube and pull it up into the roof.
- Check the frame seal.
- Clean the surface of the frame.
- When installing the frame, first attach the rear hooks into the body holes.
- Make sure the connectors are plugged in properly.
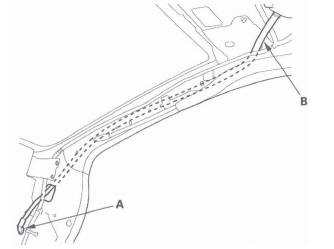
- When connecting the drain tube, slide it over the frame nozzle at least 10 mm (0.39 in.).
- Install the tube clip (A) on the drain tube (B) as shown.
10. Check for water leaks. Let the water run freely from a hose without a nozzle. Do not use a high-pressure spray.
Drain Channel Slider and Cable Assembly Replacement
1. Remove the frame.
2. Remove these parts from the frame:
- Sunshade
- Moonroof motor
3. Put on gloves to protect your hands. From both sides of the frame (A), remove the screws (B, C) securing the slide stops (D) and cable tube rear brackets (E) and remove the cable tube side bracket mounting bolts (F) and the cable tube mounting screws (G).
Fastener locations

4. Turn both cable tube side brackets (A) up to release the hooks (B) from the holes in both sides of the frame.
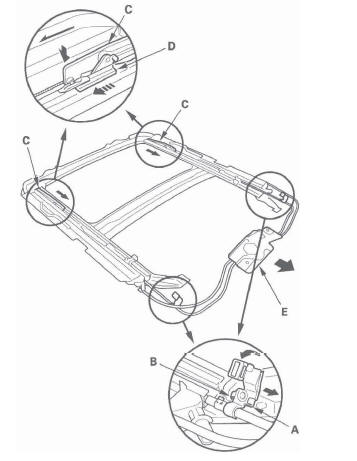
5. Pivot the glass brackets (C) down by sliding the link lifters (D) back, then slide both glass brackets back with the link lifters.
6. Slide the cable assembly (E) half-way.
7. Remove the slide stops (A) and the drain channel sliders (B) from both sides.
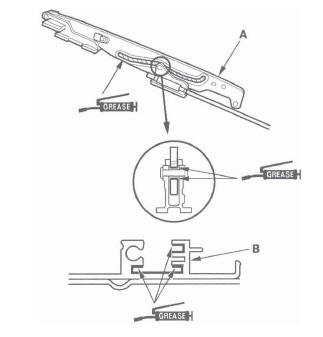
8. Slide the cable assembly (A) and both glass brackets (B) back, remove the deflector sliders (C) from both glass brackets, then remove them from the frame (D).
9. Install the slider and cable assembly in the reverse order of removal, and note these items:
- Damaged parts should be replaced.
- Apply multipurpose grease to the glass bracket (A) and guide rail portion of the frame (B) indicated by the arrows.
- Before reinstalling the motor, make sure both link lifters are parallel, and in the fully closed position.
- Before reinstalling the motor, install the frame and glass, then check the opening drag.
- After reinstalling the motor, reset the moonroof control unit.
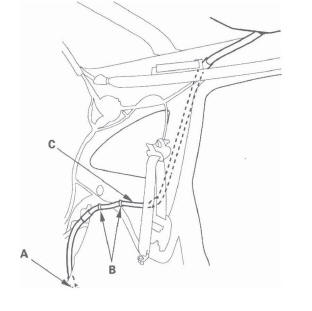
Closing Force and Opening Drag Check
1. Remove the headliner.
2. Closing force check:
- With a shop towel (A) on the leading edge of the glass (B), attach a spring scale (C) as shown.
- Have an assistant hold the switch to close the glass while you measure the force required to stop it.
- Read the force as soon as the glass stops moving, then immediately release the switch and spring scale.
Closing force: 200-290 N (20-30 kgf, 44-66 Ibf)
3. If the force in not within specification, remove the moon roof motor, then check:
- The gear portion and the inner cable for breakage and damage. If the gear portion is broken, replace the motor. If the inner cable is damaged, remove the frame, and replace the cable.
- The moonroof motor. If the motor fails to run or doesn't turn smoothly, replace it.
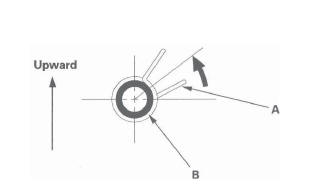
- The opening drag. Go to step 4.
4. Opening drag check: Protect the leading edge of the glass with a shop towel (A). Measure the effort required to open the glass using a spring scale (B) as shown.

5. If the load is over 40 N (4 kgf, 9 Ibf), check:
- The side clearance and glass position adjustment.
- For broken or damaged sliding parts. If any sliding parts are damaged, replace them.
- After reinstalling, reset the moonroof control unit.
READ NEXT:
 Interior Trim
Component Location Index
TAILGATE SIDE TRIM
Removal/Installation
TAILGATE UPPER TRIM
Removal/Installation
QUARTER PILLAR GLASS TRIM
Removal/Installation
REAR DOOR OPENING SEA
Trim Removal/Installation
Trim Removal/Installation-Door Areas
Special Tools Required
KTC trim tool set SOJATP2014 *
* Available through the American Honda Tool and
Equipment Program; call 888-424-6857
SRS components are loc
Sunvisor Removal/Installation
Special Tools Required
KTC trim tool set SOJATP2014 *
* Available through the American Honda Tool and
Equipment Program; call 888-424-6857
NOTE:
Put on gloves to protect your hands.
Use the appropr
SEE MORE:
DTC Troubleshooting
DTC indicator 1: An Open in the Air Mix
Control Motor Circuit
1. Start the engine.
2. Turn on the A/C, then set the temperature control
dial to Max Hot.
3. Turn the ignition switch OFF and then ON (II).
4. Do the self-diagnostic with the HVAC control unit.
5. Check for DTCs.
Is DTC 1 indicated?
F-CAN Circuit Troubleshooting
NOTE: Information marked with an asterisk (*) applies
to the CANL line.
1. Turn the ignition switch OFF.
2. Jump the SCS line with the HDS.
3. Disconnect PCM connector A (44P), then disconnect
the HDS.
4. Measure resistance between PCM connector
terminals A36 and A37.
Is there about 95- 116 Ω
