Honda CR-V: Engine Oil Life Display
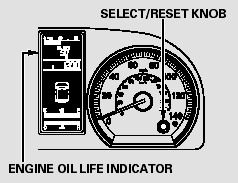
To see the current engine oil life, turn the ignition switch to the ON (II) position, then press and release the select/reset knob repeatedly until the engine oil life indicator appears.
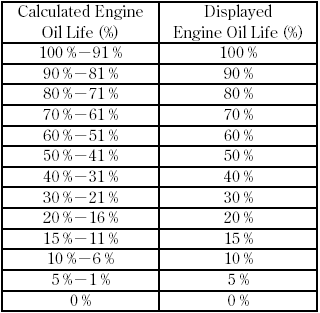
The remaining engine oil life is shown on the display according to this table:
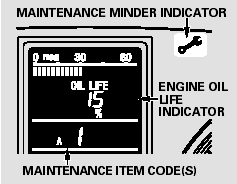
If the remaining engine oil life is 15 to 6 percent, you will see the engine oil life indicator every time you turn the ignition switch to the ON (II) position. The maintenance minder indicator will also come on, and the maintenance item code(s) for other scheduled maintenance items needing service will be displayed below the engine oil life indicator.
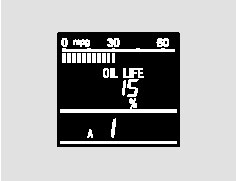
The 15 and 10 percent oil life indicators remind you that your vehicle will soon be due for scheduled maintenance.
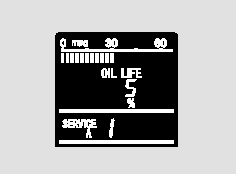
When the remaining engine oil life is 5 to 1 percent, you will see a ‘‘SERVICE’’ message along with the same maintenance item code(s), every time you turn the ignition switch to the ON (II) position.
The maintenance item code or codes indicate the main and sub items required at the time of the oil change.
You can switch the information display from the engine oil life display to the odometer or the average fuel mileage, press and release the select/reset knob on the instrument panel.
When the engine oil life is 15 to 1
percent, the maintenance minder
indicator ( ) comes on every
time you turn the ignition switch to
the ON (II) position, then it goes out
if you switch the information display.
) comes on every
time you turn the ignition switch to
the ON (II) position, then it goes out
if you switch the information display.
When you see this message, have the indicated maintenance performed by your dealer as soon as possible.
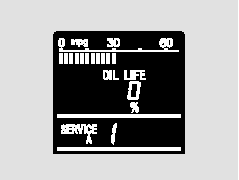
When the remaining engine oil life is
0 percent, the engine oil life indicator
will blink. The display comes on
every time you turn the ignition
switch to the ON (II) position. The
maintenance minder indicator
() also comes on and remains
on in the instrument panel. When
you see this message, immediately
have the indicated maintenance done
by your dealer.
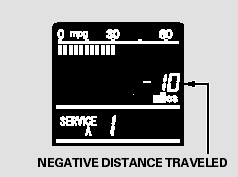
If you do not perform the indicated maintenance, negative distance traveled is displayed and begins to blink after the vehicle has been driven 10 miles (10 km) or more.
Negative distance traveled means your vehicle has passed the maintenance required point.
Immediately have the indicated maintenance done by your dealer.
To change the information display from the engine oil life display to the odometer or the average fuel mileage, press and release the select/reset knob.
When the engine oil life is 0 percent
or negative distance traveled, the
maintenance minder indicator
() remains on even if you
change the information display.
Immediately have the service performed, and make sure to reset the display as described as follows.
READ NEXT:
 Maintenance Main Items and Sub Items
All maintenance items displayed on
the information display are in code.
For an explanation of these
maintenance codes.
Resetting the Engine Oil Life Display
Your dealer will reset the display
after completing the required
maintenance service. You will see
‘‘OIL LIFE 100%’’ on the information
display the next time you turn the
ignition sw
Important Maintenance Precautions
If you have the required service
done but do not reset the display, or
reset the display without doing the
service, the system will not show the
correct maintenance intervals. This
can lead
SEE MORE:
The Starter Operates Normally
In this case, the starter motor’s
speed sounds normal, or even faster
than normal, when you turn the
ignition switch to the START (III)
position, but the engine does not run.
Are you using a properly coded
key? An improperly coded key will
cause the immobilizer system
indicator in t
Checking and Replacing Fuses
If something electrical in your
vehicle stops working, check for a
blown fuse first. Determine from the
chart on pages, or the
diagram on the fuse box lid, which
fuse or fuses control that device.
Check those fuses first, but check all
the fuses before deciding that a
blown fuse is th
